Search the Community
Showing results for tags 'command'.
-
Version 1.0.0
11 downloads
WelcomeMessage.cs Description : - This plugin allows you to display a welcome message on players' screens when they arrive on the server. They can also click a button to execute a command, such as opening a menu. Settings : - HUD colors - Display time (20s) - Welcome text (Welcome <player> !) - Button text (INFO) -Button command (say.chat /info) F1 Commands : - wm.test (to test the UI. Only admin) Permissions : - oxide.grant user <steamID/user> welcomemessage.use WuyZar's Discord : https://discord.gg/NVwRcQwGwh Game interface :$2.00 -

Version 1.2.0
78 downloads
Allows you to restrict certain commands and actions for admins, monitor their activities, and prevent admin abuse. Features Command Blocking: Prevents specified commands from being executed by certain admins. Action Blocking: Disables interactions like looting, building, or interacting with vehicles, cupboards, and more. Team Management: Manage the admins team and their permissions. Anti-Abuse: Detects abusive behavior with configurable actions such as kick or ban. Action Logging: Logs movements and interactions. Permissions adminrestrictions.limitactions - limit the admin actions. adminrestrictions.ignore - ignores a specific admin. Configuration Note: Anti-Abuse will disable damage and teleport the player back to his previous location upon detection.$19.99- 6 comments
-
- 2
-

-
- #admin
- #restrictions
- (and 14 more)
-

Version 1.0.3
455 downloads
Timed Commands is an updated version of ComTimer. Features: This plugin is great for calling events and console commands - Commands run from a random time between an interval you set - Option to run commands in a random order Config: Default Configuration: { "Command List": [], "Longer Time In Seconds": 500.0, "Shorter Time In Seconds": 200.0, "In Order": true } Setting a single command: { "Command List": ["junkyardeventstart"], "Longer Time In Seconds": 500.0, "Shorter Time In Seconds": 200.0, "In Order": true } Setting more than one command: { "Command List": [ "junkyardeventstart", "callheli 1", "harborstart" ], "Longer Time In Seconds": 500.0, "Shorter Time In Seconds": 200.0, "In Order": true }Free -
Version 4.4.0
18 downloads
MyCommands Description The MyCommands plugin displays a modern, scrollable user interface (UI) that provides players with categorized commands and real-time search functionality. Who doesn't know that feeling - you have a lot of possibilities on your server, but players can't remember all the commands. With this plugin, it becomes easy to navigate and use commands via a visual interface. Administrators can define categories, commands, and descriptions. Features: Categorized commands: Commands are grouped into collapsible categories to make navigation easier for players. Example categories include House, Bells, Tools, Admin, and Economy. Real-time search functionality: Players can search for specific commands using the integrated search bar with instant results. Modern scrollable UI: Clean, modern interface with smooth scrolling for better user experience. Command descriptions: Each command includes a helpful description that appears in an information tooltip. Info tooltips: Click the blue "i" button next to any command to see its description in a modern popup. User-friendly interface: The UI provides a clear presentation of commands with options to expand or collapse categories. Customizable commands: Administrators can add new commands, categories, or descriptions, or edit existing ones in the configuration. Close button: The UI can be closed with a simple click on the close button. Direct command execution: Players can execute commands directly from the UI without entering them manually in the chat. Automatic UI closing: When a command is executed, the UI automatically closes. Search window: Separate search results window that appears alongside the main interface. Permission-based access: Only players with the correct permission can access the command interface. as off (v.4.4.0) Customizable colors: Adjust your colors in the config. Command: Set your own command Commands: /mycommands - Opens the main command interface Permissions: mycommands.use - Players need this permission to open the UI, search commands, and execute commands. This permission can be assigned to special user groups. Config: The configuration uses a comprehensive JSON system that is automatically created on first load if no configuration exists. You can edit it to adapt it to your server needs. The config includes both command categories and detailed descriptions. { "Command": "commands", "Categories": { "House": [ "/myhouse", "/rename", "/removehouse", "/findhouse" ], "Bells": [ "/addbell", "/setbell" ], "Tools": [ "/skinbox", "/cupboard", "/test1", "/test2", "/test3", "/teller" ], "Admin": [ "/god", "/vanish", "/fly", "/noclip", "/teleport" ], "Economy": [ "/shop", "/sell", "/buy", "/balance", "/pay" ] }, "CommandDescriptions": { "/myhouse": "Teleport to your house location", "/rename": "Rename your house or building", "/removehouse": "Remove your house from the system", "/findhouse": "Find the location of your house", "/addbell": "Add a bell to your building", "/setbell": "Configure bell settings", "/skinbox": "Open the skin selection interface", "/cupboard": "Manage your tool cupboard", "/test1": "Test command #1 for debugging", "/test2": "Test command #2 for debugging", "/test3": "Test command #3 for debugging", "/teller": "Access bank teller functions", "/god": "Toggle god mode (admin only)", "/vanish": "Become invisible to other players", "/fly": "Toggle fly mode for admins", "/noclip": "Toggle noclip through walls", "/teleport": "Teleport to coordinates or player", "/shop": "Open the main shop interface", "/sell": "Sell items from your inventory", "/buy": "Purchase items from the shop", "/balance": "Check your current balance", "/pay": "Send money to another player" }, "Colors": { "MainPanel": "#1A1A1AF2", "HeaderPanel": "#333333FF", "CloseButton": "#CC3333FF", "SearchPanel": "#1F1F1FFF", "SearchLabel": "#CCE6FFFF", "InputField": "#050505FF", "InputText": "#FFFFFFFF", "InputPlaceholder": "#808099FF", "ClearButton": "#B33333FF", "CategoryButton": "#4D9933FF", "CategoryButtonText": "#FFFFFFFF", "CommandButton": "#666666FF", "CommandButtonText": "#E6E6E6FF", "InfoButton": "#ffed00", "InfoButtonText": "#FFFFFFFF", "TooltipPanel": "#1A1A1AF2", "TooltipHeader": "#3380CCFF", "TooltipContent": "#0D0D0DE6", "TooltipText": "#E6E6E6FF", "NoResultsText": "#B3B3B3FF", "SearchResultsText": "#80E680FF", "ScrollbarHandle": "#808080FF", "ScrollbarTrack": "#333333FF" } } How to Use: - Opening the UI: Use /mycommands to open the command interface - Browsing categories: Click on category headers to expand/collapse command lists - Executing commands: Click directly on any command button to execute it - Getting help: Click the blue "i" button next to commands to see descriptions - Searching: Use the search bar to find specific commands quickly - Clearing search: Click the red "Clear" button to reset the search load, run, enjoy$14.99 -
Version 1.2.12
863 downloads
The radial menu is a customizable quick access panel with all popular and frequently used server commands. It makes it a lot easier and faster to interact with various server mechanics, be it teleportation, trades, setting house points and various panels. Features Allows to almost completely eliminate the manual entry of commands by the player. Automatic calculation and arrangement of any number of sections/subsections on a circle. Several display effects. Tracks a press of the MMB or on command (can be keyed to the same MMB). Checks for the privileges of a particular command, before executing it. Ability to use your own panel images. Full customization of the location and scale of icons and panel. Support for popular plugins (NTeleportation, TeleportGUI, Clans, Friends and Rust teams). Executing console or chat commands. General settings Track MMB presses to open a radial menu? - if the player has a MMB bind, the plugin will not open the Radial Menu. The command to open the radial menu - you can use both the command and the MMB tracking. When using MMB tracking and the command at the same time: If a player has a MMB bind, his bind will be executed when he clicks on it, and the Radial Menu will not open. If there is no bind, the player can use both the command and the MMB press. Upload images to players when they connect? - when a player connects to the server, the plugin will automatically download 3 images of menu rings to his client. This avoids displaying black rectangles when opening the menu while the plugin is downloading the images to the client. Section/Subsection settings The plugin has main sections (level 1), subsections at level 1 (level 2) and subsections at level 2 (level 3). Section name - the name of the section, which is displayed under the icon. Enable this section? – on/off section. Section permission [required] - permission required for the plugin to work (without dots). Add "_add" to the end of the name so that the plugin does not register or check permissions for child subsections. Section icon - direct link to the icon (recommended size 64x64). Fill icon with color below? - Completely fills the icon with the color set below. Inactive/active section color [HEX or Unity RGBA] - The plugin supports 2 types of colors: HEX (e.g. "#57de54" or "#57de54ff") and Unity RGBA ("0.34 0.87 0.33 1"). Command executed on behalf of the player - if you do not have subsections in this section, the command (without the "/" if chat) that will be executed for that player is specified here. You can specify multiple commands using commas (e.g. "radar ui, vanish, adminpanel hide"). If there are subsections in this section, the command is not specified. Specify %steamid% or %username% so that the plugin replaces them with the data of the player on whose behalf the command is executed. Command type - Where to run this command: true - chat, false - console. Permissions for above command - if the command above is specified, you can specify the privileges of that command in this field (e.g. "removertool.normal, removertool.structure, removertool.external"). The plugin will check if the player has these privileges before executing the command. Show this section only to those with permissions above? - allows to draw the section automatically (without giving permissions to this plugin) if the player has command permissions. Show this section even to those who don't have permissions? - forcibly displays the section to all players, even those who do not have privileges to it (if you click on it, a message about lack of permissions will be displayed in chat). Subsections layout [n - number] - this setting is responsible for how subsections are arranged. 0 - automatically. Suppose you have 10 subsections, then 360 degrees / 10 subsections = 36 degrees. The plugin will automatically position the 10 subsections every 36 degrees (clockwise, starting from the top). n - from the beginning. The plugin will arrange the subsections clockwise, starting from the top, not automatically, but in a certain step. For example, you have 3 subsections, but you do not want them to be automatically scattered all around the circle, you want them to be displayed at the top, with some small step, this step will be calculated due to the conditional number of subsections n (for example, 15). Now 360 degrees / 15 conditional subsections = 24 degrees, then your 3 subsections will be positioned from the beginning and there will be 24 degrees between them. -n - from the active item. The plugin will arrange the subsections relative to the active section. For example, you have 3 subsections, but you don't want them to be automatically scattered all around the circle, and you also don't want them to be arranged in some clockwise, starting from the top. By choosing this type of arrangement, the subsections will be located in the same place as the active section, in the increments you specify. It works the same way as above, only n is specified with a minus sign (for example, -15, the minus is needed for the plugin to understand what type of arrangement to use). All examples of the layout of the subsections are present in the standard config. Permissions It may be unclear how permissions work in this plugin. Let's figure it out with a simple example from the standard config. It's not hard to figure out that this is the home point section of the standard config. To exclude identical names of permissions the plugin converts them to this form. Because of the large number of permissions generated by the plugin, there are mechanics for reducing them. If you add "_all" to any section, in the "permission" field, the plugin will not register the permissions of child subsections. For example, if the player has the permission "_homes_all", then all displayed houses, all commands (add, remove, etc.), in general everything that belongs to the section "_homes_all" will obey and is checked by the permission "radialmenu._homes_all". The "permission" fields of the child sections still have to be filled in for the plugin to work. I strongly recommend using the "Permissions Manager" plugin to set privileges for players or groups. It draws a simple interface, through which it is very easy to add or remove permissions. Teleportation The plugin supports work with teleportation plugins (set/remove/teleport to home point) NTeleportation, TeleportGUI and Teleportation by OxideBro (for RU server owners). To do this, in the main section (level 1), you must specify the permission of the "_homes" section, this is necessary for the plugin to understand that it will work with the teleport plugin. Next, in the subsection "_homes" (level 2) you must add the MAXIMUM number of displayed house points, for example 5. If the player has more house points than this number, then only the first 5 will be displayed, if less, then all of them will be displayed. For each such point, you must set its unique name, which begins with "home_n", where "n" is any unique number or word (e.g. home_1, home_2, etc.). In addition to the house points here you can place a section with the establishment of the house point, its name should be "home_add", and the command "home add {0}" (command your plugin teleport), where {0} - the name of the new house point, the plugin itself will set it relative to the square in which the player at the moment is (for example D3, if there are several in the square, then D3h1, D3h2, etc.). After that, in the subsections (level 3) of each such house point, you can specify commands relating specifically to it. For example: "home {0}", "home remove {0}" or any other commands, where {0} is the name of the specific house, the plugin itself will substitute it when executing the command. If you find all of the above complicated, you can take a look at the standard config as an example. Friends The plugin supports work with plugins Friends, Clans by k1lly0u and Rust teams. Here everything is set up similar to Teleportation. But for the plugin to understand what to work with, in the main section (level 1) you must specify one of the three options: "_teammates" - the plugin will work with Rust teams "_friends" - the plugin will work with the Friends plugin "_clans" - the plugin will work with the Clans plugin In subsections (level 2) you must add the MAXIMUM number of displayed friends, for example 8. If the player has more friends than this number, then only the first 8 will be displayed, if less, then all of them will be displayed. For each friend you must set its unique name, which begins with "friend_n", where "n" is any unique number or word (for example friend_1, friend_2, etc.). After that, in the subsections (level 3) of each friend you can specify commands specific to him. For example: "tpr {0}", "trade {0}" or any other commands, where {0} is the nickname of the player, the plugin itself will substitute it when executing the command. An example of the configuration of this section is also present in the standard config. Plugin Config Example of plugin configuration in English Example of plugin configuration in Russian. If you need Russian config, open it (RadialMenu.cs) before loading the plugin, and at the top set the variable "isRus = true". Then save and upload this file to your server.$15.00 -
Version 1.0.0
21 downloads
What's "Hazmat Skinner"? "Hazmat Skinner" is the ultimate tool for Rust players who crave unique hazmat skins. Whether you're an admin on a community server or a player, this plugin empowers you to take command of your in-game style. Key Features Easy Customization: Simply use the /hz command followed by the item name to transform your hazmat. No UI Required: Say goodbye to complex user interfaces – it's all done with commands! Permissions hazmatskinner.user: Grants access to the /hs command. Chat Commands /hs <Name>: Change the skin of the hazmat in your hand. List of names Hazmat Abyss Lumberjack Nomad Arctic Space Ninja (Skin cannot be moved back to hazmat or it will break). Surgeon (Skin cannot be moved back to hazmat or it will break). Bind to Your Preferences bind <key> "chat.say "/hs <Name>"" Upgrade your Rust experience today with "Hazmat Skinner" – the ultimate tool for hazmat customization!$10.99 -
Version 1.0.2
29 downloads
What is "Bind Looting”? "BindLooting” is a powerful tool for Rust players who want to loot crates quickly. Whether you’re an admin on a community server or a player, this plugin allows you to control your gaming style. Main Features Easy Looting: Just bind the /bindlooting command and then just press the bind key! All items in the container you're looting will move to your inventory instantly! No UI: Say goodbye to complicated user interfaces – everything happens through bind! Optional settings: Allowing a player to use a bind if they have "building privilige". Allow only "box.wooden.large" and "woodbox_deployed" (or other entities as desired) to be looted. Permissions bindlooting.use: Grants access to the /bindlooting command. Assign According to Your Preferences bind <key> "chat.say "/bindlooting"" Enhance your Rust experience today with "BindLooting” – the ultimate tool for quick looting!$12.97 -
Version 2.2.4
2,542 downloads
Automated chat messages based on chat keywords, timer or various other triggers. Plugin comes with an easy to use Admin UI for complete setup, and supports special localization for your messages. You can define messages to be sent only to specific Groups or Permissions, and you can allow players to toggle on/off messages if they do not find them useful. SUPPORTED TRIGGERS If what you need is not here and still falls under the scope of the plugin description, reach out to me Timed | ChatCommand | AutoReply | NewPlayerJoined | PlayerConnected | PlayerDisconnected | PermissionGranted | PermissionRevoked | AddedToGroup | RemovedFromGroup | PlayerDead | CrateHacked | EnteredZone | LeftZone | EnteredMonument | LeftMonument COMMANDS /am.edit - (Admin UI for complete setup) - requires automatedmessages.admin permission /tips - (Player command for toggling on/off messages) command can be changed in the config file MESSAGES LOCALIZATION You can switch between languages in Admin UI to setup localized replies for every language the game supports. Check config section below for how to add languages. Game Tips You can utilize Rust's native game tip UI to show specific messages instead or along with sending it to chat. VARIABLES Variables can be included in the messages text to show further info based on the trigger or player. The plugin also supports https://umod.org/plugins/placeholder-api with the extensive list of variables it brings. {playername} {playerid} - Player steam id {playercountry} {hacklocation} - Specific to messages with type CrateHacked {wipetimeremaining} - Days/Hours till wipe (based on rust convar settings if a missile silo monument is present) {online} - # of players online {sleeping} - # of players sleeping {joining} - # of players joining CONFIG SETTINGS Below are only settings not currently available in Admin UI, highly recommended to edit triggers or actions using /am.edit Chat Icon (Steam Id) - Icon that will be used for all messages sent by the plugin, must be a steam id. Toggle Chat Command - "tips" - Chat command that allows a player to toggle on/off messages. AutoReply Cooldown (in seconds) - Per action cooldown timer when players type a keyword set. ChatCommand Cooldown (in seconds) - Per player cooldown timer when a player types a chat command. ZoneManager Cooldown (in seconds) - Per player cooldown timer on enter or exit zone. MonumentWatcher Cooldown (in seconds) - Per player cooldown timer on enter or exit monument. Replies Server Languages - Languages your server will support. Available options: af, ar, ca, cs, da, de, el, en-PT, en, es-ES, fi, fr, hu, it, ja, ko, nl, no, pl, pt-PT, pt-BR, ro, ru, sr, sv, tr, uk, vi, zh-CN, zh-TW Default Server Language - Fallback language if player client language had no available replies, you must have at least one reply for this language for the action to function. AutoReply `Broadcast to all` option to broadcast to team only if keywords sent from team chat - true/false$14.99 -
Version 1.0.0
169 downloads
Countdown.cs Description : - This plugin allows you to send a beautiful countdown visible to all players on your server, with the option to execute a command at the end of the countdown. Settings : - HUD colors F1 Commands : - c.start <time> <command> Example : (c.start 20 say HELLO) - c.stop Permissions : - ownerid <steamID/user> WuyZar's Discord : https://discord.gg/NVwRcQwGwh Game interface :Free -

Version 2.0.72
2,925 downloads
Create your own UI buttons for your rust server! Plugin comes with built ingame editor which makes creating proccess so much easier! • Features - Create as many buttons as you want. - Attach Images or Text to buttons. - Set chat commands to each button. - UI Editor ingame - Toggle hide function to create small gui menu. • Commands • Permissions • Config Example • Cui Data Example Special thanks to @SinKohhfor contributing and testing plugin before release.$7.50 -
Version 1.0.2
71 downloads
Item Sorter: Effortless Crate Sorting for Your Server! With the ItemSorter plugin, managing your crates has never been easier. Whether you're a server admin or a community member, you can now neatly organize your items alphabetically or by categories with a simple commands. Say goodbye to clutter and chaos! Key Features Quick and Intuitive: Just look at the chest you want to sort and use a command. Alphabetical and categorical sorting: Items inside the chest will be sorted alphabetically or by category for easy access. No UI Hassle: No complicated interfaces or menus; it's a command-line solution. Community-Friendly: Perfect for community servers where simplicity and utility matter. Get your server's storage in order today with ItemSorter – the ultimate solution for tidying up your items effortlessly! Permissions ItemSorter.user - Allows the user to have access to the sort command Chat command /sort-a - Sort container alphabetically. /sort-c - Sort container by category. Bind bind <key> "chat.say "/sort-a"" - Bind for alphabetical sort command bind <key> "chat.say "/sort-c"" - Bind for the categorical sort command$12.99 -
Version 1.0.0
306 downloads
Prevents spamming of chat & console commands perfect for players abusing plugins excessively! Includes Debugging issues for any configuration mishaps! Example of adding GUIShop: "Add commands to block ( Must be lowercased do not add the slash! / ) ( 3 = Block Both | 1 = Block Chat | 2 = Block Console )": { "shop": 3, "shop.buy": 2, "shop.sell": 2, }, ## Configuration { "Add commands to block ( Must be lowercased do not add the slash! / ) ( 3 = Block Both | 1 = Block Chat | 2 = Block Console )": { "command": 3 }, "Sets the time between command usage": 3.0, "Sets the max accumulated cooldown time limit before kicking the player if they keep trying to spam": 120.0, "Exclude players from being blocked ( Add their steam 64 id's to the list )": [ 4678678647, 4678678678 ], "Message Responses": { "( Chat Icon ) Just insert a valid steam 64 ID to set": 0, "CommandBlocked": "You are on command cooldown, try again in {0} seconds", "KickReason": "Kicked for excessive command spam!" } }Free -
Version 1.0.7
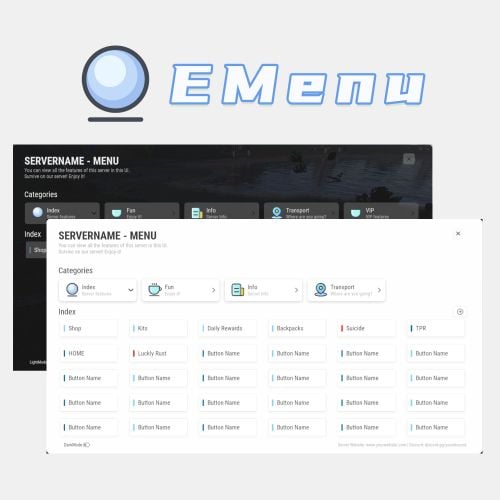
122 downloads
A Beautiful Server Menu UI, allows for unlimited categories and buttons customization. Features Supports Light and Dark Mode. Allows players to input custom parameters. Allows players to input command arguments manually. Supports adding an unlimited of categories and buttons. Categories and buttons can be configured with permissions, ensuring that only players with the permissions can access them. Support console or chat commands. Support for command running on the server. Commands ChatCommands /menu - Open EMenu ConsoleCommands emenu.open - Open EMenu Config { "Title": "SERVERNAME - MENU", "Description": "You can view all the features of this server in this UI.\nSurvive on our server! Enjoy it!", "Bottom Description": "Server Website: www.yourwebsite.com | Discord: discord.gg/yourdisocrd", "Open Commands": [ "/menu", "emenuopen" ], "Quickly open the UI(0=None|1=MiddleMouse|2=CtrlAndMiddle|3=ShiftAndMiddle)": false, "Default UI Mode (true = dark, false = light)": false, "Button Category List": [ { "Category Title": "Index", "Category Description": "Server features", "Category Icon": "https://i.imgur.com/sAeRp8j.png", "Category Permission": "", "Button List": [ { "Button Name": "Shop", "Button Lable Color": "#7AD9FF", "Button Command": "/shop", "Button Permission": "", "Button Description (For Input UI)": "", "Players Input Args": false, "Server Run Command": false, "Default Input Args": "" }, { "Button Name": "Kits", "Button Lable Color": "#7AD9FF", "Button Command": "/kit", "Button Permission": "", "Button Description (For Input UI)": "", "Players Input Args": false, "Server Run Command": false, "Default Input Args": "" }, { "Button Name": "Daily Rewards", "Button Lable Color": "#7AD9FF", "Button Command": "/daily", "Button Permission": "", "Button Description (For Input UI)": "", "Players Input Args": false, "Server Run Command": false, "Default Input Args": "" }, { "Button Name": "Backpacks", "Button Lable Color": "#7AD9FF", "Button Command": "/backpacks", "Button Permission": "", "Button Description (For Input UI)": "", "Players Input Args": false, "Server Run Command": false, "Default Input Args": "" }, { "Button Name": "Suicide", "Button Lable Color": "#ff0000", "Button Command": "kill", "Button Permission": "", "Button Description (For Input UI)": "", "Players Input Args": false, "Server Run Command": false, "Default Input Args": "" } ] }, { "Category Title": "Fun", "Category Description": "Enjoy it!", "Category Icon": "https://i.imgur.com/qmw5cNL.png", "Category Permission": "", "Button List": [ { "Button Name": "Luckly Rust", "Button Lable Color": "#0B72B2", "Button Command": "/lr", "Button Permission": "", "Button Description (For Input UI)": "", "Players Input Args": false, "Server Run Command": false, "Default Input Args": "" } ] }, { "Category Title": "Info", "Category Description": "Server Info", "Category Icon": "https://i.imgur.com/uQKMAT2.png", "Category Permission": "", "Button List": [ { "Button Name": "Info", "Button Lable Color": "#0B72B2", "Button Command": "/info", "Button Permission": "", "Button Description (For Input UI)": "", "Players Input Args": false, "Server Run Command": false, "Default Input Args": "" }, { "Button Name": "WelcomePanel", "Button Lable Color": "#0B72B2", "Button Command": "/welcome", "Button Permission": "", "Button Description (For Input UI)": "", "Players Input Args": false, "Server Run Command": false, "Default Input Args": "" } ] }, { "Category Title": "Transport", "Category Description": "Where are you going?", "Category Icon": "https://i.imgur.com/Wsqh9J6.png", "Category Permission": "", "Button List": [ { "Button Name": "TPR", "Button Lable Color": "#0B72B2", "Button Command": "/tpr %ARGS%", "Button Permission": "", "Button Description (For Input UI)": "Please enter the name of the player", "Players Input Args": true, "Server Run Command": false, "Default Input Args": "" }, { "Button Name": "HOME", "Button Lable Color": "#0B72B2", "Button Command": "/home %ARGS%", "Button Permission": "", "Button Description (For Input UI)": "Please enter the name of the home", "Players Input Args": true, "Server Run Command": false, "Default Input Args": "" } ] }, { "Category Title": "VIP", "Category Description": "VIP features", "Category Icon": "https://i.imgur.com/qmw5cNL.png", "Category Permission": "EMenu.vip", "Button List": [ { "Button Name": "Vip Shop", "Button Lable Color": "#7AD9FF", "Button Command": "/vipshop", "Button Permission": "", "Players Input Args": false, "Server Run Command": false, "Default Input Args": "" }, { "Button Name": "Bank", "Button Lable Color": "#7AD9FF", "Button Command": "/bank", "Button Permission": "", "Players Input Args": false, "Server Run Command": false, "Default Input Args": "" } ] } ] } Title - The title displayed in UI. Description - The description displayed in UI. Bottom Description - The description displayed at the bottom of UI. Open Commands - Command to open UI. Start with / for chat commands Quick Open (Press the middle mouse) - If enabled, players can use the middle mouse button to quickly open the Menu UI. When enabled, a toggle button is displayed in the UI for players to switch on and off this feature. Button Category List: Category Title - Category Title Category Description - Category Description Category Icon - Category icon, Png Url Category Permission - Permissions required to access this category If leave blank, no permission is required. Button List: Button Name - Button Name Button Lable Color - Button Lable Color (HEX) Button Command - Command run by button Start with / to run a chat command, otherwise it is a console command If "Players Input Args" is set to true, you should use "%ARGS%" to represent the arguments input by the players. If "Server Run Command" is set to true, you can use "%STEAMID%", "%PLAYERNAME%", "%PLAYER.POS.X%", "%PLAYER.POS.Y%", and "%PLAYER.POS.Z%" as variables. Button Permission - Permissions required to access this button If leave blank, no permission is required. Players Input Args - set to "true," it allows players to input arguments manually. It will open a UI for players to input arguments. Server Run Command - true = Server, false = Client If the command still starts with /, it will still run as a chat command Default Input Args - Default input arguments.$32.99 -
Version 1.3.4
581 downloads
This plugin provides a beautiful and convenient crafting panel for your server. Its design and mechanics are as similar as possible to the in-game Rust crafting panel. Add crafting of any custom items, commands, permissions and anything else you like. Features The design is ~90% similar to the design of Rust's in-game crafting panel. Support for any custom items and commands. Ability to unlock all DLC items in the in-game crafting menu. The plugin only registers permissions for items that you have specified to it. Thus, preventing the creation of a large number of permissions. Customizable sound effects, notifications in the status bar on the right, and text notifications in popular plugins. The plugin can take and give out items from inventory, game backpack and Backpacks plugin, depending on the fullness of any of them. Ability to add item variations (just look at the screenshots). Supports work with skill plugins. Supports work with economy plugins. The player can choose whether to craft or buy an item. Add items to favorites, built-in search, fully functional queue and more. Scrollbar support. Ability to use item crafting cooldown. *All the sections and items shown in the screenshots are an example of configuring the plugin. You will need to create sections yourself and add items there. Supported plugins: SkillTree - allows you to use bonuses such as: Craft_Speed, Craft_Refund, Craft_Duplicate. Also allows you to give bonuses when crafting and take away when crafting is canceled. Backpacks - plugin can take and give items in an additional backpack. ItemRetriever - plugin can take crafting ingredients from all containers that are connected to the player (including inventory, game backpack, Backpacks plugin, and any other plugin that uses ItemRetriever as Suppliers). Player DLC API - plugin allows you to check whether an item or skin belongs to a specific player. ZLevelsRemastered - allows you to use the craft speed bonus. Economics, ServerRewards, IQEconomic - these plugins are used to purchase items with the currency of these plugins. Notify, GUIAnnouncements, NCP - these plugins are used to display notifications. SimpleStatus, AdvancedStatus - these plugins are used to display notifications in the status bar at the bottom right of the screen. Permissions The plugin has immutable and generated permissions. The immutable ones include: craftingpanel._use – is responsible for opening the panel. If there is no permission, the panel will not open. craftingpanel._admin – give this permission only to administrators. It adds an additional "Give yourself" button to get items from the panel for free. This permission is also needed to use the givecraft command (about it below). craftingpanel._instant – all player crafts will be instant. craftingpanel._death – crafting queue will not be reset when the player dies. craftingpanel._disconnect – when a player leaves the server, the craft queue will not be reset. craftingpanel._economics – allows you to purchase items for the currency of the selected economy plugin. If the player does not have permission, the cost panel will still be displayed, but the player will not be able to make a purchase. craftingpanel._workbench - allows you to reduce crafting time by having a workbench of a higher level than necessary for crafting. craftingpanel._bonuses – allows the player to access the crafting bonuses from the "Crafting bonuses" section. craftingpanel._unlockdlc - if a player has this permission, he can craft all DLC items in the in-game crafting menu. If you revoke this permission, all DLC items will become unavailable again. craftingpanel._nocooldown - allows you to disable the cooldown of all items. The generated permissions are created by the plugin itself, here's how it works: craftingpanel.section.vehicles- this is permission for the "vehicles" section. craftingpanel.vehicles.minicopter - this is permission for the item "minicopter" in the "vehicles" section. craftingpanel.vehicles.snowmobile.tomaha - this is permission for the item "snowmobile" in the "vehicles" section and in "tomaha" variation. Commands givecraft steamid/nickname section item 5 skin steamid/nickname – steamid or nickname of your choice. section – section name from the Section permission [required] field. item – item name from the Item permission [required] field. 5 – how much of the current item to give out (craft multiplier). skin - name of the item from the Ingredients section, Item permission [required] fields. All arguments of this command are required. If your item has an empty "Variations" section or you want a default item, specify "default" in place of skin. resetcooldowns steamid/nickname section item - resets the cooldown of a specific item from a specific player. resetcooldowns steamid/nickname - resets the cooldown of all items from a specific player. resetcooldowns all section item - resets the cooldown of a specific item for all players resetcooldowns all - resets the cooldown of all items from all players steamid/nickname – steamid or nickname of your choice. section – section name from the Section permission [required] field. item – item name from the Item permission [required] field. General settings Allow panel scaling when the interface is scaled? - if this setting is enabled, the craft panel will be resized depending on the game interface scale (setting "user interface scale"). If the setting is disabled, the panel will always be the same size, regardless of the player interface scale. Remember the last selected section and item? - plugin will remember the last selected section, item and variation the next time the panel is opened by the player. Enable multilingual mode? – if your server has players from different countries, this mode allows you to customize translation for other languages. When you enable this mode, the plugin will write all the data that needs to be translated to the lang - file. These include: section names, item names, item descriptions, item properties, item variation names, and ingredient names. The lang - file consists of a pair: key - value. The key is a unique name, with the help of which the plugin understands what phrase to use. Section translation: section.*section permission* – key template for section name translation. For example: "section.favorite": "Favorite" – Favorite section. Translation of item information: *section permission*.*item permission*.name – key template for item name translation. For example: "sunburn.innertube.name": "Inner Tube" – item name. *section permission*.*item permission*.description – key template for item description translation. For example: "sunburn.innertube.description": " Inflatable lap for water fun." – item description. *section permission*.*item permission*.properties – key template for item properties translation. For example: "sunburn.innertube.properties ": "Any properties ..." – item properties. *section permission*.*item permission*.variations.*variation permission* – key template for variation name translation. For example: "sunburn.innertube.variations.zebra": "ZEBRA" – variation name. Translation of ingredient names: *ingredient shortname *.*ingredient skinId* - key template for ingredient name translation. For example: "wood.0": "Wood" – ingredient name. Use the PlayerDLCAPI plugin to check whether items and skins belong to the player? – The plugin will check each item and skin in the panel for belonging to the player (i.e. whether they are in his Steam inventory). Allow work with the Backpacks plugin? – plugin can take and give items in an additional backpack (Backpacks by WhiteThunder). Allow work with the ItemRetriever plugin? – this plugin provides advanced functionality for interacting with player containers: If the ItemRetriever plugin is enabled, the CraftingPanel will take crafting ingredients from all containers that are connected to the player (including inventory, game backpack, Backpacks plugin, and any other plugin that uses ItemRetriever as Suppliers). If the ItemRetriever plugin is disabled, the CraftingPanel will take items with the next priority (if the item is not found, it goes to the next container): Backpacks plugin (if enabled) -> game backpack -> inventory. The CraftingPanel plugin is fully in charge of giving out items (since ItemRetriever only allows you to take items from the player), it gives out items with the next priority (if the container is full, it moves on to the next one): inventory -> game backpack -> Backpacks plugin (if enabled) -> drop item. Reset cooldown on crafting items for all players during the wipe? - the plugin will reset all cooldowns when the server is wiped. Delete player data from the Data file if they have not logged into the server for so many days – this setting is added to prevent the plugin from keeping in memory the settings of all players who have ever visited your server. Effect at the start/end/canceling – game effects that will be played at the start of crafting/completion of crafting/cancellation of crafting (effects list, plugin for playing effects). Specify a plugin to work with the economy – specify one plugin from the list or leave the field empty to disable work with economy. Crafting bonuses This section allows you to customize crafting bonuses when using one of the supported plugins. Each of these plugins has its own settings. Amount of experience will depend on crafting time? – if this setting is disabled, then the given/taken experience will be the same (which are specified in the settings above). If this setting is enabled, the experience will be calculated using the following formula: calculated experience = crafting time * experience from the settings above. It should be taken into account that to calculate the experience for a crafted item, the full crafting time is taken (which is specified in the item's setting), and to calculate the experience for crafting cancellation, the time left to create the item is taken. The ZLevelsRemastered plugin does not have a full-fledged api for interaction with crafting bonuses, so the work with it is not fully implemented (no rewards are given in economy plugins, permission of this plugin is not taken into account, etc.). Notification settings Notification type (Chat, GameTips, Notify, GUIAnnouncements) – if this section is enabled, you must specify the type/plugin to notify the player of different warnings. Chat – notification to regular chat. GameTips – notification in the in-game Rust tooltips (blue or red at the bottom of the screen). Notify – notification in the Notify plugin by Mevent. GUIAnnouncements – notification in the GUIAnnouncements plugin by JoeSheep. Just below that are the customization fields for the specific type of notification. Game Status Settings Game status is a notification that is shown at the bottom right of the screen (like in-game crafting). The plugin can show 3 types of game status: Current craft – it's the blue panel with the gear. It is displayed while the crafting process is in progress. Giving item – it's the green panel with the down arrow. It is displayed when a player is given a craft item. Dropping item – it's the red panel with the cross. It is displayed when the items given by the plugin do not fit in the inventory and drop out near the player. Crafting Panel working with Rust's in-game status and two plugins (SimpleStatus, AdvancedStatus) that have slightly advanced features. Rust – is the in-game status built into the game. It does not require any additional plugins, but it cannot show the Current craft (blue panel with a gear). SimpleStatus – this plugin displays customizable statuses. It can show Current craft and Giving item. But cannot display Dropping item due to limitations in its operation. AdvancedStatus - this plugin displays customizable statuses. It works with all of the above status types. Section settings Section name – the displayed section name on the menu button. Section permission [required] – be sure to fill in these fields and make sure they are all unique. Because it is by this field that the plugin understands which section it is currently working with. If you specify "favorite" here, the plugin will use this section to display the player's favorite items (don't add items to it, the plugin will delete them anyway). Register this permission? – if enabled, the plugin will register a permission with the above name. In this case this section will be shown only to those players who have this permission. Section item settings Item name [required] – required field. The name of the item is displayed only in this plugin. If you need to create an item with the same name, you will find this setting below. Item permission [required] – required field. Make sure that each item in the section has a unique field. Because by this field the plugin understands which item in the current section it is currently working with. Register this permission? - if enabled, the plugin will register permission with the above name. Keep in mind that the current item will still be shown to all players, but they will not be able to craft it (this is also notified by the icon on the top left of the information section). Item description – item description, is not passed to the item when crafting, only displayed in the panel of this plugin. Item properties – if the item has some characteristics (e.g., damage, radiation protection, etc.) you can specify them here. This data is displayed in a separate panel in the information section of the item. Item shortname – if you are using the command as a craft result, leave this field empty. Check this item with the PlayerDLCAPI plugin? - this setting disables the verification of the item by the Player DLC API plugin. Create an item with the default name (true) or the above name (false)? – if true, the plugin will create an item with the default game name (which refers to the current shortname), otherwise it will set the name from the Item name field. Item skinId – if the item is custom, specify the required skinId, otherwise set it to 0. Item image [optional] – if as a result of craft, you have to execute some command, you can specify a link to a picture related to this command. Console commands executed after crafting (%steamid%, %username%, %amount%) [optional] – if you need to execute some commands as a result of crafting, you can list them with commas in this field. In the command you can specify %steamid% and %username%, the plugin will replace them with the data of the current player. The plugin can also replace %amount% with the amount per craft (next setting). If the command gives some custom game item and you know its shortname and skinid you can specify them in the fields above. This way you don't need to additionally save the image of this item to the hosting and specify its link. Amount per craft – number of items given out per craft. Max craft multiplier - maximum allowable craft multiplier. The craft multiplier (selected by the player in the Ingredients section) is how many times an item will be dispensed or how many times commands will be executed. If Amount per craft = 3, and the player chose multiplier = 2, he will receive 2 * 3 = 6 items. Crafting time [sec] – time to craft the item. It can be set to 0, then the item will be crafted instantly. Show notification in game status (if they are enabled)? – if a command from another plugin is used to give a custom item and that plugin displays game status, duplication of game statuses may occur. Therefore, it is possible to disable the display of game status for a particular item. Keep in mind that this only disables the Giving item status. Apply craft bonuses (if they are enabled)? – allows you to apply craft bonuses (from the "Crafting bonuses" section) to this item. Crafting cost in the economy plugin [0 - disable] – the value of the current item in your economy server currency. The customization works if you specified one of the supported economy plugins at the beginning. Item Variation settings In the in-game Rust crafting panel this section is called Skins, here it is called Variations. This is done because here it can include not only skins, but any items or commands related to the parent item. For example, you have several modular car presets, with different types of modules, but they are all related to modular cars. Therefore, you can specify them in one item - "Modular car". The settings in this section are similar to the parent item, except for the crafting ingredients. They will be the same as the parent item. Item Ingredient settings Resource name [required] – required field. Is used to display the name of the ingredient in the plugin panel (it is not taken into account when taking ingredients from the player). When canceling the craft, the plugin can set this ingredient to the specified name, you will find this setting below. Use this resource in ingredients? – enables or disables this resource for use in ingredients. Resource shortname [required] – required field. Shortname of the item that the plugin will look for from the player for crafting. Resource skinId – if it's a custom item, give its skinId, otherwise set it to 0. Return an item with the default name (true) or the above name (false)? – when the craft is canceled, if true, the plugin will create an ingredient with the default game name (which refers to the current shortname), otherwise it will set the name from the Resource name field. Plugin Config Example of plugin configuration in English: Example of plugin configuration in Russian. If you need Russian config, open it (CraftingPanel.cs) before loading the plugin, and at the top set the variable "isRus = true". Then save and upload this file to your server$30.00- 143 comments
- 2 reviews
-
- 8
-

-
-
- #craft
- #craft menu
- (and 17 more)
-
.thumb.gif.4ff9cb1aa0de0193422f68273dcc5ae4.gif)
Version 1.0.0
57 downloads
Create as many "VIP" Packages as you need for your community, reward the most loyal players, and new ones as well. Customizable loot table for items to be claimed on a daily cooldown in minutes, supports decimals, ex. 0.5 = 30 mins. Discord Webhook Logging will notify you what package the user is claiming. Players are notified on schedule if they are cooled down and can claim. THIS IS A COMPLETE REWRITE AND UPGRADE OF SIMPLE VIP, FOR THIS REASON SIMPLE VIP IS NO LONGER SUPPORTED. Commands /clearpackages - Clears all data /(packageclaimcommand) - Is what you set in config for the player to use to claim, you can make as many as you want to. Users must have the matching permission. Permissions ADMIN - Allows usage of the Clear Function Example Config. { "Discord Webhook URL": "", "Clear Data On Wipe?": true, "Packages": [ { "Package Name": "<color=yellow>VIP</color>", "Permission Name": "vip", "Command To Claim": "vip", "Cooldown In Hours": 0.5, "Claim Effect Path": "assets/prefabs/misc/easter/painted eggs/effects/eggpickup.prefab", "Items": [ { "Shortname": "rifle.ak", "Skin": 0, "Custom Name": "", "Amount": 1 }, { "Shortname": "metal.facemask", "Skin": 0, "Custom Name": "", "Amount": 1 } ] }, { "Package Name": "<color=red>Legend</color>", "Permission Name": "legend", "Command To Claim": "legend", "Cooldown In Hours": 12, "Claim Effect Path": "assets/prefabs/misc/easter/painted eggs/effects/eggpickup.prefab", "Items": [ { "Shortname": "supply.signal", "Skin": 0, "Custom Name": "", "Amount": 1 }, { "Shortname": "rifle.bolt", "Skin": 0, "Custom Name": "", "Amount": 1 } ] } ] } { "PackageDoesNotExist": "[<color=yellow>VIP PACKAGES</color>] This package does not exist.", "CannotClaim": "[<color=yellow>VIP PACKAGES</color>] You do not have permission to claim this package.", "NotEnoughInventory": "[<color=yellow>VIP PACKAGES</color>] You do not have enough inventory space to claim this package. You need <color=green>{0}</color> inventory slots.", "PackageReady": "[<color=yellow>VIP PACKAGES</color>] Your {0} package is ready to claim using the /<color=blue>{1}</color> command!", "CooldownRemaining": "[<color=yellow>VIP PACKAGES</color>] You must wait {0} before claiming this package again." }$10.00 -
Version 3.4.5
208 downloads
Features Automatically detects when offline players are being raided Notifies online players about raids in progress Tracks and stores raid statistics for each player Provides map markers at raid locations Optional Discord webhook integration for raid notifications Customizable notification cooldowns Notifies players of raids that occurred while they were offline Team-based notification system Commands | Command | Description | Permission | |---------|-------------|------------| | /raidinfo | View your own raid statistics | offlineraidannouncer.stats | | /raidinfo [player] | View raid statistics for another player | offlineraidannouncer.admin | | /raidstats | Alias for /raidinfo | Same as raidinfo | | /ofra.clear | Clear all stored raid data | offlineraidannouncer.admin | Permissions | Permission | Description | |------------|-------------| | offlineraidannouncer.receive | Allows a player to receive raid notifications | | offlineraidannouncer.bypasscooldown | Allows a player to bypass the notification cooldown | | offlineraidannouncer.admin | Grants administrative access to commands and features | | offlineraidannouncer.stats | Allows a player to view raid statistics | Configuration Options | Option | Description | Default | |--------|-------------|---------| | NotificationCooldown | Time in seconds before sending another notification to the same player | 600 | | IncludeOwnerName | Whether to include the name of the base owner in raid alerts | true | | IncludeRaiderName | Whether to include the name of the raider in raid alerts | true | | WipeDataOnWipe | Whether to clear all stored data when the server wipes | false | | NotifyRaidersTeam | Whether to notify the raider's team members about the raid | true | | SaveRaidStatistics | Whether to save and track raid statistics for each player | true | | NotifyOfflineOnReconnect | Whether to notify players about raids that happened while they were offline | true | | RecentlyOfflineTime | Time in seconds to consider a player 'recently offline' after disconnecting | 300 | | UseDiscordWebhook | Whether to send raid alerts to a Discord webhook | false | | DiscordWebhookUrl | The URL of your Discord webhook for raid notifications | https://discord.com/api/webhooks/your/webhook/url | | ExcludedZones | List of zone names where raid notifications won't be triggered (requires ZoneManager) | [] | | RaidThreshold | The minimum number of raid events before triggering notifications | 3 | | ShowMapMarker | Whether to show a map marker at the location of a raid | true | | MapMarkerDuration | Duration in seconds that a raid map marker will remain visible | 300 | | AdminOnlyNotifications | Whether to only send raid notifications to admins | false | | MonitoredEntities | Entity types to monitor for raid detection | [BuildingBlock, Door, StorageContainer, ExternalWall, Lock, Trap, Barricade, SleepingBag, Turret, Furnace, Workbench] | Dependencies Optional: ZoneManager - Required for zone exclusion functionality Discord Integration To enable Discord notifications: Create a webhook in your Discord server settings Set UseDiscordWebhook to true in the plugin config Add your webhook URL to the DiscordWebhookUrl setting The plugin will now send raid notifications to your Discord server whenever an offline raid is detected.$12.99 -
Version 1.0.0
35 downloads
This plugin allows you to trigger commands based on the server entity count. Usage Check interval In Seconds - The amount of seconds the plugin check the server entities count. Execute One Trigger Per Check - Executes only one trigger every entities count check. Triggers [Count] - The server entities count for the trigger. Triggers [Enabled] - The trigger state. Triggers [Priority] - The trigger priority the lower the number is the higher the priority is, meaning it will run first if the conditions are met. Triggers [Type] - The type of the trigger "Equal" to the set entities count or "Equal Or Greater" than the set entities count. Triggers [Run Once] - Runs the trigger only one time if the conditions are met, meaning it will not run again even if the conditions are met. Triggers [Commands] - The commands that will be executed when the trigger conditions are met. Configuration { "Check Interval In Seconds": 60, "Execute One Trigger Per Check": true, "Triggers": { "100000": { "Enabled": true, "Priority (The lower the higher)": 1, "Type (0 = Equal, 1 = Equal Or Greater)": 1, "Run Once": false, "Commands": [ "say Server has reached 100,000 entities!" ] }, "120000": { "Enabled": true, "Priority (The lower the higher)": 2, "Type (0 = Equal, 1 = Equal Or Greater)": 1, "Run Once": false, "Commands": [ "say Server has reached 120,000 entities!" ] }, "135000": { "Enabled": true, "Priority (The lower the higher)": 3, "Type (0 = Equal, 1 = Equal Or Greater)": 0, "Run Once": false, "Commands": [ "say Server has reached 135,000 entities!" ] } } }Free -
Version 1.0.7
31 downloads
Command Limiter Info Command Limiter allows you to limit the use of commands that players can use. For each command you can set the cooldown, minute, hourly, daily and wipe usage limits. It also allows you to apply limits in case of Building Blocks, Safe Zones, block the command permanently, etc... Command Limiter is useful for limiting the use of commands from plugins that do not implement a blocking system or implement an inflexible blocking system. Commands Commands can be typed in chat (by putting the / character in front of the command), or from console. /cl reset <steamID> -- This command allows you to reset usage limits for a specific player. To use this command you must have permission: commandlimiter.admin /cl wipe -- This command allows reset all usage limits for all players. To use this command you must have permission: commandlimiter.admin Commands can be added or modified in the configuration file: /oxide/config/CommandLimiter.json Permissions commandlimiter.admin -- Allows the use of commands reserved for administrators commandlimiter.bypass -- Allows you to bypass the command usage limit, but only for commands that have the CanBeBypassed field set to TRUE commandlimiter.bypass.force -- Allows you to easily bypass the command usage limit, regardless of the CanBeBypassed field Default Configuration { "TimeZone": "Europe/London", "Clear data on map wipe": true, "Print usage limits when command is blocked": true, "Chat Command": [ "cl", "commandlimiter" ], "Command Setting": [ { "Enabled": true, "Command": "cmd", "Commands alias": [], "BlockCommand (If set to TRUE players will no longer be able to use this command. Default FALSE)": false, "SafeZone. Value [AllowOnly | Allow | Block] (Default Allow)": "Allow", "BuildingBlocked. Value [AllowOnly | Allow | Block] (Default Allow)": "Allow", "CanBeBypassed (If set to TRUE the command block can be bypassed. It depends on the user permissions)": false, "CooldownSeconds (-1 infinite)": 30, "MaxUsagePerMinute (-1 infinite)": -1, "MaxUsagePerHour (-1 infinite)": -1, "MaxUsagePerDay (-1 infinite)": -1, "MaxUsagePerWipe (-1 infinite)": -1, "BypassPermission (Permissions to bypass the block even if [CanBeBypassed] is set to false)": [] }, { "Enabled": true, "Command": "cmd_2", "Commands alias": [ "alias 1", "alias 2" ], "BlockCommand (If set to TRUE players will no longer be able to use this command. Default FALSE)": false, "SafeZone. Value [AllowOnly | Allow | Block] (Default Allow)": "Allow", "BuildingBlocked. Value [AllowOnly | Allow | Block] (Default Allow)": "Allow", "CanBeBypassed (If set to TRUE the command block can be bypassed. It depends on the user permissions)": false, "CooldownSeconds (-1 infinite)": 30, "MaxUsagePerMinute (-1 infinite)": -1, "MaxUsagePerHour (-1 infinite)": -1, "MaxUsagePerDay (-1 infinite)": -1, "MaxUsagePerWipe (-1 infinite)": -1, "BypassPermission (Permissions to bypass the block even if [CanBeBypassed] is set to false)": [] } ], "VersionNumber": { "Major": 1, "Minor": 0, "Patch": 7 } } TimeZone -- Set the time zone with which the dates will be saved: Default: Europe/London. Clear data on map wipe -- Clear command usage data after a wipe. Default TRUE. Print usage limits when command is blocked -- Prints the command usage limits when a player uses one of the configured commands. Default TRUE. Chat Command -- Here you can add, edit or delete commands can be typed in chat (by putting the / character in front of the command), or from console. Command Setting -- The list of commands on which to apply the usage and cooldown limits must be inserted here. Enabled -- If set to TRUE, limits and cooldowns for this command will be enabled. Command -- The command on which to apply limits and cooldowns. Commands alias -- Here you can specify other commands to block with the same configurations. Useful to block a command, which has several similar or differently named commands, to do the same thing. Or alternatively to block multiple commands without creating different configurations. BlockCommand -- If set to TRUE, the command cannot be used by any player, except for players with the permissions: commandlimiter.admin or commandlimiter.bypass.force. SafeZone. Value [AllowOnly | Allow | Block] (Default Allow) -- Sets whether the command can be used in safe zones: AllowOnly: The command can only be used in safe zones. Block: The command cannot be used in safe zones. Allow: No restrictions for safe zones. BuildingBlocked. Value [AllowOnly | Allow | Block] (Default Allow) -- Sets whether the command can be used in areas where you have building permissions: AllowOnly: The command can only be used where you do not have building permissions. Block: The command can only be used where you have building permissions. Allow: No restrictions for building zones. CanBeBypassed -- If set to TRUE the command can be bypassed by players with permission: commandlimiter.bypass. CooldownSeconds -- Cooldown for command reuse. MaxUsagePerMinute -- Limit the use of the command for each minute. MaxUsagePerHour -- Limit the use of the command for each hour. MaxUsagePerDay -- Limit the use of the command for each day. MaxUsagePerWipe -- Limit the use of the command for wipe. BypassPermission (Permissions to bypass the block even if [CanBeBypassed] is set to false) -- Here you can specify one or more names, to create permissions to bypass the limit. If the player has at least 1 of these permissions, he can bypass the limit even if the CanBeBypassed property is set to false. Example: if you enter "vip1” as permission, a command called commandlimiter.bypass.vip1 will be created that you can assign to players. Order Application Limits The usage and cooldown limits of the various commands are applied in the following order: Wipe limits -- If the wipe limits have not been exceeded, proceed to the next check, otherwise the command will be blocked. Daily limits -- If the daily limits have not been exceeded, proceed to the next check, otherwise the command will be blocked. Hourly limits -- If the time limits have not been exceeded, proceed to the next check, otherwise the command will be blocked. Limits per minute -- If the minute limits have not been exceeded, proceed to the next check, otherwise the command will be blocked. CooldownSeconds -- The command will be executed if the cooldown has expired, otherwise you will have to wait for the cooldown to reset. LOCALIZATION The plugin are translated into the following languages: English Italian Translation files are located in the /oxide/lang folder, here is an example of a /oxide/lang/en/CommandLimiter.json translation file. You can add translations for other languages by adding them to the folder: /oxide/lang$4.99 -
Version 0.0.2
282 downloads
SimpleEvents allows scheduling console commands for in-game events and separate timed commands. Features: - Schedule custom console commands. - Schedule console commands for in-game events. - Configure independent timed commands. - Choose between sequential or simultaneous execution of timed commands. - Define minimum and maximum intervals for timed commands. - Set minimum player count requirements for timed commands. - In-game events, such as Patrol Helicopter, CH47 Helicopter, Cargo Ship, Cargo Plane, Easter Egg Hunt, Santa's Sleigh, Halloween Hunt, and Bradley APC. Default Config: { "Custom Commands Execution Mode | 1 = Sequentially, 2 = Simultaneously, 3 = Disabled": 1, "Custom Commands": [ { "Commands": [ "", "" ], "Min Interval (s)": 60, "Max Interval (s)": 120, "Min Players": 0 }, { "Commands": [ "", "" ], "Min Interval (s)": 180, "Max Interval (s)": 300, "Min Players": 0 } ], "Patrol Helicopter": { "Commands": [ "", "" ], "Min Players": 0, "Prefab": "assets/prefabs/npc/patrol helicopter/patrolhelicopter.prefab" }, "CH47 Helicopter": { "Commands": [ "", "" ], "Min Players": 0, "Prefab": "assets/prefabs/npc/ch47/ch47scientists.entity.prefab" }, "Cargo Ship": { "Noninitial LootRound Min Players": [], "Commands": [ "", "" ], "Min Players": 0, "Prefab": "assets/content/vehicles/boats/cargoship/cargoshiptest.prefab" }, "Cargo Plane": { "Commands": [ "", "" ], "Min Players": 0, "Prefab": "assets/prefabs/npc/cargo plane/cargo_plane.prefab" }, "Easter Egg Hunt": { "Commands": [ "", "" ], "Min Players": 0, "Prefab": "assets/prefabs/misc/easter/egghunt.prefab" }, "Santa's Sleigh": { "Commands": [ "", "" ], "Min Players": 0, "Prefab": "assets/prefabs/misc/xmas/sleigh/santasleigh.prefab" }, "Halloween Hunt": { "Commands": [ "", "" ], "Min Players": 0, "Prefab": "assets/prefabs/misc/halloween/halloweenhunt.prefab" }, "Bradley APC": { "Commands": null, "Min Players": 0, "Prefab": null } }Free -
Version 2.0
4 downloads
Time Check automatically outputs the ingame time as well as real-time minutes until next day/night. Set interval via config file (default every 30m)$1.99 -

Version 0.1.0
139 downloads
What is it? A simple command to jump from one place to another. How to use it? Look at anything and type /jump and you will be teleported to the place you are looking at if the place is further than the MaxDistance in config you will be teleported (MaxDistance meters) into that direction. Permission jump.use -- Gives you ability to use the /jump command ChatCommand /jump Configuration { "Max jump distance": 300.0 }Free -
Version 0.0.3
69 downloads
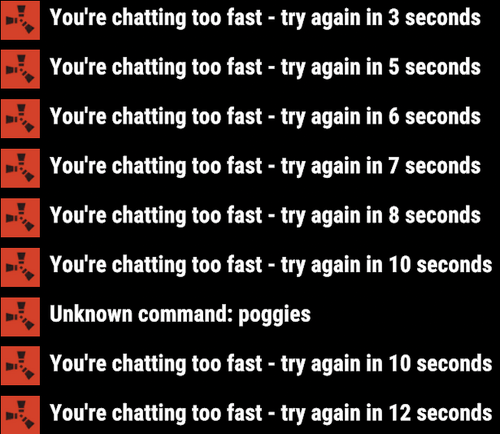
This harmony plugin makes it so that you can use commands even while typing too quickly. You will also not extend your cooldown by opening chat and pressing enter anymore, as I have fixed that as well. These two changes are a LARGE QoL improvement, in my opinion at least, that you will likely notice pretty quickly. This plugin is a drag and drop, just drop it into your normal plugins folder and you're good to go! Will do everything by itself. Example: You send a message and press a keybind for a chat command, you get told you're chatting to fast, or even just trying to type a command right after typing. With this plugin, you will NEVER have that issue again. Example 2: Send a message, and then have a cooldown of 5 seconds, you open chat and press enter to close it, your cooldown will not be updated.$1.69 -
Version 1.8.0
258 downloads
Support for up to 18 command buttons, with standard configuration. Change the button background color, button text, button color! When adding or removing buttons, they are automatically positioned in the center of the screen! Convenient configuration, you just need to add a new button, write the name and command! Choose any color for the background of the button, change the color of the name to your taste! You can also hide the panel for the player with the /FAST command and open it as well (everything is saved in the plugin's date file) Permission SvFastMenu.use issue to a group or player to display the command bar { "AnchorMax_Main": "0.6125930 0.01822916", "AnchorMin_Main": "0.3696925 0.001302288", "Buttons": [ { "ButtonName": "UP", "ColorButton": "0.24 0.29 0.15 0.9", "ColorText": "1 1 1 0.89", "Command": "/up 4", "Permission": "" }, { "ButtonName": "TURRET", "ColorButton": "0.24 0.29 0.15 0.9", "ColorText": "1 1 1 0.89", "Command": "/turret", "Permission": "" }, { "ButtonName": "LSAVE", "ColorButton": "0.24 0.29 0.15 0.9", "ColorText": "1 1 1 0.89", "Command": "/load save", "Permission": "" }, { "ButtonName": "NOMINI", "ColorButton": "0.24 0.29 0.15 0.9", "ColorText": "1 1 1 0.89", "Command": "/nomini", "Permission": "SvFastMenu.default" }, { "ButtonName": "MINI", "ColorButton": "0.24 0.29 0.15 0.9", "ColorText": "1 1 1 0.89", "Command": "/mymini", "Permission": "" } ], "ChatTag": "SVFAST", "FontName": "robotocondensed-bold.ttf", "FontSize": 10, "Overlay": "Overlay" }$5.00 -
.thumb.png.dccc8fc736f607ab1286fc4ce34b1699.png)
Version 1.0.0
1 download
About UPromocodes This essential plugin allows players to redeem exclusive in-game benefits by entering unique promo codes. Whether unlocking special items, resources, or perks, players can enhance their Rust experience with this intuitive promo code system. Plugin config { "Promo codes": [ { "Names ( chat command names )": [ "promo", "promo2" ], "Commands with delay": [ { "Delay seconds": 0.0, "Console commands": [ "test 1 %STEAMID%", "test 2 %STEAMID%" ] }, { "Delay seconds": 86400.0, "Console commands": [ "test 1 %STEAMID%", "test 2 %STEAMID%" ] } ] }, { "Names ( chat command names )": [ "promo", "promo2" ], "Commands with delay": [ { "Delay seconds": 0.0, "Console commands": [ "test 1 %STEAMID%", "test 2 %STEAMID%" ] }, { "Delay seconds": 86400.0, "Console commands": [ "test 1 %STEAMID%", "test 2 %STEAMID%" ] } ] } ] } Localization { "Chat_PromoWasActivated": "You successfully activated promo code.", "Chat_PromoAlreadyActivated": "You have already activated this promo code." } Contacts: Need help or custom plugin for your server? Contact me using Discord: metangerine ----------------------------------------------------------------------$10.00 -
Version 1.1.1
368 downloads
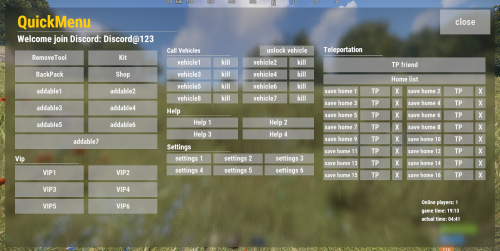
Stop fiddling with commands! This plugin allows you to create arbitrary buttons and give each button a different command! After installing this plugin, players can open this menu with just one command, and then conveniently click buttons to execute various commands! At the same time, this plugin also supports the middle mouse button function, allowing you to open menus without complicated binding of any key! I have created an initial template just like the picture Honestly, I've been using it for over a year, it's very convenient Let's take a look at its details: characteristic: - When the button is clicked, there will be a click sound effect - QuickMenu supports the middle mouse button to open the menu by default(Also applies when closed). If you don't want to use this function, you can enter the chat command /z to close. Of course, it only works for a single player, just like the DATA example below - After disabling the middle mouse button function, you can also enter bind J chat.say /q in the F1 console to bind the J key shortcut to open the Quick Menu(Also applies when closed), where the J key can be replaced with other keys. Chat command: /q - Open QuickMenu /z - Middle mouse button function true/false Config: { "title text size": 45, "Title text content": "<color=#FFcc00>QuickMenu</color>", "title min offset": "0.025 0.9", "title max offset": "0.65 0.98", "background min offset": "0.025 0.05", "background max offset": "0.975 0.95", "background color": "0 0 0 .5", "Discord": "<size=26><color=#FFFFFFFF>Welcome join Discord: Discord@123</color></size>", "Left title": "<size=20><color=#FFFFFFFF>Vip</color></size>", "middle title 1": "<size=18><color=#FFFFFFFF>Call Vehicles</color></size>", "middle title 2": "<size=20><color=#FFFFFFFF>Help</color></size>", "middle title 3": "<size=20><color=#FFFFFFFF>Settings</color></size>", "right title": "<size=20><color=#FFFFFFFF>Teleportation</color></size>", "Image URL": "", "Image min offset": "0.4 0.02", "Image max offset": "0.55 0.2", "Image color": "1 1 1 0.8", "close button text size": 26, "close button text": "close", "close button color": "1 1 1 .7", "close button min offset": "0.888 0.888", "close button max offset": "0.99 0.99", "Middle button function": true, "= = = = = = = = = = = = = [ button settings] = = = = = = = = = = = = =": [ { "button text size": 14, "button color": "0.8 0.8 0.8 0.6", "button text": "", "button text color": "1 1 1 0.9", "Button Min Offset": "0.025 0.899", "button max offset": "0.35 0.9", "button command": "" }, { "button text size": 19, "button color": "0.8 0.8 0.8 0.6", "button text": "RemoveTool", "button text color": "1 1 1 0.9", "Button Min Offset": "0.02 0.76", "button max offset": "0.16 0.82", "button command": "/remove" }, { "button text size": 19, "button color": "0.8 0.8 0.8 0.6", "button text": "Kit", "button text color": "1 1 1 0.9", "Button Min Offset": "0.17 0.76", "button max offset": "0.31 0.82", "button command": "/kit" }, { "button text size": 19, "button color": "0.8 0.8 0.8 0.6", "button text": "BackPack", "button text color": "1 1 1 0.9", "Button Min Offset": "0.02 0.69", "button max offset": "0.16 0.75", "button command": "/backpack" }, { "button text size": 19, "button color": "0.8 0.8 0.8 0.6", "button text": "Shop", "button text color": "1 1 1 0.9", "Button Min Offset": "0.17 0.69", "button max offset": "0.31 0.75", "button command": "/shop" }, { "button text size": 19, "button color": "0.8 0.8 0.8 0.6", "button text": "addable1", "button text color": "1 1 1 0.9", "Button Min Offset": "0.02 0.62", "button max offset": "0.16 0.68", "button command": "/kit" } ] } DATA: { "MiddleMouseButtonEnable": { "76561199161744587": true, "76561199161742450": false } }$12.00- 23 comments
- 1 review
-
- 1
-
-
- #uipanel
- #quickmenu
- (and 4 more)


.thumb.jpg.4abde6ce06035db4993ba98aa473b214.jpg)