Search the Community
Showing results for tags 'automatic'.
Found 24 results
-
Version 1.0.0
5 downloads
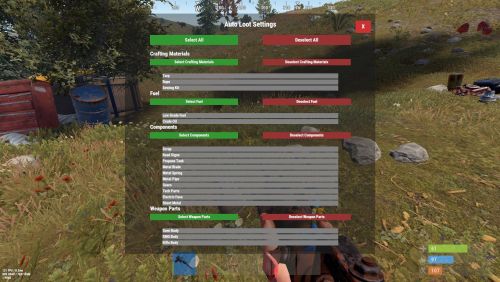
Description: Tired of manually looting every barrel and road sign in Rust? AutoLootMaster revolutionizes scavenging by automatically collecting selected items from barrels and road signs when you destroy them. With a sleek, category-based UI, players can easily customize what they want to auto-pickup – from scrap and components to fuel and weapon parts. No more wasting time on unwanted junk! This plugin is perfect for servers looking to enhance player experience, reduce grind, and add convenience without breaking balance. It supports permissions for barrels and road signs separately, and includes a configurable pickup distance to prevent exploits. Easy to set up, lightweight, and compatible with most Rust servers. Key highlights: Automatic Pickup: Loot is instantly added to your inventory upon destroying containers. Customizable Preferences: Per-player settings saved across sessions. Category System: Grouped items for quick selection (e.g., Components, Fuel). UI-Friendly: Intuitive menu with select/deselect all, category toggles, and individual item buttons. Performance Optimized: Minimal impact on server resources. Boost your server's appeal – players will love the time-saving features! Tested on latest Rust versions. Video: Features: Auto-Loot from Containers: Automatically picks up items from barrels (loot_barrel_1/2, oil_barrel) and road signs (roadsign1-9) when destroyed by the player. Player-Specific Preferences: Each player can choose which items to auto-collect via a personal UI menu. Categorized Item Selection: Items grouped into categories like Crafting Materials (Tarp, Rope, Sewing Kit), Fuel (Low Grade Fuel, Crude Oil), Components (Scrap, Road Signs, etc.), and Weapon Parts (SMG Body, Rifle Body, etc.). Select/Deselect Options: Buttons for selecting/deselecting all items, entire categories, or individual items. Configurable Distance: Set a maximum distance (default 3f) for auto-pickup to ensure it's only for nearby destructions. Permission-Based Access: Separate permissions for enabling auto-loot on barrels and road signs. Data Persistence: Player preferences saved in a data file for reloads and wipes. Bonus Scrap Multiplier Support: Handles server modifiers for scrap yield automatically. Compact UI Design: Responsive and non-intrusive overlay menu accessible via chat command. Commands: /loot - Opens the AutoLootMaster UI menu for selecting pickup preferences. (Note: All commands are chat-based and use Covalence for cross-platform support.) Permissions: autolootmaster.barrel.on - Allows auto-loot from barrels (loot_barrel_1/2, oil_barrel). autolootmaster.roadsign.on - Allows auto-loot from road signs (roadsign1-9). Grant these to players or groups via your permission system (e.g., Oxide permissions). By default, all players can use the UI, but auto-pickup requires permissions. Configuration: The config file (AutoLootMaster.json) is simple and auto-generated on first load. Here's an example: json { "Auto Loot distance": 3.0 } Auto Loot distance: The maximum distance (in meters) from the player to the container for auto-pickup to trigger. Set to 0 to disable distance check (not recommended). Reload the plugin after changes with oxide.reload AutoLootMaster.$4.99 -

Version 2024.5.2.1658
300 downloads
SAVE 13% WHEN BUYING THE BUNDLE NOW SUPPORTING PROCGEN AND CUSTOM URL BASED MAPS ! This plugin will allow you to setup automatic server wipes without requiring external scripts. This plugin is very useful for any server owner but I'm positive that it will be really useful for those hosting providers running panel based game instances where you do not have full access to customize the server or the provided wipe tool is very limited. You should have a look at the suggested plugins for Oxidation's Scheduler which is a perfect fit for a fully in-game automatic wipe process. The plugin also allows you to set a list of seeds that will be used at server wipe to select the new map seed. You can define as many different wipe types as you'd like on the config file like so: This example is for a "forced" wipe. In order to execute the wipe type on the rcon console "wipe forced". "Forced": { "Restart": 120, "Message": "A server wipe is being executed, we'll be back shortly", "Game": { "Blueprints": true, "Logs": true, "Map": true, "PlayerDeaths": true, "PlayerIdentities": true, "PlayerStates": true, "PlayerTokens": true }, "Plugins": { "Convalence": true, "Data": true, "Groups": true, "Language": true, "Logs": true, "Users": true }, "Files": [ "my/custom/path/this_file_will_be_deleted.json" ], "Blacklist": [ "carbon/data/this_file_will_never_be_deleted.json" ] } This example is for a "weekly" wipe. In order to execute the wipe type on the rcon console "wipe weekly". "Weekly": { "Restart": 120, "Message": "A server wipe is being executed, we'll be back shortly", "Game": { "Blueprints": false, "Logs": true, "Map": true, "PlayerDeaths": true, "PlayerIdentities": false, "PlayerStates": true, "PlayerTokens": false }, "Plugins": { "Convalence": false, "Data": true, "Groups": false, "Language": true, "Logs": true, "Users": false }, "Files": [ "my/custom/path/this_file_will_be_deleted.json" ], "Blacklist": [ "carbon/data/this_file_will_never_be_deleted.json" ] } This is a standalone Harmony patch, Oxide installation is optional. Copy the Oxidation.Wiper.X.dll file into your HarmonyMods folder and restart your server. At the first server start after installing the patch a new configuration file Oxidation.Wiper.json will be created at the HarmonyMods folder. What is Harmony ? Harmony is a library for patching .NET code during runtime, it directly manipulates game code (CIL) without any additional abstraction layer such as Oxide. The direct patching of the game's byte code allows more performant modding as developers no longer need to rely on third party code, events or hooks to build custom functionality.$4.99 -
Version 1.0.1
31 downloads
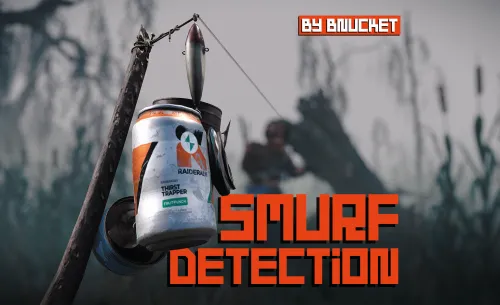
Welcome to the Smurf Detection Plugin by Bnucket! This powerful tool helps you maintain a level playing field on your Rust server by detecting potential smurf accounts. - Keep Your Rust Server Fair and Fun! Features Automatic Smurf Detection: Identifies potential smurf accounts as soon as players join. Discord Integration: Sends alerts to your Discord server. Customizable Configurations: Tailor the plugin to meet your server’s specific needs. Whitelist Management: Exclude trusted players from smurf detection checks. Detailed Reports: Provides comprehensive player data and smurf probability. How It Works Player Connection: When a player connects to your server, the plugin fetches their Steam data. Data Analysis: The plugin analyzes various metrics like playtime, Steam level, friends count, game count, account age, achievements, and ban history. Probability Calculation: Using customizable thresholds, the plugin calculates the likelihood that the player is a smurf. Automated Actions: If the smurf probability exceeds your set threshold, the plugin can execute predefined commands (e.g., kick the player). Discord Alerts: Alerts are sent to a specified Discord channel, providing detailed player data and detection results. Easy Configuration Modify the plugin configuration to suit your needs: { "SteamApiKey": "YOUR_STEAM_API_KEY", "DiscordWebhookUrl": "YOUR_DISCORD_WEBHOOK_URL", "MinPlayTime": 2000, "SmurfProbabilityThreshold": 85.0, "SmurfCommand": "kick {SteamID} Suspicious_account", "Whitelist": [] } { "PlayTime": {"MinValue": 0, "MaxValue": 2000, "MinProbability": 35, "MaxProbability": 0}, "SteamLevel": {"MinValue": 0, "MaxValue": 30, "MinProbability": 25, "MaxProbability": 0}, "FriendsCount": {"MinValue": 0, "MaxValue": 50, "MinProbability": 5, "MaxProbability": 0}, "GamesCount": {"MinValue": 0, "MaxValue": 40, "MinProbability": 20, "MaxProbability": 0}, "AccountAge": {"MinValue": 0, "MaxValue": 1095, "MinProbability": 5, "MaxProbability": 0}, "Achievements": {"MinValue": 0, "MaxValue": 92, "MinProbability": 4, "MaxProbability": 0}, "VACBan": {"MinValue": 0, "MaxValue": 1, "MinProbability": 0, "MaxProbability": 3}, "GameBan": {"MinValue": 0, "MaxValue": 1, "MinProbability": 0, "MaxProbability": 3} } Detailed Player Data For each player, the plugin collects and analyzes: Playtime in Rust Steam Level Friends Count Games Count Account Age Achievements VAC and Game Bans Discord Notifications Stay informed with instant notifications on Discord: Player Name and Steam ID Smurf Probability Detailed Player Stats Detection Method (automatic/manual) Commands Console Commands: smurfcheck <playerName or steamId>: Manually check if a player is a smurf. whitelist <add/remove> <steamId>: Manage the whitelist. Chat Commands: /smurfcheck <playerName or steamId>: Manually check via chat. /whitelist <add/remove> <steamId>: Manage the whitelist via chat.$19.97 -

Version 2.00
5 downloads
Overview: The Ultimate automatic raid management system for Clan/Team raiding. Commands: These commands require RaidZones.Use /set - Sets the center of the Raid Zone/Detection Zone and Enables active listening for explosions. /removezone (ClanTag) - Removes the Raid Zone listener from clans base. Config: The default Config file : Bubble Duration - The amount of time that the Zone will be active for once an explosion is detected. Raid Bubble Radius - The size of the zone that Attackers/Defenders need to hold to win the raid, also the size of the visible bubble. Damage Detection Radius - The size of the zone that will listen for explosive damage to activate a raid zone. Defender Hold Time - The amount of time that the defenders need to maintain control of their base to win the raid. Attacker Hold Time - The amount of time that the raiders(attackers) need to maintain control of the zone to win the raid. Color of Zone - Sets the color of the Visible bubble currently available in Red, Blue, Gray, Green, and Purple. Announce raids to server - Determines if announcements should be sent on raid start and if raid winners should be displayed in chat. Entity Search Radius - The radius around the TC that will be checked to insure the assigned clan has building permission. *Defender Hold Time and Attacker Hold Time are on sperate timers, only needing their teams timer to complete to win. *Defending and Attacking timers change based on team members in the zone. If one team has more members than the other, their timer will progress while the opposing teams will not. Demonstration Video:$15.00 -

Version 1.3.0
43 downloads
Permission based plugin which automatically stops furnaces and refineries when there are no ores/crude, and restarts them when new items are added. Includes optional behaviour to turn off all of a player’s ovens on logout and back on at login. Permissions: furnacenoorestop.use – Enables automatic stop/start of furnaces and refineries. Grants functionality regardless of who adds items. Note: Does not affect oil refineries in Safe Zone. If the oven already contains cookables and is off, adding more will start it when the interface is closed, provided there is fuel inside. Config: { "Turn off furnaces when players disconnect?": true, "Turn on players furnaces when they connect?": true, "Debugging when player connect and disconnects?": false } FurnaceNoOreStop - Oxide/Rust Plugin Copyright (C) 2025 TacmanFree -

Version 1.4.1
65 downloads
SmartAntiTeam is an advanced anti-teaming detection and automatic moderation system for Rust servers. It employs multiple sophisticated detection methods, automated ban capabilities, and real-time Discord integration to maintain fair gameplay by preventing team limit violations.$19.99- 3 comments
- 1 review
-
- 1
-

-
- #antiteam
- #automatic
- (and 12 more)
-

Version 1.0.0
4 downloads
xMissileSiloHatchDoor The xMissileSiloHatchDoor plugin is a small but practical admin tool for Rust servers. It ensures the missile silo hatch door is always open after startup and gives admins manual control via console commands. It’s especially useful on servers where players need consistent access to the silo or where the door occasionally fails to open. The red card and button press for the silo hatch door is not needed anymore. Features: Automatic opening on startup: After the server initializes, it waits 60 seconds (to go sure the prefab is already spawned), then automatically opens the missile silo hatch door. If server is running and you load the plugin, just wait 60 seconds and the door will be opened (There are console messages) Admin-only console commands: xms.open → Opens the missile silo hatch door. xms.close → Closes the missile silo hatch door.$5.99 -

Version 1.3.0
186 downloads
FarmPro turns regular planter boxes into a fully automated, wireless farming system. No pipes, no cables—just place a FarmPro barrel anywhere, and nearby planters will instantly link over the air. It takes care of everything for you: planting, watering, cloning, fertilizing, harvesting, and even generating special items. All of this happens virtually, with no visible devices or messy connections. Whether you're growing hemp, berries, potatoes, or something more exotic, FarmPro makes your farm faster, cleaner, and way more fun to manage. What You Can Do with FarmPro Plant and harvest automatically – Seeds and clones are planted into empty sockets, and ripe crops are harvested or cloned depending on your settings. Go 100% wireless – No industrial piping or power required. Planters connect wirelessly within a radius that you define. Choose between clone or harvest mode – Each planter can be switched between cloning or harvesting, and you'll see visual feedback when it's changed. Use simulated farming hardware – Sprinklers, heaters, and lights work virtually—no deployables. Craft special items – Combine specific fertilizers with plants and gene patterns to generate rare, customized items with unique names and effects. Access an in-game shop – Use a clean UI to buy FarmPro gear, fertilizers, and consumables. You can even sell items back for scrap or RP. Add NPC vendors – Spawn a FarmPro seller at the Outpost or anywhere you want, with a visible map marker and fully configurable stock. Special Items with Real Buffs Grow plants using the right fertilizer and genes to generate rare items like: Ore Booster – Boosts mining yield and radiation resistance Beer of Strength – Gives cooling and comfort Recovery Balm – Increases max health and speeds up healing Energy Bloom – Makes you run and ride faster Recycler Fuel – Increases scrap yield and vision in darkness Each item is visually distinct and applies real, timed modifiers when used. Player Groups and Permissions You can set up multiple player tiers with different farming powers. For example: Control how many planters a player can use Adjust the wireless detection radius Set cloning and harvesting multipliers per crop Choose whether new planters start with full water Enable or disable access to the in-game shop You might have a "Default" group, and then extra perks for VIP1, VIP2, VIP3, VIP4, and Admins—each with more benefits. Useful Chat Commands /farmpro.give – Gives yourself a FarmPro box (permission: farmpro.give) /farmpro.menu – Opens the shop menu (only if allowed by your tier) /farmpro.spawnnpc – Spawns a vendor NPC where you're standing /farmpro.removenpc – Removes the nearest FarmPro NPC /farmpro.planters – Shows how many planters are currently on the server (admin only) /farmgive <identifier> <amount> <playerName|playerId> Parameters: <identifier>: The unique identifier for the custom item to be given. <amount>: The number of items to give. If the value is invalid or less than 1, it defaults to 1. <playerName|playerId>: The target player's display name or Steam64 ID. Shop and Economy Integration FarmPro supports Scrap, Economics, and ServerRewards. All prices, items, and categories are fully configurable. Here’s the default FarmPro item setup: "Item Short Prefab Name": "box.wooden.large", "Item SkinID": 3529006189 You can also add your own items and fertilizers to the shop. Plugin Compatibility FarmPro works great alongside: Ganja – Integrates with cannabis-related plants and items SkillTree – Grants XP and activates buffs on harvest Economics, ServerRewards – All fully supported Why Server Owners Love It No visible wiring or clutter Custom farming economy that players can grow into Clean, mobile-friendly UI Flexible configuration and permissions Powerful admin controls Fully monetizable with VIP perks and special items Start farming smarter today. No wires, no mess—just FarmPro. Configuration File$20.00- 49 comments
-
- 1
-
-
- #farm
- #automatic
- (and 6 more)
-

Version 1.0.1
805 downloads
This plugin will allow players to open and close doors and gates by honking their horn. If the door is locked, players must have authorization on the lock in order for the door to be opened. IE if the player does not have the code entered into a codelock, or did not place the keylock on the door they are attempting to open, it won't open. Commands togglehorn - toggles the ability for the horn to open doors. Permissions horndoors.use - required to use this plugin horndoors.off - this permission is assigned when the players disable horn doors access with the toggle horn commandFree -

Version 0.5.4
125 downloads
Hey! This is RustHandler, a tool for automatic Rust management (Debian-based Linux distros: Debian, Ubuntu Desktop & Server (64 bit)). No, you're not in the wrong place, this is all about hosting a RustDedicated Linux server, and managing it with a simple, pleasant Winform panel, making server management a breeze with just a few clicks. Installation : On the server side: -Put RustHandler.sh in your user's root directory (/home/YourUser/*here), where it must remain for RustHandler to function properly. -Do : chmod +x RustHandler.sh sudo ./RustHandler.sh -install And that's it! That's all there is to it! PC side : -Now run RustHandlerClient.exe on your PC, log in with your normal user (not root). -Log in > apply your settings in "Server Settings", save > Wipe > Update > Start ! THAT'S IT. -Optional: Install the Rust typography in the archive so that it's correctly interpreted in your software If you have any problem, you can contact me via Discord, I will answer you faster than on the site, search : sebl4rd With RustHandler, you can: -Wipe your server in 1 click. Before wiping, change your settings in Server Settings, then stop your server and wipe it (Full wipe or Save BP option). The Server settings panel contains a number of parameters, including : -CPU affinity -Automatic backups -Custom path selection -Network management -Startup convars -Autoupdate on startup -Choice of Oxide or Carbon compiler -Tips you have about 40 of the most useful convars. You can add/remove as many as you want. RustHandler automatically restarts your server, if for example you use the "TimedExecute.cs” plugin, if you program the command, every day at noon "restart 300”, the server will restart automatically, and if you activate the "Auto_Update” mod, it will update each time it restarts! RustHandler logs all restarts of your Rust server, whether accidental or not. If for example your server becomes unstable, and you suspect it to restart randomly, consult: /home/YourUser/RustHandler/restarter.log You will have a detailed list of reboots your machine has done. Server restart on 2022-04-07 19:59:05 Server restart on 2022-04-08 12:00:58 Server restart on 2022-04-09 12:01:25 Server restart on 2022-04-10 12:00:54 Server restart on 2022-04-11 12:01:18 Server restart on 2022-04-12 12:00:55 Also saves Rust server status backups. Plugin manager: Plugin Manager, allows you to install, update and manage your plugins very easily. Auto scraping of Umod site to keep database up to date. Detection of out-of-date plugins, links to plugins in an organized list... Etc. Rcon client : A Rcon client window, allowing you to make basic commands, and get feedback from your server. Currently pretty basic, but just a click away. You can easily check that your server has started up correctly with this. This window will be greatly improved. RustHandler also has a "protection”, which prevents launching a Rust server several times (otherwise data corruption). But it also allows you to run multiple Rust servers on your machine. If you want to run a 2nd Rust server simultaneously on your dedicated machine (or more), simply create another user, paste Rusthandler.sh at the root of this user, run RustHandler_Client.exe and log in. RustHandler automatically creates logs (raw logs) of your server, including EVERYTHING, so also the start of the server, which does not normally appear on an RCON protocol. Each time your server restarts, RustHandler creates a new log file. Linux beginners : Remember, NEVER to use root/sudo to modify server files/folders. If you modify files with root/sudo, your normal user will no longer be able to modify them! Upcoming updates: -Unfortunately, I haven't had time to translate everything yet, but it will happen very soon! (Baguette !) Added : English version since 0.0.3 -A Wipe mod (without BP)/ FullWipe : Done : in 0.0.4 version Plugin Manager : Oopsie ! A presentation in video A clicable interface throught ssh instead of word commands : Done.. Long time ago Scheduled Wipe -A command or clickable menu to easily import a backup. In case you have a corrupt save. -Your suggestions? Tell me about !$25.00 -
.thumb.gif.f32a2f182ff8c24af53b7c58d4ef9e8a.gif)
Version 1.1.0
273 downloads
This plugin automatically displays active PVP zones on your server map in real-time. Perfect for enhancing your players' gaming experience during airdrops and special events. Key Features Automatic PVP zone display Markers appear instantly during events Perfect synchronization with airdrops and events Automatic marker removal when events end Performance and simplicity Lightweight plugin that doesn't impact server performance No configuration needed - works immediately Compatible with your existing plugins Benefits for your players Clear visibility of active combat zones Better strategic planning for PVP actions Reduced frustration from invisible zones More professional and modern interface Requirements This plugin requires the following dependencies to work: Marker Manager Modified : https://codefling.com/plugins/marker-manager-modified Zone Manager : https://umod.org/plugins/zone-manager Dynamic PVP : https://umod.org/plugins/dynamic-pvp Console Commands The plugin provides two console commands for administrators: ampz.reload Reloads the plugin configuration without restarting the server. Description: Allows you to apply configuration changes in real-time ampz.status Displays current plugin statistics. Information displayed: Active zone markers count Cached zones count Timer interval OnlyDynamicPvp mode status Installation Installation is simple: download the plugin and place it in your plugins folder. It works automatically without additional configuration. Important: Don't forget to properly configure Dynamic PVP so that zones are detected and displayed on the map.$11.99 -
Version 25.9.5411
177 downloads
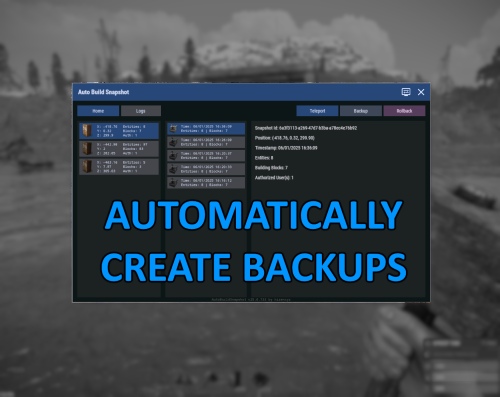
Automatically create backups for your base that you can then rollback to later. Menu command defaults to "abs.menu", but this can be modified in the settings. Most of the navigation is meant to be self-explanatory. All of the phrases should be registered and able to be updated for localization as well. Donations A big ol' thank you if you decide you wanna donate- Ko-fi: https://ko-fi.com/hizenxyz Configuration Explanations General Settings Update Check Interval (seconds): The interval that the plugin will check for updates across all bases and process any changes made to the base. By default this is every hour, but could be shortened if you feel that it should check more often or if you lower the delay between snapshots significantly. Note: This is reset on server restart. Delay Between Snapshot (seconds): The backup interval for individual bases. This is the maximum timespan between saves. Note: This is reset on server restart. Snapshot Retention Period (hours): The number of hours to keep a backup data file for before removing it from the system. Defaults to 30 days. This can be shortened if you don't want to keep backups that long. Not recommended to go longer unless you're running a server that can somehow span multiple wipes. Note: Persisting saves between wipes is not officially supported. Include Ground Resources: Whether to include resources in the backup. Include Non-Authorized Deployables: Disabled. Not currently implmented. Default behavior will include everything. Current Time Zone: The time zone you'd like to display all of the UI timings in. Purely visual. Backend files still save in UTC (Universal Coordinated Time). Commands and Permissions Admin Permission: Gives permission to all other permissions. Toggle Menu Command: The command to toggle the main menu. Toggle Menu Permission: The required permission to toggle the main menu (admin permission will default grant). Backup Permission: The required permission to run manual backups from the interface (backups can only run from interface, so toggle menu or admin permissions are required). Rollback Permission: The required permission to run rollbacks from the interface (rollbacks can only run from interface, so toggle menu or admin permissions are required). Advanced Foundation Zone Radius: Read-only, this is just the radius used to scan foundations. Currently cannot be changed. Max Retry Attempts on Failure: How many attempts to try making a backup before giving up on the base.Free -
Version 1.0.3
18 downloads
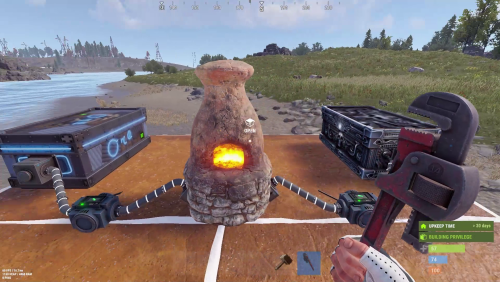
INTRODUCING INDUSTRIAL FURNACE – TRANSFORM YOUR RUST SMELTING! Elevate your Rust server with this high-performance, automated smelting system designed for efficient resource processing and server management. KEY FEATURES: • Automated Attachments & Custom Layouts: Integrates storage containers and adapters in both visible and hidden configurations. • Adjustable Smelting Speed & Fuel Efficiency: Customize smelting speeds for Standard, VIP, and Admin users. Advanced cooking logic minimizes fuel use and even produces bonus charcoal. • Cooking & Fuel Management: Manages cooking cycles, fuel consumption, and item transfers for optimal performance. • Robust Access & Pickup Control: Secure your furnace with owner-based permissions plus optional team and friend access via the Friends plugin. Easily pick up placed furnaces to reclaim resources. • Intuitive Purchase & User Interfaces: Buy your furnace with in-game commands and manage input/output storage through user-friendly UIs. • Smart Item Management: Automatically transfer items between the furnace, input, and output storages. • Comprehensive Configuration: Fine-tune every aspect including purchase costs, smelting speeds, player limits, and multi-tier permission settings. • Multi-Language Localization: Fully localized in English, Portuguese, German, Spanish, and Russian. ESSENTIAL PERMISSIONS & COMMANDS: • industrialfurnace.admin: Grants admin access for unlimited furnace placements. • industrialfurnace.give: Enables the /givefurnace command to award furnace items. • industrialfurnace.pickup: Allows authorized players to pick up placed furnaces. • Group-Specific Permissions: Automatic registration (e.g., industrialfurnace.vip1, vip2, etc.) controls enhanced limits and faster smelting for VIP players. USAGE & SETUP: • Purchasing: Use /buyfurnace to open the purchase UI. Costs are configurable (typically scrap, sheet metal, refined metal, and metal fragments). • Placing & Interacting: Place the furnace using standard building mechanics and manage storage via intuitive UI panels. • Configuration Updates: The versioned config auto-updates with settings for furnace skin ID, storage visibility, and access options (owner-only, team, or friend). • Enhanced Cooking & Transfer: Enjoy efficient smelting and smart item transfers based on VIP settings, ensuring smooth operations during high demand. Upgrade your Rust server today with Industrial Furnace and experience the future of efficient, automated resource management! Plugin configuration:$9.99 -

Version 1.0.0
9 downloads
Helldivers Spawn is a spawn area for players on your Rust server. Inspired by the popular Helldivers game, this monument contains a large Helldivers style decoration. CONTAINS: Eight spawn points. Pictures on the walls, use these pictures to put images. Large windows with views to the outside. Doors to go outside, press the buttons to open the doors. Automatic lighting, when the night comes the light turns on automatically. Helldivers logo.$12.90 -

Version 2.3.5
927 downloads
permission for use UI - setupfurnaces.use Commands: /fsetup - open UI /fadd - you can add new furnace /fremove - you can remove added furnace FEATURES: Reoganize button in UI Work without fuel Output multiplier Melting speed { "Auto reload [If you change the config and save the file the plugin will reload itself]": true, "Oven setup for players": { "setupfurnaces.default": { "furnace": { "Quick smelt multiplier": 1, "Output multiplier": 1, "Reorganize items": false, "Cook without fuel": true }, "furnace.large": { "Quick smelt multiplier": 1, "Output multiplier": 1, "Reorganize items": true, "Cook without fuel": true }, "electricfurnace.deployed": { "Quick smelt multiplier": 2, "Output multiplier": 5, "Reorganize items": true, "Cook without fuel": true }, "refinery_small_deployed": { "Quick smelt multiplier": 1, "Output multiplier": 1, "Reorganize items": true, "Cook without fuel": true }, "campfire": { "Quick smelt multiplier": 1, "Output multiplier": 1, "Reorganize items": true, "Cook without fuel": true }, "bbq.deployed": { "Quick smelt multiplier": 1, "Output multiplier": 1, "Reorganize items": true, "Cook without fuel": true } }, "setupfurnaces.vip": { "furnace": { "Quick smelt multiplier": 1, "Output multiplier": 1, "Reorganize items": true, "Cook without fuel": true }, "furnace.large": { "Quick smelt multiplier": 1, "Output multiplier": 1, "Reorganize items": true, "Cook without fuel": true }, "electricfurnace.deployed": { "Quick smelt multiplier": 1, "Output multiplier": 1, "Reorganize items": true, "Cook without fuel": true }, "refinery_small_deployed": { "Quick smelt multiplier": 1, "Output multiplier": 1, "Reorganize items": true, "Cook without fuel": true }, "campfire": { "Quick smelt multiplier": 1, "Output multiplier": 1, "Reorganize items": true, "Cook without fuel": true }, "bbq.deployed": { "Quick smelt multiplier": 1, "Output multiplier": 1, "Reorganize items": true, "Cook without fuel": true } } } }$14.99 -
Version 1.0.1
39 downloads
Create "Automated" Giveaways, Items based on Votes At the Set Interval, a small popup voting UI is shown to players. Based on the players online, this list is randomized, and players vote on the giveaway they want. After the end of the voting, UIs close and the item with the most votes is locked in. At the end of the giveaway, a random online user is given the prize. Awards can be any command you can run in game, (give items, give kits, Give RP, Give Economics, etc.) Permissions "simplegiveaways.use" : Ability to start or restart a giveaway. Chat Commands /giveaway.start : Stops the current giveaway and starts a new one. Config https://pastebin.com/fU2EZBtv Discord: Shady14u https://discord.gg/8mvvBrrw4Y$10.50 -

Version 1.1.1
207 downloads
Auto Sign Moderation is an AI based moderation plugin to automatically handle moderation of all signs and images in rust. Automatically hide, remove and log signs on your server Free Moderation mode - Basic AI moderation completely free Advance Moderation mode - Custom AI instructions to moderate content Discord logging of moderated signs Batch mode - Send images in batches for better performance and less cost Auto Sign Moderation has an optional loading image for when an image is pending approval and a Discord logging mode, where moderated content is logged to discord. autosignmoderation.whitelist - bypass sign checks There are two main moderation modes. The first is the moderation API, which is a free API endpoint of Open AI. This model has limited options for what it can moderate generally speaking it works best for sexual and violent type content. The Advance Moderation API uses the gpt-4o-mini model. This is a paid model, where each request will cost the end user. This plugin has been designed in a way to reduce costs of using the paid model, dependant on image size the cost per image is close to $0.15 per 100 images checked (more about this in the FAQ). { "Image Size 25 - 100%": 50.0, "Image Quality 25 - 100%": 75.0, "Sign Update Cooldown (seconds)": 5.0, "Player Moderated Cooldown (seconds)": 300.0, "Hide signs while being checked": true, "Use Temp Loading Image": false, "Temp Loading Image URL:": "https://i.postimg.cc/4NNrqT2x/pngegg-2.png", "Logging Mode Only": false, "Send Player Chat Warnings": false, "Batch Mode - Disables hiding of signs": { "Check images in batches (Advance Mode Only)": true, "Batch Image Check Rate (Minutes)": 15.0, "Minimum images to batch check": 3.0, "Max checks to bypass minimum images 0 = no bypass": 4.0 }, "Discord Settings": { "Log to Discord": false, "Log moderated Images to Discord (WARNING THIS MAY SEND NSFW CONTENT TO YOUR DISCORD)": false, "Discord Webhook": "https://support.discord.com/hc/en-us/articles/228383668-Intro-to-Webhooks", "Discord Username": "Sign Moderator", "Server Name": "", "Avatar URL": "https://i.ibb.co/sQ10728/Loading-Pls-Wait2.png" }, "Moderation API (Free) - Limited Options": { "Enable": true, "Open AI Token": "https://openai.com/index/openai-api/", "Cooldown between API Checks (seconds)": 1.0, "Block images of harassment": true, "Block images of harassment/threatening": true, "Block images of sexual": true, "Block images of hate": true, "Block images of hate/threatening": true, "Block images of illicit": true, "Block images of illicit/violent": true, "Block images of self-harm/intent": true, "Block images of self-harm/instructions": true, "Block images of self-harm": true, "Block images of sexual/minors": true, "Block images of violence": true, "Block images of violence/graphic": true }, "Advance Moderation API (Paid)": { "Enable GPT Model (WARNING THIS IS PAID PLEASE READ DOCS)": false, "Open AI Token": "https://openai.com/index/openai-api/", "Cooldown between API Checks (seconds)": 1.0, "Model (Don't change this if you dont know what it is)": "gpt-4o-mini", "Content to moderate": "Pornography, Hate Speech, Child Exploitation, Racist images signs text or symbols, Words like nigger, symbols which resemble swastikas" } } FAQ: Whats the difference between the paid model vs the free one? The paid model allows for complete customization of content to be moderated and it has text recognition. Meaning it is extreamly useful for symbols and hate text. What are the settings to make checks cheapest? Batch mode, will send multiple images within the same batch. This effectively reduces the default cost by about half once you send images in batches of 3 or more. Reducing the image size and resolution also assists in reducing the cost. Be mindful that if your quality reduction setting is too high the AI model may struggle moderating fine detailed content. Keeping your content to moderate prompt simple and straight forward is important as well. If the query becomes extreamly long or complex it may cost more. How do I set up an OpenAPI Token? First sign up to OpenAPI if you dont have an account: https://platform.openai.com/signup Set up an organisation this can be called anything https://platform.openai.com/settings/organization/general Create a project https://platform.openai.com/settings/organization/projects Create an API key in your organisation under the just created project https://platform.openai.com/api-keys If you wish to use the paid model there are two more steps Set your usage limits for your organisation start with a low amount for testing such as $10 https://platform.openai.com/settings/organization/limits Add credit to your account https://platform.openai.com/settings/organization/billing/overview. Its best to just add a small amount of credit such as $10 and then top up later. Where do i monitior API usuage? You can monitor usage here: https://platform.openai.com/settings/organization/usageFree- 7 comments
- 1 review
-
- 6
-
-

-
- #auto sign moderation
- #autosignmoderation
- (and 21 more)
-

Version 1.1.14
190 downloads
AgileZones will create and remove ZoneManager zones around Player Bases as well as moving points of interest like CargoShip, Supply Drops, Bradley, Tugboats, and Heli-Crash sites. Great care has been taken to ensure the plugin does not impact server performance and that Zones are consistent and correct even after a server-crash. TruePVE (default) and NextGenPVE integration allows you to configure detailed rules for each zone type, e.g., Cargo Ship versus Supply Drops, with Rulesets and ZoneFlags. Add the ZoneManagerAutoZones plugin to generate ZoneManager zones around monuments and you've got a server-enforced hybrid PVP/PVE world. Add the ZoneDomes plugin for optional visible domes. Add the Zone PVx Info plugin to get whether the player is inside a PVP zone on the HUD. Set Entering and Leaving Zone messages to empty quotes ("") to disable them. Demo You should be able to find a demo server by searching modded servers for "AgileZones". Be sure to "Show Empty" servers. Default Configuration { "Enable TruePVE": true, "Enable NextGenPVE": false, "Enable ZoneDomes": true, "Enable ZoneDomes For TCs": false, "Enable ZoneDomes For SupplyDrops": true, "Enable ZoneDomes For Cargo": true, "Enable ZoneDomes For HeliCrash": true, "Enable ZoneDomes For BradleyAPC": true, "Enable ZoneDomes For Tugboats": false, "Visible Domes for Moving Zones Darkness (Default 1)": 1, "Delay creating a zone after placing a TC in seconds": 600.0, "Delay removing a zone after a TC is destroyed": 900.0, "TC Zone Radius in meters - set zero to disable": 50, "TC RuleSet": "exclude", "TC Zone Flags": null, "CargoShip Zone Radius in meters - set zero to disable": 125, "Cargo RuleSet": "exclude", "Cargo Zone Flags": null, "SupplyDrop Zone Radius in meters - set zero to disable": 50, "SupplyDrop RuleSet": "exclude", "Supply Drop Zone Flags": null, "Apc Zone Radius in meters - set zero to disable": 50, "Apc RuleSet": "exclude", "Apc Zone Flags": null, "HeliCrash Zone Radius in meters - set zero to disable": 50, "Heli RuleSet": "exclude", "Heli Zone Flags": null, "Tugboats Zone Radius in meters - set zero to disable": 50, "Tugboats RuleSet": "exclude", "Tugboats Zone Flags": null, "Entering Zone Message": "WARNING: You are now entering a PVP Zone", "Leaving Zone Message": "Leaving a PVP Zone", "Zone Tag (Adds this string to zone names)": "_PVP" } I recommend changing ZoneDomes Darkness to 1 (down from 5 by default) as well. Installation: Just Drop the .cs file into the oxide/plugins directory/folder. AgileZones can be installed on existing servers as easily as a fresh wipe, at any time. Existing Bases, SupplyDrops, CargoShips, Bradley, even Heli Crashsites will be handled and have zones created, no restart required. A config file will be generated in oxide/config where you can modify the default configuration. Use the admin only chat command "/ReloadTCs" to apply config changes to already created zones. Don't forget that config changes are not automatically loaded. You can "Oxide.Reload AgileZones" to load new config without restarting the server, and then use the /ReloadTCs chat command to apply those changes to existing zones. Future: This started as a 2 hour proof of concept for player-added PVP zones around TCs and ended up featuring-creeping it's way into weeks of work. There are still some things I'd like to add, but I wanted to get it out there, I hope this is a huge improvement for hybrid PVP servers. TODO: For now, you must modify the oxide/config/AgileZones.json file and reload the plugin. RCON Command: oxide.reload AgileZones ZoneManager doesn't handle overlapping zones very well; you'll receive a notification for each zone you leave which might be confusing when you are still inside a PVP zone. I'd like to improve on this and some other issues with ZoneManager. I didn't realize the ZoneManager license allowed for branching; I wouldn't have jumped through some of the hoops had I known. You can improve on this by setting Entering and Leaving zone messages to empty quotes (""), and installing the Zone PVx Info plugin which will put a UI element on the HUD instead.$15.00 -

Version 1.1.3
699 downloads
This is a dead simple light controller with little performance impact, no configuration required. All player deployed lights will get turned on at sunset and turned off at sunrise. Lights will require one unit of fuel to be powered but they will have no consumption. Currently supported entities: chineselantern.deployed jackolantern.angry jackolantern.happy lantern.deployed tunalight.deployedFree- 1 comment
-
- 1
-
-
- #lighting
- #light control
- (and 5 more)
-

Version 1.6.3
132 downloads
The XP System is an XP and Rewards based system. Designed to keep players to keep playing on your servers. I have been running this for years now on my servers and I must say it is great, Players are always on trying to get the MOST XP and to remain as the leader at the top of the list and hold the title. Has a Prestige Leveling system with it as well, so every time a player hits 100 XP, they Prestige and it is announced to the server. At that point the rewards are all now double (see screenshots below) if they Prestige a 3rd time then the rewards are triple and so forth, The most I have personally seen a player Prestige was 6 times in a single wipe. Of course the longer the wipe schedule the more a player can earn. Time for leveling is set to every 30 Minutes of being on the server, with a warning to all players a few mins before that XP is about to be issued and to make sure they have space in their inventory. The leader with the most XP, Also is broadcasted to everyone. The leader also receives each time they hold the title A random amount of Scrap as well as a Large Present. NOTE: The leader will hold the title whether they are online or offline until another players takes over. IF the leader is offline they will NOT gain more XP, they must be online in order to gain XP. However they will still gain the Leader Rewards if they are still the leader and offline until another players gains the most XP beating them. Features Custom Rewards Items (this doesn't need to be changed as it is setup pretty damn good as is and none of my players have ever complained about any of the items. (recommend just leaving it as is) Auto Wipe Feature when server is wipe to reset all player data Apply extra rewards for Top XP Leader Set min and max amounts of Scrap Rewards for TOP XP Leader Level Settings are already setup (highly recommended that you DO NOT CHANGE ANY OF IT) Top XP Leader broadcasted to all players when rewards are issued so everyone knows who the XP Leader is. Encourages players to stay on your servers so they can try and be the leader - I cannot tell you how funny it is to see players jump on right after a wipe just so they can try and be the TOP XP Leader and try and hold the Title Features and API XP Call that I personally use for DeathNotes (requires a customized DeathNotes to work, if you want a copy please DM me with your Order Number and I will send you a custom DeathNotes Plugin to use with the XP System, What this does is when a Death Note is used, it shows the Current XP Level for the Player who killed anything and also the Victims XP Level if they are a victim) Unique Prestige Leveling System just like in COD every 100 XP earned the Player hits a Prestige Level and the rewards are doubled or tripled and so forth see screenshots Broadcasts to Console when the XP Rewards are issued as well as who is the current Top XP Holder and if they are online or offline Option to disable giving of Gifts to Highest XP Holder if offline (enabled by default) Option to disable Admin Players from receiving XP and Gifts (enabled by default) NOTE: Pretty much this is a plug and play drop in plugin that instantly works with absolutely NO NEED to change anything in the config file. It has been tried and tested for over 4 years running on all my servers. OF course you can still change the settings it is HIGHLY RECOMMENDED TO LEAVE IT AS IS! Commands /xp - (public for all players) shows the current XP Level /xp list (public for all players) shows the current XP, Prestige Level and ZP Rewards List Console Commands xp.give - gives a player XP. Example: xp.give FastBurst 100 = FastBurst will receive 100 XP xp.reset - resets a players XP. Example: xp.reset FastBurst = FastBurst XP is not reset to 0 xp.resetall - manually resets the XP Data File Permissions permissions are only set if you set them as part of one of the rewards API Call private int GetXP(ulong player) { // returns the int value of the players XP Level } Configuration { "General Settings": { "Wipe data on new map": true, "Gametip announcement duration (seconds, 0 to disable)": 0.0, "Start level": 0, "Enable Scrap and Presents for Highest XP": true, "Minimum amount of Scrap to give for Highest XP if enabled": 25, "Maximum amount of Scrap to give for Highest XP if enabled": 125, "Enable giving of XP and Gifts to Admin players (default true)": true, "Enable giving of Scrap and Presents to Highest XP if offline (default true)": true }, "Time Settings": { "Experience for playtime": 1, "Time between give experience for playtime (seconds)": 1800, "Popup Announcement time before XP (seconds)": 1620 }, "Reward Item Settings": [ { "Level": 1, "Items": [ { "Command": "", "Shortname": "chicken.cooked", "Amount": 25, "Skin": 0, "Display name": "Cooked Chicken", "Blueprint": false, "Permission": "" } ] }, { "Level": 2, "Items": [ { "Command": "", "Shortname": "wood", "Amount": 2500, "Skin": 0, "Display name": "Wood", "Blueprint": false, "Permission": "" } ] }, { "Level": 3, "Items": [ { "Command": "", "Shortname": "xmas.present.medium", "Amount": 1, "Skin": 0, "Display name": "Medium Present", "Blueprint": false, "Permission": "" } ] }, { "Level": 4, "Items": [ { "Command": "", "Shortname": "stones", "Amount": 1000, "Skin": 0, "Display name": "Stones", "Blueprint": false, "Permission": "" } ] }, { "Level": 5, "Items": [ { "Command": "", "Shortname": "xmas.present.large", "Amount": 1, "Skin": 0, "Display name": "Large Present", "Blueprint": false, "Permission": "" } ] }, { "Level": 6, "Items": [ { "Command": "", "Shortname": "metal.fragments", "Amount": 250, "Skin": 0, "Display name": "Metal Fragments", "Blueprint": false, "Permission": "" } ] }, { "Level": 7, "Items": [ { "Command": "", "Shortname": "ammo.pistol", "Amount": 50, "Skin": 0, "Display name": "Pistol Ammo", "Blueprint": false, "Permission": "" } ] }, { "Level": 8, "Items": [ { "Command": "", "Shortname": "chainsaw", "Amount": 1, "Skin": 0, "Display name": "Chainsaw", "Blueprint": false, "Permission": "" } ] }, { "Level": 9, "Items": [ { "Command": "", "Shortname": "jackhammer", "Amount": 1, "Skin": 0, "Display name": "Jackhammer", "Blueprint": false, "Permission": "" } ] }, { "Level": 10, "Items": [ { "Command": "", "Shortname": "metal.refined", "Amount": 250, "Skin": 0, "Display name": "High Quality Metal", "Blueprint": false, "Permission": "" } ] }, { "Level": 20, "Items": [ { "Command": "", "Shortname": "metal.fragments", "Amount": 500, "Skin": 0, "Display name": "Metal Fragments", "Blueprint": false, "Permission": "" } ] }, { "Level": 30, "Items": [ { "Command": "", "Shortname": "scrap", "Amount": 500, "Skin": 0, "Display name": "Scrap", "Blueprint": false, "Permission": "" } ] }, { "Level": 40, "Items": [ { "Command": "", "Shortname": "hq.metal.ore", "Amount": 150, "Skin": 0, "Display name": "High Quality Metal Ore", "Blueprint": false, "Permission": "" } ] }, { "Level": 50, "Items": [ { "Command": "", "Shortname": "metal.ore", "Amount": 2000, "Skin": 0, "Display name": "Metal Ore", "Blueprint": false, "Permission": "" } ] }, { "Level": 60, "Items": [ { "Command": "", "Shortname": "ammo.rifle", "Amount": 250, "Skin": 0, "Display name": "5.56 Rifle Ammo", "Blueprint": false, "Permission": "" } ] }, { "Level": 70, "Items": [ { "Command": "", "Shortname": "sulfur.ore", "Amount": 2000, "Skin": 0, "Display name": "Sulfur Ore", "Blueprint": false, "Permission": "" } ] }, { "Level": 80, "Items": [ { "Command": "", "Shortname": "supply.signal", "Amount": 1, "Skin": 0, "Display name": "Supply Signal", "Blueprint": false, "Permission": "" } ] }, { "Level": 90, "Items": [ { "Command": "", "Shortname": "gunpowder", "Amount": 1000, "Skin": 0, "Display name": "Gun Powder", "Blueprint": false, "Permission": "" } ] }, { "Level": 100, "Items": [ { "Command": "", "Shortname": "lmg.m249", "Amount": 1, "Skin": 0, "Display name": "M249", "Blueprint": false, "Permission": "" } ] } ], "Levels Settings": [ { "Level": 1, "Experience to get level": 1.0 }, { "Level": 2, "Experience to get level": 1.0 }, { "Level": 3, "Experience to get level": 1.0 }, { "Level": 4, "Experience to get level": 1.0 }, { "Level": 5, "Experience to get level": 1.0 }, { "Level": 6, "Experience to get level": 1.0 }, { "Level": 7, "Experience to get level": 1.0 }, { "Level": 8, "Experience to get level": 1.0 }, { "Level": 9, "Experience to get level": 1.0 }, { "Level": 10, "Experience to get level": 1.0 }, { "Level": 11, "Experience to get level": 1.0 }, { "Level": 12, "Experience to get level": 1.0 }, { "Level": 13, "Experience to get level": 1.0 }, { "Level": 14, "Experience to get level": 1.0 }, { "Level": 15, "Experience to get level": 1.0 }, { "Level": 16, "Experience to get level": 1.0 }, { "Level": 17, "Experience to get level": 1.0 }, { "Level": 18, "Experience to get level": 1.0 }, { "Level": 19, "Experience to get level": 1.0 }, { "Level": 20, "Experience to get level": 1.0 }, { "Level": 21, "Experience to get level": 1.0 }, { "Level": 22, "Experience to get level": 1.0 }, { "Level": 23, "Experience to get level": 1.0 }, { "Level": 24, "Experience to get level": 1.0 }, { "Level": 25, "Experience to get level": 1.0 }, { "Level": 26, "Experience to get level": 1.0 }, { "Level": 27, "Experience to get level": 1.0 }, { "Level": 28, "Experience to get level": 1.0 }, { "Level": 29, "Experience to get level": 1.0 }, { "Level": 30, "Experience to get level": 1.0 }, { "Level": 31, "Experience to get level": 1.0 }, { "Level": 32, "Experience to get level": 1.0 }, { "Level": 33, "Experience to get level": 1.0 }, { "Level": 34, "Experience to get level": 1.0 }, { "Level": 35, "Experience to get level": 1.0 }, { "Level": 36, "Experience to get level": 1.0 }, { "Level": 37, "Experience to get level": 1.0 }, { "Level": 38, "Experience to get level": 1.0 }, { "Level": 39, "Experience to get level": 1.0 }, { "Level": 40, "Experience to get level": 1.0 }, { "Level": 41, "Experience to get level": 1.0 }, { "Level": 42, "Experience to get level": 1.0 }, { "Level": 43, "Experience to get level": 1.0 }, { "Level": 44, "Experience to get level": 1.0 }, { "Level": 45, "Experience to get level": 1.0 }, { "Level": 46, "Experience to get level": 1.0 }, { "Level": 47, "Experience to get level": 1.0 }, { "Level": 48, "Experience to get level": 1.0 }, { "Level": 49, "Experience to get level": 1.0 }, { "Level": 50, "Experience to get level": 1.0 }, { "Level": 51, "Experience to get level": 1.0 }, { "Level": 52, "Experience to get level": 1.0 }, { "Level": 53, "Experience to get level": 1.0 }, { "Level": 54, "Experience to get level": 1.0 }, { "Level": 55, "Experience to get level": 1.0 }, { "Level": 56, "Experience to get level": 1.0 }, { "Level": 57, "Experience to get level": 1.0 }, { "Level": 58, "Experience to get level": 1.0 }, { "Level": 59, "Experience to get level": 1.0 }, { "Level": 60, "Experience to get level": 1.0 }, { "Level": 61, "Experience to get level": 1.0 }, { "Level": 62, "Experience to get level": 1.0 }, { "Level": 63, "Experience to get level": 1.0 }, { "Level": 64, "Experience to get level": 1.0 }, { "Level": 65, "Experience to get level": 1.0 }, { "Level": 66, "Experience to get level": 1.0 }, { "Level": 67, "Experience to get level": 1.0 }, { "Level": 68, "Experience to get level": 1.0 }, { "Level": 69, "Experience to get level": 1.0 }, { "Level": 70, "Experience to get level": 1.0 }, { "Level": 71, "Experience to get level": 1.0 }, { "Level": 72, "Experience to get level": 1.0 }, { "Level": 73, "Experience to get level": 1.0 }, { "Level": 74, "Experience to get level": 1.0 }, { "Level": 75, "Experience to get level": 1.0 }, { "Level": 76, "Experience to get level": 1.0 }, { "Level": 77, "Experience to get level": 1.0 }, { "Level": 78, "Experience to get level": 1.0 }, { "Level": 79, "Experience to get level": 1.0 }, { "Level": 80, "Experience to get level": 1.0 }, { "Level": 81, "Experience to get level": 1.0 }, { "Level": 82, "Experience to get level": 1.0 }, { "Level": 83, "Experience to get level": 1.0 }, { "Level": 84, "Experience to get level": 1.0 }, { "Level": 85, "Experience to get level": 1.0 }, { "Level": 86, "Experience to get level": 1.0 }, { "Level": 87, "Experience to get level": 1.0 }, { "Level": 88, "Experience to get level": 1.0 }, { "Level": 89, "Experience to get level": 1.0 }, { "Level": 90, "Experience to get level": 1.0 }, { "Level": 91, "Experience to get level": 1.0 }, { "Level": 92, "Experience to get level": 1.0 }, { "Level": 93, "Experience to get level": 1.0 }, { "Level": 94, "Experience to get level": 1.0 }, { "Level": 95, "Experience to get level": 1.0 }, { "Level": 96, "Experience to get level": 1.0 }, { "Level": 97, "Experience to get level": 1.0 }, { "Level": 98, "Experience to get level": 1.0 }, { "Level": 99, "Experience to get level": 1.0 }, { "Level": 100, "Experience to get level": 1.0 } ], "Version": { "Major": 1, "Minor": 6, "Patch": 2 } } Localization { "XP Added Chat": "<color=green>You earned {0} XP</color>", "XP Added Gametip": "<color=white>You earned {0} XP</color>", "New Level": "<color=green>You now have {0} XP, for the reward list type /xp list.</color>", "Level1": "<color=green>You have {0} XP, Prestige {1}.</color>", "Level2": "<color=green>You level up 1 XP every 30 minutes.</color>", "Level3": "<color=green>For the XP reward list type /xp list.</color>", "New Prestige": "<size=16><color=orange>CONGRATULATIONS!</color> {0} has just reach Prestige Level {1}!</size>", "Highest XP": "{0} has the most XP in this server, {1}. {2}", "HighXP Items": "Receives {0} in Scrap and 1 Large Present!", "XPInfo": "<color=green><size=13>XP is gained by playing on the server, it rewards you with items, type /xp for more information.</size></color>", "Reward Received": "<color=green>You have been rewarded with {1} for your XP.</color>" }$25.00 -

Version 1.0.8
1,107 downloads
Nice and Simple.. Clears the fuel tank on Minicopter and Scrap Transport Heli and AttackHelicopter spawns at the Bandit Camp and replaces it with the amount set in the config. No need to change your stack size to counteract the new air wolf fuel give away. Load this, set the amount and be happy Configuration { "Amount of fuel to spawn with PlayerHelicopters": 100, "Amount of fuel to spawn with Scrap Helicopters": 100, "Amount of fuel to spawn with Attack Helicopters": 100 } No Perms No Commands Just Load, Set, Reload! If you have any questions or problems, join my discord https://discord.gg/D2zTWCEnrNFree- 7 comments
- 3 reviews
-
- 1
-
-
- #rust
- #helicopter
- (and 8 more)
-

Version 1.0.5
47 downloads
RUST AUTO WIPER Rust auto wiper is an advanced but simple-to-set-up Discord bot that makes your server wipes 100% automated! Features: 100% automates the server wipe process. Start map votes for the next wipe automatically. Manage wipes of as many servers as you need. Dynamically update server details on the wipe. (ex: server title, description) Deletes a selection of files and folders on the wipe. (ex: plugin data files) Sends wipe announcements. Updates server on the wipe. Set up wipe reminders. Information: This advanced server wipe system covers 100% of the wipe cycles on all your servers. The real power of this tool is that it's running separately from the server, this makes managing server files much easier when the server is offline. with this tool, you don't need batch files or other crap to get your server(s) wiped. This tool also uses cron intervals to determine the exact wipe dates and times. *Note: This tool must be run on a Windows VPS/Server* Configuration: (This example shows 1 server, but you can set up as many servers as you want) module.exports = { token: '', // Your Discord bot token rustMapsApiKey: '', // the rustmaps.io api key guildId: '984577959648174121', // the id of the discord server you want to use the bot in logChannelId: '1102195648683585616', // the id of the channel where the bot should log all actions dbdAccountId: '', // your dbd account id (get this by typing /license display in the support server) debugMode: true, // if true, the bot will log all actions to the console servers: [ // in this list your can add as many servers as you need { server_identifier: 'server1', // the unique identifier of the server. (used for internal purposes) server_name: 'Test Server', // the name of the server server_ip: '', // the ip of the server server_port: 28015, // the port of the server server_queryPort: 28017, // the query port of the server server_rconPort: 28016, // the rcon port of the server server_rconPassword: '', // the rcon password of the server server_modded: true, // if the server is modded or not (if plugins are used) wipe_Interval: '0 20 19 1/1 * ? *', // the interval of the wipe. (generate interval at http://www.cronmaker.com/) wipe_bpWipe: false, // if the wipe is a bp wipe or not files_serverRootPath: 'C:\\Users\\user\\Desktop\\rsmtesting', // the path to the main server folder. (where your start.bat is located) files_savesFolderPath: 'C:\\Users\\user\\Desktop\\rsmtesting\\server\\rsm', // the path to the saves folder. (where your map file is located) files_serverCfgPath: 'C:\\Users\\user\\Desktop\\rsmtesting\\server\\rsm\\cfg\\server.cfg', // the path to the server.cfg file files_startFilePath: 'C:\\Users\\user\\Desktop\\rsmtesting\\start.bat', // the path to the start.bat file files_oxideFolderPath: 'C:\\Users\\user\\Desktop\\rsmtesting\\oxide', // the path to the oxide folder files_excludeSafeFiles: ['logs', 'cfg', 'Log.EAC.txt'], // save files that should not be deleted on wipe. (always exclude cfg) files_deletables: [ // file paths that should be deleted on wipe. (use absolute paths) 'C:\\Users\\user\\Desktop\\rsmtesting\\oxide\\data\\Shop.json', 'C:\\Users\\user\\Desktop\\rsmtesting\\oxide\\data\\Referrals.json', 'C:\\Users\\user\\Desktop\\rsmtesting\\oxide\\data\\StaticLootables_data.json', 'C:\\Users\\user\\Desktop\\rsmtesting\\oxide\\data\\VanishPlayers.json', 'C:\\Users\\user\\Desktop\\rsmtesting\\oxide\\data\\Kits', ], vote_autoStart: true, // if the vote should start automatically vote_channelId: '1098325670687416331', // the id of the channel where the vote should be posted vote_StartAt: '0 0 19 1/1 * ? *', // the interval when the vote should start. (generate interval at http://www.cronmaker.com/) vote_endAt: '0 10 19 1/1 * ? *', // the interval when the vote should end. (generate interval at http://www.cronmaker.com/) vote_maps: ['1000_1', '1000_50000', '1000_1000'], // the maps that should be voted for. (always format the map name like this: 'mapSize_mapSeed') vote_mapCount: 3, // the amount of maps that should be voted for. the maps from the list will be randomly selected vote_multiple: true, // if players can vote for multiple maps update_dynamicTitle: true, // if the title should be updated dynamically update_serverTitle: 'Test Server wiped on {wipeDate} test1', // the title of the server. placeholders: {wipeDate} update_dynamicDescription: true, // if the description should be updated dynamically update_serverDescription: 'Test Server wiped on {wipeDate} test1', // the description of the server. placeholders: {wipeDate} // embed placeholders: {serverName} {mapSeed} {mapSize} {mapImage} {mapUrl} {wipeDate} {nextWipeDate} {nextBpWipeDate} {nextVoteDate} announcement_autoAnnounce: true, // if the announcement should be posted automatically after a wipe announcement_channelId: '1098325694930497607', // the id of the channel where the announcement should be posted announcement_content: '@ ping roles', // the content of the announcement. (can be used to ping roles) announcement_embedTitle: '{serverName} just wiped!', // the title of the embed announcement_embedDescription: '**Join Server:**\nSteam: steam://connect/{serverIp}:{serverPort}\nF1: `client.connect {serverIp}:{serverPort}`\n\n**Planned:**\nNext wipe: {nextWipeDate}\nNext BP wipe: {nextBpWipeDate}\nNext vote: {nextVoteDate}\n\n**Map:** [rustmaps.com]({mapUrl})', // the description of the embed announcement_embedColor: '#038CB5', // the color of the embed. (must be a hex color) announcement_embedImage: '{mapImage}', // the image of the embed announcement_embedFooterText: 'Server just wiped!', // the footer text of the embed announcement_embedFooterIcon: '', // the footer icon of the embed announcement_embedThumbnail: '', // the thumbnail of the embed announcement_embedAuthorName: '', // the author name of the embed announcement_embedAuthorIcon: '', // the author icon of the embed announcement_embedUrl: '', // the url of the embed reminder_autoRemind: true, // if the reminder should be posted automatically before a wipe reminder_Interval: '0 15 19 1/1 * ? *', // the interval when the reminder should be posted. (generate interval at http://www.cronmaker.com/) reminder_channelId: '1098325694930497607', // the id of the channel where the reminder should be posted reminder_content: '@ ping roles', // the content of the reminder. (can be used to ping roles) reminder_embedTitle: '{serverName} is about to wipe!', // the title of the embed reminder_embedDescription: 'Make sure to vote for the next map!', // the description of the embed reminder_embedColor: '#038CB5', // the color of the embed. (must be a hex color) reminder_embedImage: '', // the image of the embed reminder_embedFooterText: 'Server is about to wipe!', // the footer text of the embed reminder_embedFooterIcon: '', // the footer icon of the embed reminder_embedThumbnail: '', // the thumbnail of the embed reminder_embedAuthorName: '', // the author name of the embed reminder_embedAuthorIcon: '', // the author icon of the embed reminder_embedUrl: '', // the url of the embed }, ], }; Support: You can get support at my Discord server by clicking HERE!$30.00 -

Version 1.0.0
274 downloads
Sentry Tech The Israeli military deployed this Sentry Tech system, dubbed as the Roeh-Yoreh (Sees-Fires) by the IDF along the Gaza border fence with pillboxes placed at intervals of some hundreds of meters. The 4-million USD (3.35 million Euro) system was completed in late spring of 2008. The weapon system mounts a .50BMG automated M2 Browning machine gun and a SPIKE guided missile in each pillbox[3] covered by an opaque protective shield. The weapon is operated by one soldier and fed information from cameras, long range electro-optical sensors, ground sensors, crewed aircraft, and overhead drones, as well as radar. Connected via fiber optics to a remote operator station and a command-and-control center, each machine gun-mounted station serves as a type of robotic sniper, capable of enforcing a nearly 1,500-meter-deep area of denial. The gun is based on the Samson Remote Controlled Weapon Station. The weapon is capable of acquiring targets and maintaining a firing solution independently, but still requires human input to fire or release ordnance. A prefab for the battlefield or role play server. The Sentry Tech comes in 2 different versions. Check out the Humvee's, they go well with it! Please note: Download the prefab files and place them in RustEdit/CustomPrefabs directory of RustEdit. The prefabs can be accessed in the custom section of prefab browser. To use sinlge letters, the prefab has to be broken by selecting it (once placed) and using the "break prefab" function. Please note: Download the prefab files and place them in your C:\RustEdit\CustomPrefabs directory Questions and suggestions: Help is needed? Do you have a question or suggestion? Join my Discord to get in touch: https://discord.gg/FyNEXv6bxWFree -
Version 1.0.1
24 downloads
THIS SYSTEM IS NOT WORKING DUE TO RUST SYSTEM Automatically sends information about the server to the discord channel. How to use this bot? 1. install the higher node.js 2. download the bot files 3. file extraction 4. open the console 5. "npm i" <- type in console 6. open to config.js module.exports = { ip: "0.0.0.0", // server ip (domain) port: 0, // server port channel_id: "0", // discord channel id color: "#7289da", // embed color token: "TYPE YOUR TOKEN", // insert your bot token here! updateInterval: 20, // it is seconds and an integer must be entered. watcher: true // you can hide to your server ip and port } 7. edit to config.js 8. "node index.js" <- type in console 9. check to console!$9.99- 2 comments
-
- 1
-
-
- #discord bot
- #tool
- (and 7 more)


.thumb.jpg.7b7118ca6f13ed2752b37b38bf188582.jpg)