Follow the Below Instructions Carefully to Convert MSG Files via the DRS Softech MSG Converter Tool:
Step 1: Download the DRS Softech MSG Converter and Install it. Launch the tool as an administrator. The screen displays as shown below:


Step 2: Choose Either of two options: Single File/Multiple Files and Select Folder. Tap on Next.
Step 3: Again, click on the Select File(s) button to add MSG files. Or click on the Select Folder button to add an entire folder containing any number of MSG files.


Step 4: Locate and select all MSG files you want to convert. Click Open to add files to the tool.
Step 5: Once all MSG files are added to the tool, tap on the Next button to proceed. (Note: You can tap on Remove/Remove All to remove the desired MSG file from the list.)


Step 6: After successful import, expand the tree hierarchy to see the MSG files preview. Select files from the list and click Next.
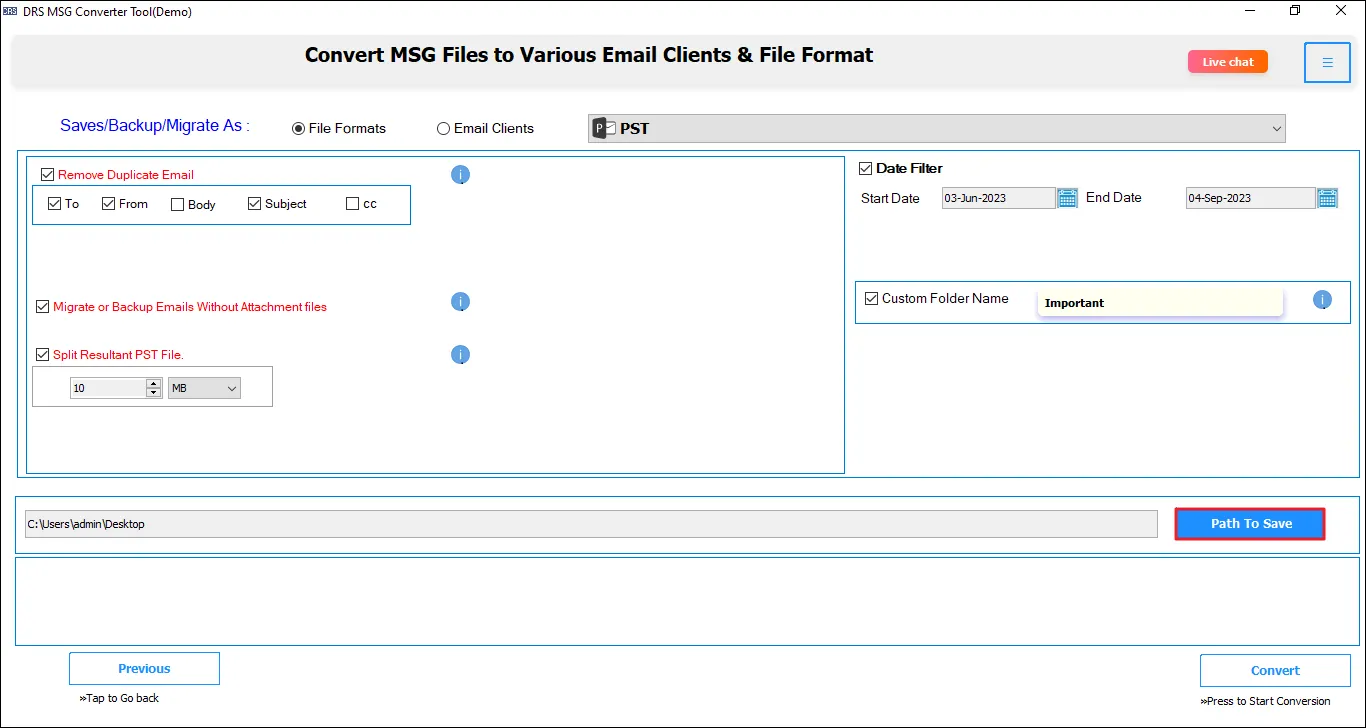
Step 7: On the next interface of the tool, you can see the Save/Backup/Migration As field. It includes two migration options: File Formats and Email Clients. To convert MSG to other file formats opt for the File Format option. To migrate MSG files to specific email clients, choose Email Client.


Step 8: Expand the list of File Formats to choose the desired file format. However, PST is the selected file format by default.
Step 9: You get various filters and options to customize your backup and get a precise and accurate result. They work as described:
- Remove Duplicate Emails: Allows you to eliminate all duplicate emails based on To, From, Body, Subject, and CC.
- Migrate or Backup Without Attachment Files: Enables users to exclude email attachments while converting MSG files.
- Split Resultant PST File: To break the resultant PST file into multiple smaller PST files.


Step 10: Other filters include:
- Date Filter: Apply the date filter to convert emails associated with a particular date range. Select the feature and enter the Start Date and End Date.
- Custom Folder Name: You can save the resultant file in a custom-named folder. Select the feature and enter a suitable name in the field.
Step 11: Click on the Path to Save button, to save the resultant file at any desired location. By default, the resultant file is saved on the Desktop.

Step 12: After choosing all the file conversion filters and options, click on the Convert button to start the process.
- Date Filter: Apply the date filter to convert emails associated with a particular date range. Select the feature and enter the Start Date and End Date.
- Custom Folder Name: You can save the resultant file in a custom-named folder. Select the feature and enter a suitable name in the field.
Step 13: The file conversion process may take some time depending on the number and size of MSG files. After the conversion is complete, you will receive a pop-up “Process has been Completed.” Tap Ok. Further, you can download the conversion report or begin another conversion.

Follow steps 1 to 7 as mentioned earlier. Further, to migrate MSG to Office 365, do as directed below:

Step 8: Opt for the Email Client option. Expand the list and select the desired email client you want to move MSG files to. Here, Office 365 is selected by default.
Step 9: The tool allows you to log in to your Office 365 account using ‘Login with Modern Authentication’ only. So, enter your Office 365 email address and click on Sign In.


Step 10: Once the authentication is successful, return to the tool.
Step 11: You can apply the following filters to create a backup as intended:
- Choose Remove Duplicate Email, and select the criteria based on which you want to remove duplicate emails.
- Select the Migrate or backup emails without attachment files option to prevent migration of attachment files.
- You also get to choose a mailbox folder where to save the migrated MSG files: Mailbox, Archive Folder, or Public Folder.


Step 12: Also, you get:
- Date filter to migrate or convert emails ranging between particular date ranges.
- Custom Folder Name feature for naming the destination folder in your Office 365 account. Tick the option and type the desired name in the field.
Step 13: At last, click on the Convert button to begin the migration of selected MSG files to the Office 365 account. The application initiates the migration.


Step 14: After the migration is complete, a popup will appear. Click OK. (Note: To download the migration report, press the Download Report button, and to migrate MSG to another destination file type, press Convert Again.)