
If you completed my previous tutorial on the beginner’s introduction to python, you might have been left with some open questions, (and new found knowledge of course). The most important question is of course, ‘what’s next?’. It would be very difficult(but not impossible) to create meaningful and robust python software without getting into other deeper topics, which I will cover in this tutorial series.
My Freelance Paycheck – Start Your Career as A Freelancer Today!
I’ll assume you have python 3 installed already, since this is not a beginner’s tutorial. If you do not, go here first.
You’ll need PyCharm to get started, (as the title suggests), so make sure you download the community addition here:
https://www.jetbrains.com/pycharm/download/
Click Here To Learn How to Create Your Own Programming Language!
To get started, let’s fire up that PyCharm IDE.

An IDE is an integrated development environment. What that means is that everything you need to write, edit, test, compile(if applicable), run, and in some cases deploy your software is available to you in one place. In fact, there are many different flavors of IDE across programming languages, and event across the same programming language you have options.
Note: If you Already have you interpreter setup, go down below to the Section titled “Running your first python script in PyCharm”. You have the option to do this when you first create your project in PyCharm.
Roku Express | Easy High Definition (HD) Streaming Media Player – Price $29.00

To get started with PyCharm, you’ll need to configure the python interpreter for your project. You can do this by going to File->Settings.

Select Project:<nameofyourproject>. Depending on what you have installed, your screen will look different. In my case, I had an old python 2.7 installation. We need to select python 3.

Click on the settings wheel next to the project interpretter, and click “Show All”


Hit the + sign to add another interpreter. Click on System Interpreter, and find the one you want to use for python 3. Once selected, click OK. Select it again in the Project Interpreters window, Click OK.

Click Apply in the Settings window and then click OK. Some scanning and indexing will take place. Grab a cup of coffee, take a 5 minute break and come back to it!.
Apple iPad (Wi-Fi, 32GB) – Space Gray (Latest Model) – Price $279.99

Running your first python script in PyCharm
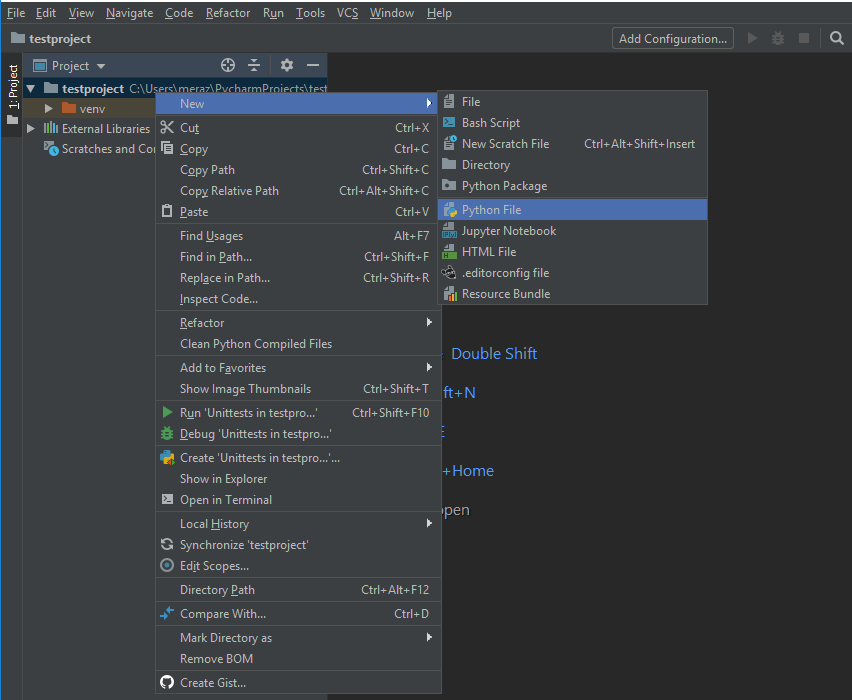
First, right click on the root folder of you project, in my case testfolder, and select New->Python File.
Name the file hello.py and click OK to save it. Add the following python code to your file and save your file:
from datetime import datetime

print(f'Hello world, the time is {datetime.now()}')
Right click anywhere in the editor window and select Run hello:

This automatically crates a debug configuration and opens console window to run your script as shown below:

Pretty neat huh? Configurations are what tell PyCharm how it’s suppose to run and Debug your script, so it’s a good idea to save those, and create new ones for different scripts or projects. You can do this by clicking the dropdown on the name of your script next to the Run(play) button and selecting “save hello Configuration”. Once it’s saved, click on Edit Configurations, and you will see your new hello configuration details:

You can use your first configuration as a model to follow when needing to run other scripts, and add as many run configurations as you’d like.
We will be using PyCharm for the remainder of this tutorial, so you go back to this lesson to refresh every now and then, or leave comments in the posts if you need any extra help!
Toshiba 32LF221U19 32-inch 720p HD Smart LED TV – Fire TV Edition- Price $129.99


1 Comment