Search the Community
Showing results for tags 'codefling'.
Found 14 results
-
Version 3.1.1
9,274 downloads
Skinner! The unrivaled no.1 performance skinning plugin. Skin any item in the game with a unique skinbox giving you live skinning, auto skinning and skin sets. Thanks for everyone who has given feed back through the duration of the beta release. Skinner 3.0 is finally here! Visual overhaul! - with dynamic UI menus for permission based player menus Automatic skin filtering and dev modes for new TOS Permission based skin sets Team share skins! Auto unlock owned skins! and More!!! Live Skinning - Skin items in place without moving them Auto import - Automatically import and use all game approved skins Skin Sets - Create a variety of different skin sets for any item Skin Requests - Allows players to request and Admins to accept new skins in game Auto Skins - Automatically apply selected skins to every item that enters your inventory Skinner 2.0 offers unrivaled performance in plugin efficiency. Our standard testing shows runtime results were 60x faster and memory usage was 200x more efficient than the closest peforming plugin. SkinMenu Commands: /Skin or /S - Live skin any item in your inventory by selecting a skin you wish to apply /SkinCraft or /Sc - Create multiple skin sets for use in other functions such as skinauto or skinteam /Skinitem or /Si - Skin a deployable item you are looking at ingame. Args - Spectify 1, 2 or 3 to automatically use a skin set. Automatic Commands: /Skincon or /scon - sets all items in a container you are looking at to your default craft set Args - Optional, spectify 1, 2 or 3 to automatically use a skin set. /Skininv or /sinv - sets all items in your inventory to your default craft set Args - Optional, spectify 1, 2 or 3 to automatically use a skin set. /Skinauto or /Sauto - Automatically apply selected skins to every item that enters your inventory based off your skin sets. Args - Optional, spectify 1, 2 or 3 to automatically use a skin set. /Skinteam or /st - sets all items in your inventory and your teams to your default craft set Args - Optional, spectify 1, 2 or 3 to automatically use a skin set. Toggle - Use /skinteam toggle to opt in or out of the team skin set /SkinBase - Allows you to skin all deployables in your base to your default skincraft skins. Args - Optional, specify item name to filter items being skinned example: /Skinbase sleepingbag to only skin sleeping bags. /SkinAll Command - Skin all the items in all the containers in your base. Args - Optional, specify item by shortname example: /SkinAll rifle.ak to only skin ak47's. Skin Import Commands: /Skinimport or /sip - Import custom workshop skins Args - WorkshopID example: /Skinimport 2397648701 /Colimport or /cip - Import custom workshop collection using /skinimport collectionID Args - Collection ID example: /Colimport 2921147807 /Skinrequest or /Sr - Request a skin to be added to skinner, requested skins will show in the /Skinrequests UI for approval Args - WorkshopID example: /Skinrequest 2397648701 /Skinrequests or /Srs - Opens the the skinner menu with a box of skins awating approval Button Usage - Select an option and remove the skin to enact the process Try - Recieve a copy of an item with that skin Approve - Adds the skin from the menu to the imported skins list Deny - Removes the skin Note: All chat commands are universal meaning they can be used via the console, rcon(for import commands) and can be customized via the configuration. Player Permissions: Skinner.default - enables /skin command Skinner.items - enables /skinitem command Skinner.craft - enables /skincraft command Skinner.skinauto - enables /skinauto command Skinner.skincon - enables /skincon command Skinner.skininv - enables /skininv command Skinner.skinbase - for use of the /skinbase command Skinner.skinteam - Allows the use of the /skinteam command Skinner.skinall - for the use of the /skinall command Skinner.skinrequest - enables /skinrequest Cooldowns Permissions: Cooldown settins can be adjusted via the plugin config. Applying the cooldown permission example skinner.default30 will enforce cooldowns on those with the permission. If no cooldown permission is applied no cooldowns will be enforced. If multiple cooldown perms are assigned to a single player they fastest cooldown will be used. "Command based cooldowns ('permission' : 'command' seconds": { "Default30CD": { "skin": 30.0, "skinitem": 30.0, "skincraft": 30.0, "skincon": 30.0, "skininv": 30.0, "skinteam": 30.0, "skinbase": 60.0, "skinall": 60.0 } Admin Permissions: Skinner.import – enables /Skinimport, /Colimport and /Skinrequests Skinner.bypassauth - bypasses the building auth requirement when using /Skinitem Skinner.permskintry - enables try feature when using /Skinrequests Warning: trying a skin will make a copy of that item. Only give this perm to admins who are allowed to spawn items. Other Permissions: Skinner.skinautotoggled - applied when a player disables skinauto Skinner.skinteamblock - applied when a player disables team skins Skinner offers multiple ways of importing skins including via the config and through commands: Importing via the config: To import skins via the config insert workshopIDs into the imported skins list as per the code snippet below, once finished reload skinner and the shortname and displayname fields will be automatically populated. You can add extra skins at any stage using this method. "Imported Skins List": { "861142659": {}, "2617744110": {} }, Optionally entire workshop skin collections can be added to conifg, each item skin is automatically imported to your imported skins list on plugin load. "Import Skin collections (steam workshop ID)": [496517795,2921147807], Importing via commands: Commands can be used to edit the config options for imported skins and collections via RCON, chat commands and the f1 console. Commands include: /Skinimport WorkshopID /Colimport CollectionID Importing via Skin Requests: Players can requests skins to be added to the game using the skinrequests feature. By using the command /skinrequest WorkshoID a skin gets automatically uploaded to the skin requests box. Admins with the skinner.import permission can open the requests box with the /skinrequests command. Skins from the request box can then be "tried" approved or denied. Each skin requested can be logged to discord using the webhook in the config. Importing from other plugins: Skinner now has a tool for windows to import data from skinbox, xskins and skincontroller. Simply select your json data file with imported skins into the tool and copy the new imported skins list into the skinner config. https://github.com/Whispers88/SkinDataConverter/releases/tag/Main Note: The "Imported Skins (skinid : 'shortnamestring', skinid2 : 'shortnamestring2'": {}" is now redundant and automatically converted to imported skins list. { "Skin Commands (skin items in you inventory": [ "skin", "s", "skinbox", "sb" ], "Skin Items Commands (skin items you have already placed": [ "skinitem", "si", "skindeployed", "sd" ], "Set default items to be skinned": [ "skincraft", "sc" ], "Automatically set all items in you inventory to your default skins": [ "skininv", "sinv" ], "Automatically set all items a container to your default skins": [ "skincon", "scon" ], "Automatically skin all deployables in your base": [ "skinbase", "skinbuilding" ], "Automatically skin all items in your base": [ "skinall", "sa" ], "Automatically skin all items that are moved into you inventory": [ "skinauto", "sauto" ], "Skin your teams inventories with your skin set": [ "skinteam", "st" ], "Request workshop skins via workshop ID": [ "skinrequest", "sr" ], "Approve workshop skin requests": [ "skinrequests", "srs" ], "Set your selected skin set": [ "skinset", "ss" ], "Import Custom Skins": [ "skinimport", "sip" ], "Import Workshop Collection Command": [ "colimport", "cip" ], "Skin Request Notification Discord Webhook": "", "Custom Page Change UI Positon anchor/offset 'min x, min y', 'max x', max y'": [ "0.5 0.0", "0.5 0.0", "198 60", "400 97" ], "Custom Searchbar UI Positon anchor/offset 'min x, min y', 'max x', max y'": [ "0.5 0.0", "0.5 0.0", "410 635", "572 660" ], "Custom Set Selection UI Positon anchor/offset 'min x, min y', 'max x', max y'": [ "0.5 0.0", "0.5 0.0", "250 610", "573 633" ], "Auto import approved skins": true, "Remove player data after inactivity (days)": 14, "Apply names of skins to skinned items": true, "Add Search Bar UI": true, "Use on itemcraft hook (skin items after crafting - not required when using skinauto)": false, "Override spraycan behaviour": false, "Use spraycan effect when holding spraycan and skinning deployables": true, "Blacklisted Skins (skinID)": [], "Blacklisted Itemms (itemID)": [], "Import Skin collections (steam workshop ID)": [], "Command based cooldowns ('permission' : 'command' seconds": { "Default30CD": { "skin": 30.0, "skinitem": 30.0, "skincraft": 30.0, "skincon": 30.0, "skininv": 30.0, "skinteam": 30.0, "skinbase": 60.0, "skinall": 60.0 } }, "Imported Skins List": {} } //Get all Cached skins public Dictionary<int, List<ulong>> GetAllCachedSkins() { return _cachedSkins; } //Check if skin is a Redirect item public bool IsRedirectID(ulong uID) { return HasMask(uID); } //Convert Redirect ID to item ID public int RedirectIDtoItemID(ulong uID) { return (int)UnsetMask(uID); } //Get a list of skins for a particular item public List<ulong>? GetSkinsItemList(int itemid) { _cachedSkins.TryGetValue(itemid, out List<ulong>? cachedSkins); return cachedSkins; }$24.99 -

Version 1.0.1
12 downloads
CodeFling Creator Bot is a Discord bot, written in Python using Discord.py. The bot monitors users specified in the config and using the CodeFling API, sends notifications to Discord for various actions: - New Releases (Plugins, Maps, Tools etc) - Plugin/Release Updates - New Comments/Discussion Posts - New Reviews - New Private Messages The bot is lightweight and written with efficiency and reliability in mind. It makes only the API calls it needs and stores data in an SQLite database for use later. When guild members use the bot commands, the data is pulled from the local database and doesn’t make extra calls to the API, which means you don’t need to worry about rate limiting or getting banned by the API. The bot polls the API looking for new content at set periods as set in the config, notifying about new content and then updating the database with new data. PLEASE NOTE: Requires Python 3.6 or higher. README: CodeFling Creator Bot 1.0.1 Discord Bot by ZEODE ========================================== Minimum requirements: Python 3.6 or higher Dependacies: Discord.py aiohttp Using pip: pip install -U discord.py pip install -U aiohttp The -U flag just means “upgrade to the latest version if already installed.” Using apt: apt install python3-discord apt install python3-aiohttp This file explains each configuration option in config.json *************** DEFAULT CONFIG FILE IS CREATED ON FIRST RUN *************** DISCORD SETTINGS ---------------- Make sure your Discord bot has at least "Send Messages", "Read Message History" and "Embed Links" permissions. bot_token: Your Discord bot token from the Discord Developer Portal. Get it from: https://discord.com/developers/applications release_channel_id: Discord channel ID where file release/update notifications will be posted. To get channel ID: Enable Developer Mode in Discord settings, right-click channel, "Copy ID" purchase_channel_id: Discord channel ID for purchase notifications (recommend private channel). Shows when someone buys one of your paid plugins. support_channel_id: Discord channel ID for support request notifications. HOPEFULLY COMING SOON - Currently the API endpoints do not provide the necessary information to provide this (I have asked for it, so watch this space). comments_channel_id: Discord channel ID for comment/discussion notifications. Shows when users comment on your files (excludes file author replies). downloads_channel_id: Discord channel ID for file downloads notifications (recommend private channel). Shows when users download your files. reviews_channel_id: Discord channel ID for file review notifications. Shows when users review a monitored file. messages_channel_id: Discord channel ID for user message notifications (recommend private channel). Notifys when a monitored user receives a message on CodeFling. commands_channel_id: Discord channel ID for people to use bot commands. People can use bot ! commands here, all user messages can be cleaned automatically, see below. admin_commands_channel_id: Channel for users with the bot admin role to use admin commands away from public channels All normal commands also work here for bot admin role users to use here too clean_commands_channel: If true, users messages are automatically deleted shortly after they are sent to the channel. max_number_files_to_list: Number of files to return when users use the "!list plugins" command bot_admin_role_id: Users need this role to use the admin only commands ping_release_channel: If this is true, new releases or updates to files will be notified with the @everyone tag NOTE: - Leaving any of the channel IDs blank will disable notifications for those actions - Although there are separate channels for each type in the config, this is just for anyone wanting this, if you want you can put the same channel ID in more than one channel config CODEFLING SETTINGS ------------------ monitored_users: Dictionary of Codefling user IDs and their API tokens. Format: "user_id": "api_token" How to get your User ID: - Visit your Codefling profile - Hover over or click on "See my activity" - Your user ID is in the URL: https://codefling.com/profile/USER_ID-username/content/ - Copy just the numbers, without the "-username" part How to get API Token: - Visit: https://codefling.com/settings/apps/ - Click "Add App" > "Creator API" - Select "All" under scopes - Copy the access token to paste in your config Example: "monitored_users": { "user_id_1": "your_api_token_here", "user_id_2": "another_api_token" } Note: Each user needs to use their own API token. poll_interval_seconds: How often (in seconds) the bot checks Codefling for new content. Default: 120 (2 minutes) Suggested values: ____________________________________________________________________________________ | Type | Safe poll interval | Notes | | ----------------------- | ------------------ | ----------------------------------- | | Light use (1–2 authors) | 60 s | Feels instant, safe if few requests | | Medium (3–5 authors) | 120 s | Recommended default | | Heavy use (5+ authors) | 300 s | Low strain, good scaling | | Massive / strict API | 600 – 900 s | Extremely safe | |_________________________|____________________|_____________________________________| Note: Too frequent polling may hit API rate limits. retention_days: How many days of historical data to track and store. Default: 7 days The bot will: - Only notify about content within this time window - Automatically clean up older data daily - On first run, load existing content from this period Recommended values: - 7 days (minimal storage) - Recommended - 30 days (balanced) - 90 days (extended history) NOTE: Monitored resource/file data is kept indefinitely for users !stats !list commands etc, but the bot will only look for new actions within this period to send notifications to Discord or not. This maintains speed and performance so the bot isn't retreiving more data than is necessary with each API call. In most cases, 7 days should be more than sufficient for all use cases. LOGGING SETTINGS ---------------- timestamp_date_format: The format for timestamps in the console/log output. Availble: - %d - %m - %y e.g: %d-%m-%y would make something like 30-10-25 timestamp_time_format: Specify the format for the timestamp. - 12h - 24h log_file_path: Set the path to the OPTIONAL log file. If left blank, no log file will be used. API OPTIONS ----------- Note: You can usually leave this as is and it will work absolutely fine. max_attempts: How many times to try an API request if it fails before giving up on that attempt Useful for occasional CloudFare errors/timeouts timeout_seconds: How long to wait before retrying a API request due to timeout config_version: DO NOT EDIT THIS COMMANDS ------------------ NOTE: Commands by users do not query the CodeFling API every time. They only retreive data from the SQLite database, so you don't have to worry about rate limiting or banning from users abusing the commands on Discord. This also means it is much quicker with results. The database is updated with all the info every time the API is queried as per the poll rate in the config only. Non-Admin Commands: !help Lists all available commands !stats [username] Get own stats without parameter if you are monitored by the bot or get stats for the user specified !list files List all files monitored by the plugin (config option to limit results) !list authors List all file authors/devs monitored by the bot !file <FileName> / !file <file_id> Give information about that file Admin Commands: !user add <user_id> <api_token> Add the specified user ID and API token to the bot, save in the config and begin monitoring !user remove <user_id> Stops monitoring and removes the specified user ID from the bot and config !rotate Immediately rotate the log file and begin a new blank log file (rotated files saved in logs/) !cleardb Immediately clear the SQLite database and re-seed a new database (ALL DATA WILL BE CLEARED) !test <review|download|purchase|comment|message> Send a test notification to Discord for the most recent entry of the given type !test <file> [new|updated] Send a test notification to Discord for the most recent entry for files/releases, using the new or updated parameter accordingly/ FIRST RUN BEHAVIOR ------------------ On first run, the bot will: 1. Create a SQLite database (codefling_bot.db) 2. Load/Cache all users existing files. 3. Load/Cache all existing content from the last N days (retention_days) 4. DOES NOT send any notifications for existing content 5. Only notify about NEW content after initialization On subsequent runs: 1. Check for content created while bot was offline 2. Send notifications for missed content 3. Continue normal monitoring TROUBLESHOOTING --------------- No notifications appearing: - Verify channel IDs are correct - Check bot has "Send Messages", "Read Message History" and "Embed Links" permissions - Confirm API tokens are valid and have correct scopes Getting rate limited: - Increase poll_interval_seconds value - Default 300 seconds (5 minutes) should be safe Bot sends old notifications on startup: - This is normal if content was created while bot was offline - Bot catches up on missed content within retention period - On first run, no old notifications should appear SUPPORT ------- For issues with the bot, check console output for error messages. Get more support in my Discord: https://discord.gg/jnyg3FvDnc For Codefling API issues, see: https://codefling.com/developers$14.99- 1 review
-
- 1
-

-
- #discord
- #discordbot
- (and 8 more)
-
Version 1.0.2
19 downloads
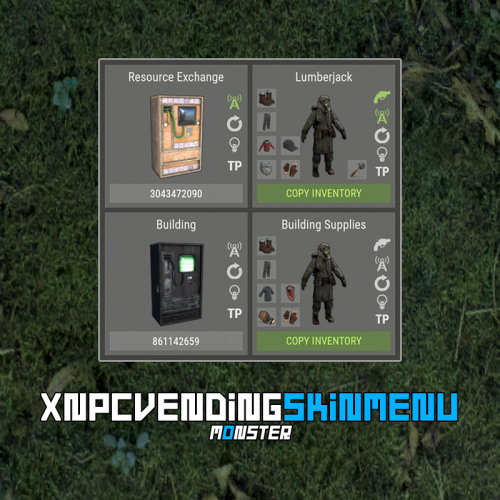
XNPCVendingSkinMenu - NPC Vendings/Shopkeepers skin menu for your server. -> In the code you can switch the plugin language - LanguageEnglish = true <- Key Features Optimization of the interface for different monitor resolutions. Storing NPC data in - oxide/data/XDataSystem/XNPCVendingSkinMenu There is a lang ru/en/uk/es. Sound effects when interacting with the menu. Vending settings: skin and automatic application. Shopkeeper settings: clothing, weapon(belt), skins, item in hand and automatic application. Easily copy your inventory with one click of a button. [ Clothing and belt with skins and modules are copied. ] Ability to change the skin of an item. Just click on it. Ability to display NPCs on the map - all of them or individually. Ability to teleport to NPCs. [ Select an NPC from the list if there are 2 or more NPCs. ] If there is no NPC on the map, it will be displayed in transparent color in the menu. NPCs that are not in the plugin data will be automatically copied and added as soon as they are spawned. The plugin only copies and modifies default NPCs. This allows you to use custom NPCs from other plugins without problems. [ OwnerID(vendings and shopkeepers) and SkinID(shopkeepers only) == 0 ] The NPC is automatically changed after loading the plugin. For an NPC to be changed, its settings must be activated. Brief description of the buttons: Permissions xnpcvendingskinmenu.admin - access to menu and settings. Commands [ChatCommand] /npcvendingskin - open menu. [ConsoleCommand] npcvendingskin.savedata - command for additional saving of changes. [ Optional. The plugin will automatically save the information when you unload it. ] Config { "General settings": { "SteamID profile for custom avatar": 0, "Chat prefix": "<size=12><color=#FFFFFF50>[</color> <color=#00FF0050>XNPCVendingSkinMenu</color> <color=#FFFFFF50>]</color></size>\n" }, "GUI settings": { "Color_background_1": "0.517 0.521 0.509 0.95", "Color_background_2": "0.217 0.221 0.209 0.95", "Color_background_3": "0 0 0. 0.9", "Button color (icons)": "1 1 1 0.75", "Block color": "0.517 0.521 0.509 0.5", "Color of the active button next": "0.35 0.45 0.25 1", "Color of the inactive button next": "0.35 0.45 0.25 0.4", "Text color of the active button next": "0.75 0.95 0.41 1", "Text color of the inactive button next": "0.75 0.95 0.41 0.4", "Color of the active button back": "0.65 0.29 0.24 1", "Color of the inactive button back": "0.65 0.29 0.24 0.4", "Text color of the active button back": "0.92 0.79 0.76 1", "Text color of the inactive button back": "0.92 0.79 0.76 0.4" } }$18.99 -

Version 1.0.0
46 downloads
Codefling logo in various extensions. .png .png 500X500 .svg .webp .webp 500X500 .psdFree -
Version 1.0.0
82 downloads
- Codefling logo to decorate your maps.Free-
- 6
-
-

-
- #codefling
- #logo
- (and 8 more)
-
Version 1.0.2
42 downloads
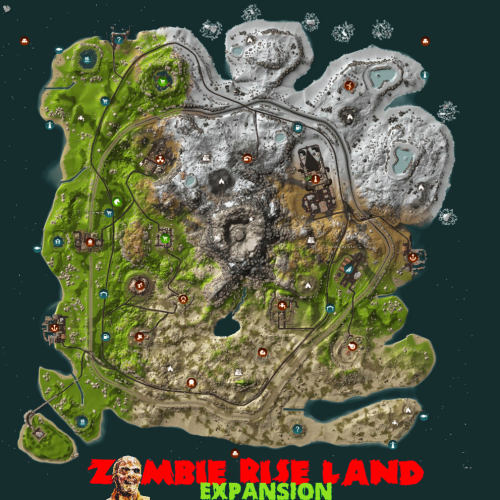
Hello everyone, Zombie Rise Land Map Description This is a custom map made entirely of Rustedit depicting a zombie rising land, whose volcanic center is overrun by zombies protecting its energy fortress. Going around the map you will find a complete world of many monuments and natural wonders with ordered paths and connected with each monument to advance in land vehicles at full speed, search or find the resources and build your fortresses where you can finally invade the center of zombie origin with your friends. The map will continue to be renewed based on new rust updates with no download limits and free editing. Password is included in a text file for you to customize as you wish. Play as you want, have fun and enjoy. Thank you! Need some tour? You can visit our Discord and request a tour to see the map completely: https://discord.com/invite/EUSuDuTFYN With this ticket you will be able to see it completely in its entirety. Map Features Entity count estimate 99k Map Size 3700 File dependencies for your server: RustEdit DLL: https://github.com/k1lly0u/Oxide.Ext.RustEdit Map Custom Monuments and Roads: Volcano with zombie ceremonial center Custom Lake 2 railway bridges New! Control Center monument on new expansion island. Map Rust Monuments: Power Plant Launch Site Train Yard Harbor Military Base Arctic Base Junkyard Water Treatment Plant Airfield Outpost Lighthouse Satellite Dish Artic Research Nuclear Missile Silo Ferry Terminal Oil Rigs Underwater Labs Bandit Camp The Dome Quarry HQM, Stone and Sulfur Warehouse Stable Gas Station Supermarket Underwater Labs$16.00 -

Version 1.0.6
82 downloads
Immerse yourself in an optimized and meticulously designed Rust map, with less than 6k prefabs, it showcases six captivating custom monuments for exploration. Say goodbye to major FPS drops at monuments and dive into an adventure like no other. Traverse the above-ground train system, uncovering engaging areas brimming with valuable loot. Indulge in the perfect fusion of unique content and the comforting vanilla atmosphere for an unforgettable gaming journey. Map size: 4250 Prefab Count: 5700 Optimal FPS Custom Monuments Forbidden Bridge - Vending machine spawn - 1 hackable crate - 2 diesel cans - Minicopter spawn - Loads of Scientist + heavy's - Loads of loot Windmill Sanctuary - Green card + fuse puzzle room - 1 Hackable Crate - 1 Recycler - 1 blue Card Spawn - Multiple Scientists - 2 diesel cans Recycling Facility - Blue card + fuse puzzle room. - 1 Red card spawn - 1 Hackable crate - Multiple Scientist - Multiple recyclers Toxic Waste Plant - Green,Blue and red card puzzle room - 3 fuses required - 1 supply drop spawn - 1 hackable crate - Multiple scientists + heavy's - 6 diesel can spawn Small Fishing Village - 1 Drone Station - 1 Recycler Large Fishing Village - 1 Drone Station - 1 Recycler Other monuments Train Yard Launch Site Giant Excavator Power Plant Abandoned military base Harbour Abandoned Cabins The Dome Missile Silo Bandit Camp Stables Mining Outpost Gas Station Abandoned supermarket Sewer Branch Oil Rig small + large Underwater Labs Underground train tunnels Water Treatment Plant Please make yourself aware of the TOS-Restrictions If you find any bugs or issues contact me on here or discord and il sort them out straight away @ DocNorris#5423.$24.99 -

Version 1.0.3
55 downloads
LuckyClick is an amazing plugin that allows your players to participate in the lottery every day, thereby they will be able to increase their game balance. - Display of the latest winners - Easy to install - Easy to set up - Optimized plugin - The plugin is compatible with: 1) Economy, 2) Bank of System, 3) ServerReward -Tthe ability to change the interface text to suit your language. (Lang file) Plugin Config { "Image settings": [ { "Name": "COIN", "Path": "LuckyClick/Images/coin.png" } ], "A chance to win": 30, "Rate multiplication factor": 2.0, "Number of attempts per day": { "luckyclick.default": 600, "luckyclick.vip": 15, "luckyclick.elite": 20 }, "Minimum bid": 10.0, "Maximum bid": 100.0, "Use Economics?": false, "Use ServerReward?": false, "Use BankSystem?": true, "Name of the currency to display in the table": "RC", "Use effects when winning/losing?": true }$15.00- 3 comments
- 1 review
-
- 4
-
-
-
- #oxide
- #economics
- (and 6 more)
-

Version 1.0.0
178 downloads
This is an extension of the Magic Panel plugin that shows an icon for the Supermarket Event plugin. The icon's color and position can be set individually in the configuration file. Please note: The Magic Supermarket Event Panel only works in conjunction with the "MagicPanel" and "SupermarketEvent" plugins. Make sure you have installed these plugins before using the Event Panel. The plugin also automatically checks if any of the required plugins are missing. If this is the case, the "Supermarket Event" plugin will be automatically unloaded. #Configuration The settings and options can be configured in the MagicSupermarketEventPanel file under the config directory. The use of an editor and validator is recommended to avoid formatting issues and syntax errors. { "Active Color": "#00FF00FF", "Inactive Color": "#FFFFFF1A", "Panel Settings": { "Dock": "center", "Width": 0.02, "Order": 1, "BackgroundColor": "#FFF2DF08" }, "Panel Layout": { "Image": { "Url": "https://www.dropbox.com/scl/fi/z5u2110vdl96wfgehdet2/MagicSupermarketEventPanelIcon.png?rlkey=1ols5dhijdcgiozdcdbxesrm6&dl=1", "Enabled": true, "Color": "#FFFFFFFF", "Order": 0, "Width": 1.0, "Padding": { "Left": 0.1, "Right": 0.1, "Top": 0.05, "Bottom": 0.05 } } } } #Credits Thanks to MJSU for the Magic Panel plugin. We reworked one of the plugin extensions so that MagicPanel now also supports the Supermarket Event plugin. #Supermarket Event Trailer #Buy Supermarket EventFree -
Version 1.0.0
98 downloads
This is an extension of the Magic Panel plugin that shows an icon for the Triangulation Event plugin. The icon's color and position can be set individually in the configuration file. Please note: The Magic Triangulation Event Panel only works in conjunction with the "MagicPanel" and "Triangulation" plugins. Make sure you have installed these plugins before using the Event Panel. The plugin also automatically checks if any of the required plugins are missing. If this is the case, the "Triangulation" plugin will be automatically unloaded. #Configuration The settings and options can be configured in the MagicTriangulationEventPanel file under the config directory. The use of an editor and validator is recommended to avoid formatting issues and syntax errors. { "Active Color": "#00FF00FF", "Inactive Color": "#FFFFFF1A", "Panel Settings": { "Dock": "center", "Width": 0.02, "Order": 1, "BackgroundColor": "#FFF2DF08" }, "Panel Layout": { "Image": { "Url": "https://www.dropbox.com/scl/fi/0yiadj87yi0htkckeap76/TriangulationEventIcon.png?rlkey=5sct5foybfzmi96gmoyjcvh79&dl=1", "Enabled": true, "Color": "#FFFFFFFF", "Order": 0, "Width": 1.0, "Padding": { "Left": 0.1, "Right": 0.1, "Top": 0.05, "Bottom": 0.05 } } } } #Credits Thanks to MJSU for the Magic Panel plugin. We reworked one of the plugin extensions so that MagicPanel now also supports the Triangulation Event plugin. #Triangulation TrailerFree -
Version 1.0.0
172 downloads
This is an extension of the Magic Panel plugin that shows an icon for the Water Treatment Showdown Event plugin. The icon's color and position can be set individually in the configuration file. Please note: The Magic Triangulation Event Panel only works in conjunction with the "MagicPanel" and "Water Treatment Showdown" plugins. Make sure you have installed these plugins before using the Event Panel. The plugin also automatically checks if any of the required plugins are missing. If this is the case, the "WaterTreatmentEvent" plugin will be automatically unloaded. #Configuration The settings and options can be configured in the MagicWaterTreatmentShowdownEventPanel file under the config directory. The use of an editor and validator is recommended to avoid formatting issues and syntax errors. { "Active Color": "#00FF00FF", "Inactive Color": "#FFFFFF1A", "Panel Settings": { "Dock": "center", "Width": 0.02, "Order": 1, "BackgroundColor": "#FFF2DF08" }, "Panel Layout": { "Image": { "Url": "https://www.dropbox.com/scl/fi/qoq4lf8f1moiq2go4vns2/MagicWaterTreatmentShowdownEventIcon.png?rlkey=szxdt3wcinn61l8gwkdapqpya&dl=1", "Enabled": true, "Color": "#FFFFFFFF", "Order": 0, "Width": 1.0, "Padding": { "Left": 0.1, "Right": 0.1, "Top": 0.05, "Bottom": 0.05 } } } } #Credits Thanks to MJSU for the Magic Panel plugin. We reworked one of the plugin extensions so that MagicPanel now also supports the Water Treatment Showdown Event plugin. #Buy PluginFree-
- 1
-
-
- #magicpanel
- #water treatment showdown
- (and 6 more)
-
Version 1.0.2
343 downloads
(Addon for Restore Upon Death) Prevents the Restore Upon Death plugin from restoring player inventory in certain zones. An expansion everyone will love! Features : Simple Config Notification after death Toggle Notification Modify Chat Icon Modify Chat Prefix Permissions (bypass & nonotify) Language support (EN & DE) #Installation: Download the NoRestore.cs plugin and move it to the plugins folder, to be found under oxide\plugins directory. Dependencies Required NoRestore only works if ZoneManager & RestoreUponDeath are installed. Permissions: NoRestore.bypass - players/admins with this perm get their stuff restored NoRestore.nonotify - nonotify so players/admins with this permission no longer get a message. Example Configuration: The settings and options can be configured in the NoRestore.json file under the oxide/config directory. The use of an "JSON-Editors" is recommended to avoid formatting issues and syntax errors. { "Chat Settings": { "Chat Prefix": "<size=12><color=#AE3624>YOURSERVERNAME</color> <size=16>|</size> <color=#738D45>NoRestore</color>\n", "Notification In Chat": true, "ChatIcon (SteamID)": 76561198978132862 }, "Zone Settings": { "List ZoneIDs": [ "16846395", "25788248" ] } } Plugin Configuration: Chat Settings Chat Prefix - You can set the chat prefix (YOURSERVERNAME can be replaced with your server name) Notification In Chat - Enables or disables notification after death in general (By default, notification is enabled for the player) ChatIcon (SteamID) - Here you can add a chat icon, all you need to do is add a SteamID (By default, no SteamID is stored, so it is set to 0, i.e. deactivated!) Zone Settings List ZoneIDs - here you simply add the ZoneIDs from the ZoneManager plugin where the "NoRestore" plugin should not restore the inventory. (The ZoneIDs can be found in zone_data.json under oxide\data\ZoneManager directory.) Localization The default messages are in the NoRestore.json file under the lang/en directory. To add support for another language, create a new language folder (e.g. ru for Russian) if not already created, copy the default language file to the new folder and then customize the messages. Default Messages for en { "NoRestorCM": "Inventory was not restored!" } Credits @Krungh Crow for helpingFree -
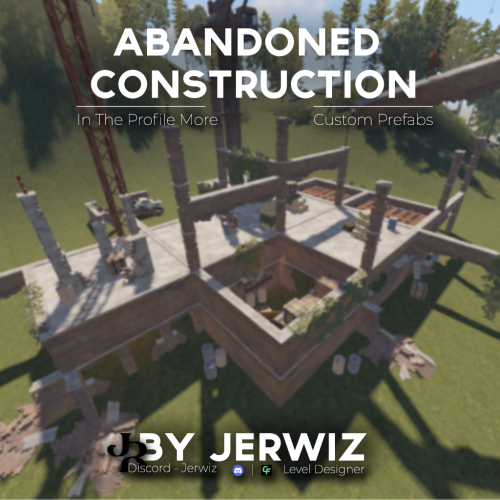
Version 1.0.0
19 downloads
This is a building under construction that has been abandoned with loot scattered all over the two floors and crane. Loot : - box 20 pcs. - loot-barrel 50 pcs. - Military Box 4 pcs. - recycler 1 pcs. it cannot be built around Other Works: if you have any questions - jerwiz$1.99 -

Version 1.0.0
3 downloads
Welcome to Codefling Hq, this is a custom hq that has 2 accessible floors with loot . You will need a blue keycard and 1 fuse to access all the loot . Every purchase 50% of the sale will be donated to codefling to show my support Features Blue keycard puzzle room (Deaths office) 2 interactive draw bridges 2 interactive vault doors 1 interactive lift Prefab count : 1803 If you have any problems you can contact discord DocNorris#5423 Please make yourself aware of the TOS-Restrictions for use. If you find any bugs or issues contact me on here or discord and il sort them out straight away DocNorris#5423$9.99- 1 comment
-
- 2
-
-
- #codefling
- #hdrp
- (and 10 more)