
A small yet powerful program for stitching and cutting webtoons/manhwa/manhua raws.
GUI Version supports most versions of Windows. Console Version works on any platform with Python installed.
It's free, but any donation is appreciated
A small yet powerful program for stitching together webtoons/manhwa/manhua raws, then slicing them down to whatever size you wish for.
The "smart" part of the name comes from the fact that it uses simple pixel calculations to avoid cutting through SFX, speech bubbles, or drawings. This makes life much easier for teams working on those raw images. [Both CLRD and TS will thank you a lot].
It's not fancy, and does not use AI, but it's fast, robust, simple, and more importantly — it works. (So I decided to share it with you!)


- Open the application.
- Browse to your raw images folder.
- Select the output file type. (Supported types: png, jpg, webp, bmp, psd, tiff, tga)
- Set the Rough Panel Height of the output files.
- Click Start Process.
- Done, enjoy!
- Files will be ordered the same way they appear in your file explorer, so make sure everything is in order (sort by name).
- Explore the advanced settings after reading the documentation to have more control over the output files.
- Put the raws you wish to stitch in a folder.
- Download the program zip file of the latest release (found in the Releases section).
- Unzip the file to a suitable location on your device.
- The application will launch, and you can proceed with the Quick Start steps above.
- Download the source code zip file of the latest release (found in the Releases section).
- Unzip the file to a suitable location on your device.
- Install Python (3.10+ required).
- Run
setup.pyeither by double-clicking it or using the terminal:python setup.py - Run
SmartStitchGUI.pyeither by double-clicking it or using the terminal:python SmartStitchGUI.py - The application will launch, and you can proceed with the Quick Start steps above.
Keep in mind that this setup is only needed once. After running setup.py, you can launch SmartStitchGUI.py directly every time.
A robust logging system has been implemented in the GUI version of SmartStitch. Almost every interaction with the program is logged. When an error occurs, the application will inform you about it and leave the details in a file in the __logs__ folder. A file is created for every day of usage. You can open an issue ticket here and attach the log file so it can be easily debugged and fixed.
Since only one person maintains this application, only tickets for version 3.0 and above will be accepted. Please don't open tickets for lower versions, since your problem could have already been solved.
Keep in mind that if the issue is critical enough, it may require a copy of the raw files you used as input. This will only be requested for special case issues.
You can also contact me on Discord if you don't want to use the GitHub Issue System. (MechTechnology#5466)
Here is the complete documentation for the application, broken down into 4 sections: basic settings, advanced settings, how to build your own version, and how to run the console version.
These are the required settings that all users should be mindful of.
Here you set the path for the input folder which contains the raws that will be processed by the program. If batch mode is enabled, it will search for subfolders within the given input path. So make sure your folder and files are in order.
Console Parameter Name: --input-folder, -i
The default output type is PNG since it is lossless. However, you can always change to other types, such as JPG. The program saves JPG at 100 quality, so there should be no noticeable loss in quality, but it is up to the user what format they want. (You can also now use PSD files for convenience if you are a Photoshop user. However, output files will not contain the layers of the original input PSD file.)
Default: .png --- Supported Types: png, jpg, webp, bmp, psd, tiff, tga --- Console Parameter Name: -t
Here you set the size that you want most output panels to roughly be. The program uses it as a guide to see where to slice/cut the images. However, it IS ROUGH, meaning if the program finds bubbles/SFX/anything at that specific pixel length, it will try to find the next closest position where it can cut the image. Thus, the output size of each image will vary because of that, but they will all be roughly around this size.
Default: 5000 --- Console Parameter Name: -sh
This is very straightforward. It adds a setting to select one of three modes to enforce changes on the image width:
- 0 => No Enforcement: Load the files as-is and work on them. If they vary in size, you will get some black lines on the sides. (Highest quality as there are no changes to the pixel values.)
- 1 => Automatic Uniform Width: Force all files to have the same width as the smallest file in the input folder.
- 2 => User Customized Width: The user specifies the width they want via the Custom Width parameter. (Please just use waifu2x for upscaling raws; do not use this mode for it.)
Default: 0 --- Value Range: 0-2
Default Custom Width: 720 --- Console Parameter Name: -cw
Console only supports custom width or no enforcement.
You can have multiple chapter folders in the input folder. The program will automatically search the nested tree and treat every folder within the input folder as its own chapter, processing them individually. It will skip folders with no images.
These settings are for more tech-savvy users, or people that find themselves in a special case that needs fine-tuning.
Detector type is a very simple setting. Currently, there is a Smart Pixel Comparison detector, which is the default way of edge detection in this program, and Direct Slicing, which cuts all panels to the exact size that the user inputs in the Rough Panel Height field.
Default: Smart Pixel Comparison --- Console Parameter Name: -dt
Before slicing at a specific height, the program checks the row of pixels it will slice at for bubbles/SFX/anything. It compares neighboring pixels for any drastic jump in value (the allowed tolerance for jumps in pixel value is the Object Detection Sensitivity).
If there is too big of a jump in value between the pixels, that means there is something that shouldn't be cut, so it moves up a pixel row and repeats. For 100 sensitivity, it means if the entire pixel row does not have the exact same pixel value/color, it will not slice at it. For 0 sensitivity, it does not care about the pixel values and will cut there, essentially turning the program into a normal dumb image slicer.
Default: 90 --- Value Range: 0-100 --- Console Parameter Name: -s
This is the step at which the program moves if it finds the line it's on to be unsuitable for slicing. Meaning, when it moves on to the next line, it moves up/down X number of pixels to a new line, then it begins its scan algorithm once again. This X number of pixels is the Scan Line Step. Smaller steps should give better results, but larger ones save computational power.
Default: 5 --- Value Range: 1-100 --- Console Parameter Name: -sl
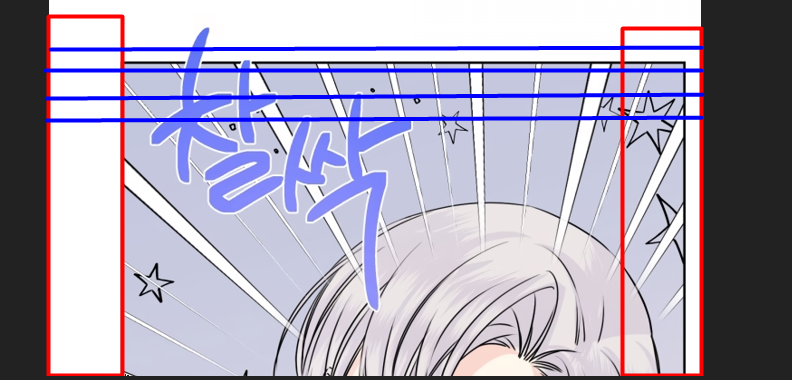
This gives the option to ignore pixels on the border of the image when checking for bubbles/SFX/anything. Why, you might ask? Borders do not make the detection algorithm happy, so in some cases, you want it to start its detection only inside said border. Be careful what value you set this to, since if it's larger than the image, it will cause the program to crash/stop its operation.
Default: 0 --- Console Parameter Name: -ip
Red being the area ignored because of the Ignorable Border Pixels, and the blue lines would be the lines that the application tests for where it can slice. (This example does not use the default values for those parameters.)
For those working on various projects that require different stitching settings for each of them, you can now have multiple settings profiles that you can create and name as you like. Selecting the profile from the dropdown will update all the program settings to that of the selected profile. This can, for example, be very useful when working with manhwas and manhuas of different resolutions.
This setting is for convenience, mainly for heavy users.
(GUI Only) With this option, one can set a specific console process to be fired on the output files of the application. For example, you can set it to fire waifu2x on the output files, so you can have the best raw processing experience. So how do we set that up?
- Navigate to the Post Process tab.
- Enable the "Run postprocess after completion" flag.
- Set the process path/location. You can essentially browse to the process' exe file.
- Set the arguments you want to pass to the process (use the argument
[stitched]to pass the output directory to your process). - Optional: Use the argument
[processed]to pass a custom output directory to your process for those that can't create their own output.
Of course, you can use whatever version of waifu2x or process that you want. This is just an example of what I set up for myself.

- Download the source code zip file of the latest release (found in the Releases section).
- Unzip the file to a suitable location on your device.
- Install Python (3.10+ required) and uv.
- From the terminal, navigate to the directory where the source code was unzipped and run:
uv run task console -- --help
- Download the source code zip file of the latest release (found in the Releases section).
- Unzip the file to a suitable location on your device.
- Install Python (3.10+ required).
- Open a terminal and run:
pip install numpy pillow natsort - From the terminal, navigate to the directory where the source code was unzipped and run the command as per the usage details below.
python SmartStitchConsole.py [-h] -i INPUT_FOLDER
                                  -sh SPLIT_HEIGHT
                                  [-t {.png,.jpg,.webp,.bmp,.psd,.tiff,.tga}]
                                  [-cw CUSTOM_WIDTH]
                                  [-dt {none,pixel}]
                                  [-s [0-100]]
                                  [-lq [1-100]]
                                  [-ip IGNORABLE_PIXELS]
                                  [-sl [1-100]]

required arguments:
  -i INPUT_FOLDER, --input-folder INPUT_FOLDER    Sets the path of Input Folder
  -sh SPLIT_HEIGHT                                Sets the value of the Rough Panel Height

optional arguments:
  -h, --help                                      Show this help message and exit
  -t {.png,.jpg,.webp,.bmp,.psd,.tiff,.tga}       Sets the type/format of the Output Image Files
  -cw CUSTOM_WIDTH                                [Advanced] Forces Fixed Width for All Output Image Files, Default=None (Disabled)
  -dt {none,pixel}                                [Advanced] Sets the type of Slice Location Detection, Default=pixel (Pixel Comparison)
  -s [0-100]                                      [Advanced] Sets the Object Detection Sensitivity Percentage, Default=90 (10 percent tolerance)
  -lq [1-100]                                     [Advanced] Sets the quality of lossy file types like .jpg if used, Default=100 (100 percent)
  -ip IGNORABLE_PIXELS                            [Advanced] Sets the value of Ignorable Border Pixels, Default=5 (5px)
  -sl [1-100]                                     [Advanced] Sets the value of Scan Line Step, Default=5 (5px)
python SmartStitchConsole.py -i "Review me" -sh 7500 -t ".png"
# This will run the application on input_folder of "./Review me" with split_height of 7500 and output_type of ".png"
- Install Python (3.10+ required) and uv.
- Run
setup.pyeither by double-clicking it or using the terminal:python setup.py - From the terminal, navigate to the directory where the source code was unzipped and run:
uv run task build
- Install Python (3.10+ required) and uv.
- Run
setup.pyeither by double-clicking it or using the terminal:python setup.py - From the terminal, navigate to the directory where the source code was unzipped and run:
uv run task build-no-icon
- The output compiled application will not need Python installed to run, but will only run on the platform it was built/compiled on.
- Mac and Linux compiling was not tested by me, so uh... good luck xD