Fluid is a somewhat old app, but can be rather useful. It containerizes any website, making it into an “app” that you can put in the dock and assign to a desktop – things you can’t exactly do with a browser window. iOS has an analogous builtin functionality where you can add a web page to your home screen, but Apple hasn’t done this for macOS (yet). I have a number of Fluid Apps I use on a daily basis and I find them very useful.
After updating to Sequoia however, I was rather irked that Apple’s new security settings did not afford me the opportunity to say, “Hey, I’ve been using these apps for years. I created them. I trust them. I trust the Fluid app developer. Just let me run them.”
When I first tried to launch my trusty self-created apps, I would be presented with 2 cryptic errors:
(“RT” by the way, is the ticketing system we use at work to track user requests. When I’m on “RT duty”, I switch to my RT desktop and start handling tickets. I have a self-rolleddesktop-based time tracking system, so time I spend on that desktop goes toward my “RT Project”.)
I figured out a way around this irksome conundrum using code signing (which requires that you install xcode developer tools), but first, you have to remove what Apple now classifies as “detritus” with the following error if you try to code-sign an app that has things like resource forks:
$ codesign --force --deep -s - RT.app
RT.app: replacing existing signature
RT.app: resource fork, Finder information, or similar detritus not allowed
To remove the “detritus” and then code-sign an app (I’m using my RT.app), run the following in the Terminal.app:
Be aware that `xattr -cr` removes all the app’s newly Apple-disallowed attributes, which may brick the app? In my case, it didn’t seem to break anything, but if you want to see what it will remove, to understand what will happen, you can list the attributes with `xattr -lr RT.app`.
From now on, you should be able to launch and use the app!
It has been quite awhile since I’ve had any new blog posts, but I just fixed an issue with my Obi200 related to the recent ObiTALK shutdown on May 31st:
and I thought I would just throw up my rough notes on the process.
I’m not going to get into the details of that flow or how to modify it to reboot your Obi200, but I will say that basically, I have my Obi200 plugged into a smart outlet, which my flow power-cycles when it detects that the Obi200 has lost its connection. (I noted during this process that it may be possible to trigger a reboot using its API, but I didn’t try that.)
My flow stopped working sometime around May 31st. That’s because MrTom’s flow was looking for a substring in the status xml file that was related to the ObiTALK status (“Normal (User Mode)”) instead of the google voice connection status. My Obi200 continues to work with google voice. (There’s just no way to (easily) reconfigure it if the GV account ever changes.) I debugged the issue on the command line using this curl command:
Note that you have to use --digest or you get a 401 error response. Adding --digest actually initially responds with another 401, but curl apparently makes a second request that succeeds. Not sure what that’s about.
This is the relevant section of the output:
<object name="SP1 Service Status" access="readOnly" minEntries="0" maxEntries="4" numEntriesParameter="NumberOfLines" enableParameter="Enable" subtitle="SP1 Service Status" status="true" notify="true" >
<parameter name="Status" provision="false" access="readOnly" >
<description >
Status of this service
</description>
<syntax >
<string >
<size maxLength="128" >
</size>
</string>
</syntax>
<value hash="f84a7e6" type="input" default="" current="Connected" >
The thing to look for to determine the google voice status is the xml element named “SP1 Service Status” (“service provider 1”) and its contained value element’s “current” attribute (“Connected”). There are 4 possible service provider status elements. I have 2 configured and according to google, “SP1” is (likely) google. I don’t actually know what my SP2 slot is configured for. I thought all I had was google voice, so I suggest exploring your 4 slots to see what slot is related to your desired provider whose status you want to monitor.
The connected status of my SP1 provider is confirmed on the obi200’s web interface. Once you log into the device using it’s IP address, the SP1 status can be found on the system status page:
That json element path may be different in your setup/Obi firmware version. You can explore the path from the beginning using a debug node and changing the value to output using each step of the msg path from msg.paylod to msg.payload.model.object[4].parameter[0].value[0].$.current
Useful obi info I found when looking into this:
The ObiTALK portal, which was used to set up OBi devices with Google Voice, has been shut down as of October 31st, 2024. Therefore, you cannot manually connect your OBi200 to Google Voice using the traditional OBiTALK setup method.
Important Information:
Discontinued Support: All OBi devices that worked with consumer Google Voice have been discontinued by HP/Poly.
No New Setups: You cannot add, remove, or configure consumer Google Voice service on OBi devices through the ObiTALK portal.
Existing Devices May Still Work (for now): If your OBi200 was already configured with Google Voice before the ObiTALK shutdown, it may continue to function for an undetermined period.
No Alternative Direct Setup: There are no other devices from any manufacturer that work directly with consumer Google Voice, and there are no plans to change this.
What You Can Do:
Since direct manual setup through ObiTALK is no longer possible, you will need to consider alternative options:
If your OBi200 is already configured with Google Voice: You can continue to use it as long as it works, but be aware that support is limited.
If you need a new VoIP solution: You will need to explore other VoIP providers and devices that offer compatible features with your needs. Some providers may offer SIP credentials that allow you to connect your OBi device, but this would require configuring the device directly through its web interface, not the ObiTALK portal.
Migrate to a different service provider: Providers like Anveo may offer alternative methods to connect your OBi device using SIP credentials.
In summary, it is no longer possible to manually connect an OBi200 to Google Voice using the ObiTALK portal due to its shutdown. You should explore other VoIP options or verify if your already configured OBi200 is still working.
Many product manufacturers provide remote controls with their devices that have toggle buttons on them, e.g. many TV remotes have a single power button, and that same button turns the TV off if on or on if off. This makes it difficult to create automations using the RM Mini 3 that only turn a device (for example) off (and not on).
When my dad got a new TV, he gave me his old (dumb) LG TV. It did not have a working CEC interface so that I could control the power and inputs via HDMI from my Raspberry Pi 3B+, so I set about controlling it from my BroadLink RM Mini 3. The only problem was the toggles. I learned via searching that not only did discrete, single function IR codes exist, but that the information for obtaining and converting those codes in a fashion that was compatible with my RM Mini 3 was mixed and dubious. Most of what was out there related to HomeAssistant, and doesn’t work for Homebridge’s homebridge-broadlink-rm plugin. After days of trial and error, I eventually worked out how to retrieve and convert the codes…
Back in 2020, I posted a procedure I had worked out to extract ALL of the hex codes that had been recorded in a BroadLink RM Mini 3 en masse in order to eliminate the need to re-record every button individually (which could be impossible if the physical remote is either broken or missing).
Well, BroadLink changed the game. They replaced their e-Control app with a new BroadLink app, and the trick I originally used to obtain all of the codes no longer works. I’d received a new red RM Mini 3 for christmas, was unable to set it up using e-Control, installed the new app, and being blissfully unaware of the new limitations, I lazily added codes over some time, thinking I could extract them later when I wanted to create new automations.
Once I learned that I couldn’t use the old trick, I set about figuring out a workaround, and I succeeded. I took notes and commented on the old post that I’d send the raw version of the notes to anyone who requested them, and I have received numerous such requests, so I figured it was time to share them in a new post…
While I will not be reviewing how to get homebridge or the plugin up and running and configured, I will provide a few tips that may save you some aggravation:
If you have multiple RM Mini 3’s, you will need a hosts section at the top level of the plugin’s config and each accessory will need a “host” item with the static DHCP address of the device
Note that even though the packaging of the red BroadLink RM Mini says it is a “3”, it has the same or similar firmware as the RM 4, so you need to add the isRM4 item and set it to true.
You need to “unlock” the mini in the BroadLink app under Home -> <Your Mini> -> ... -> Property -> Lock device
Now, to extract the codes, here is what you need to do…
Login using the same BroadLink account you used with the BroadLink app. (Note, you will see it populate with your devices & codes, but they will not work – that’s OK. All we need is the unencrypted device data.)
On your Mac…
Connect your iPhone to your Mac using a USB/Lightning cable
Click the iPhone in a Finder window’s left pane (Note: iPhone Synching has moved from the old iTunes app to the Finder)
Click “Trust” on the Finder window to trust your iPhone (if prompted)
Unlock your iPhone and tap “Trust” when the dialog appears prompting you to trust your computer
In the Finder window with your phone selected…
Select the General tab in the finder window
Select Backup all of the data on your iPhone to this Mac
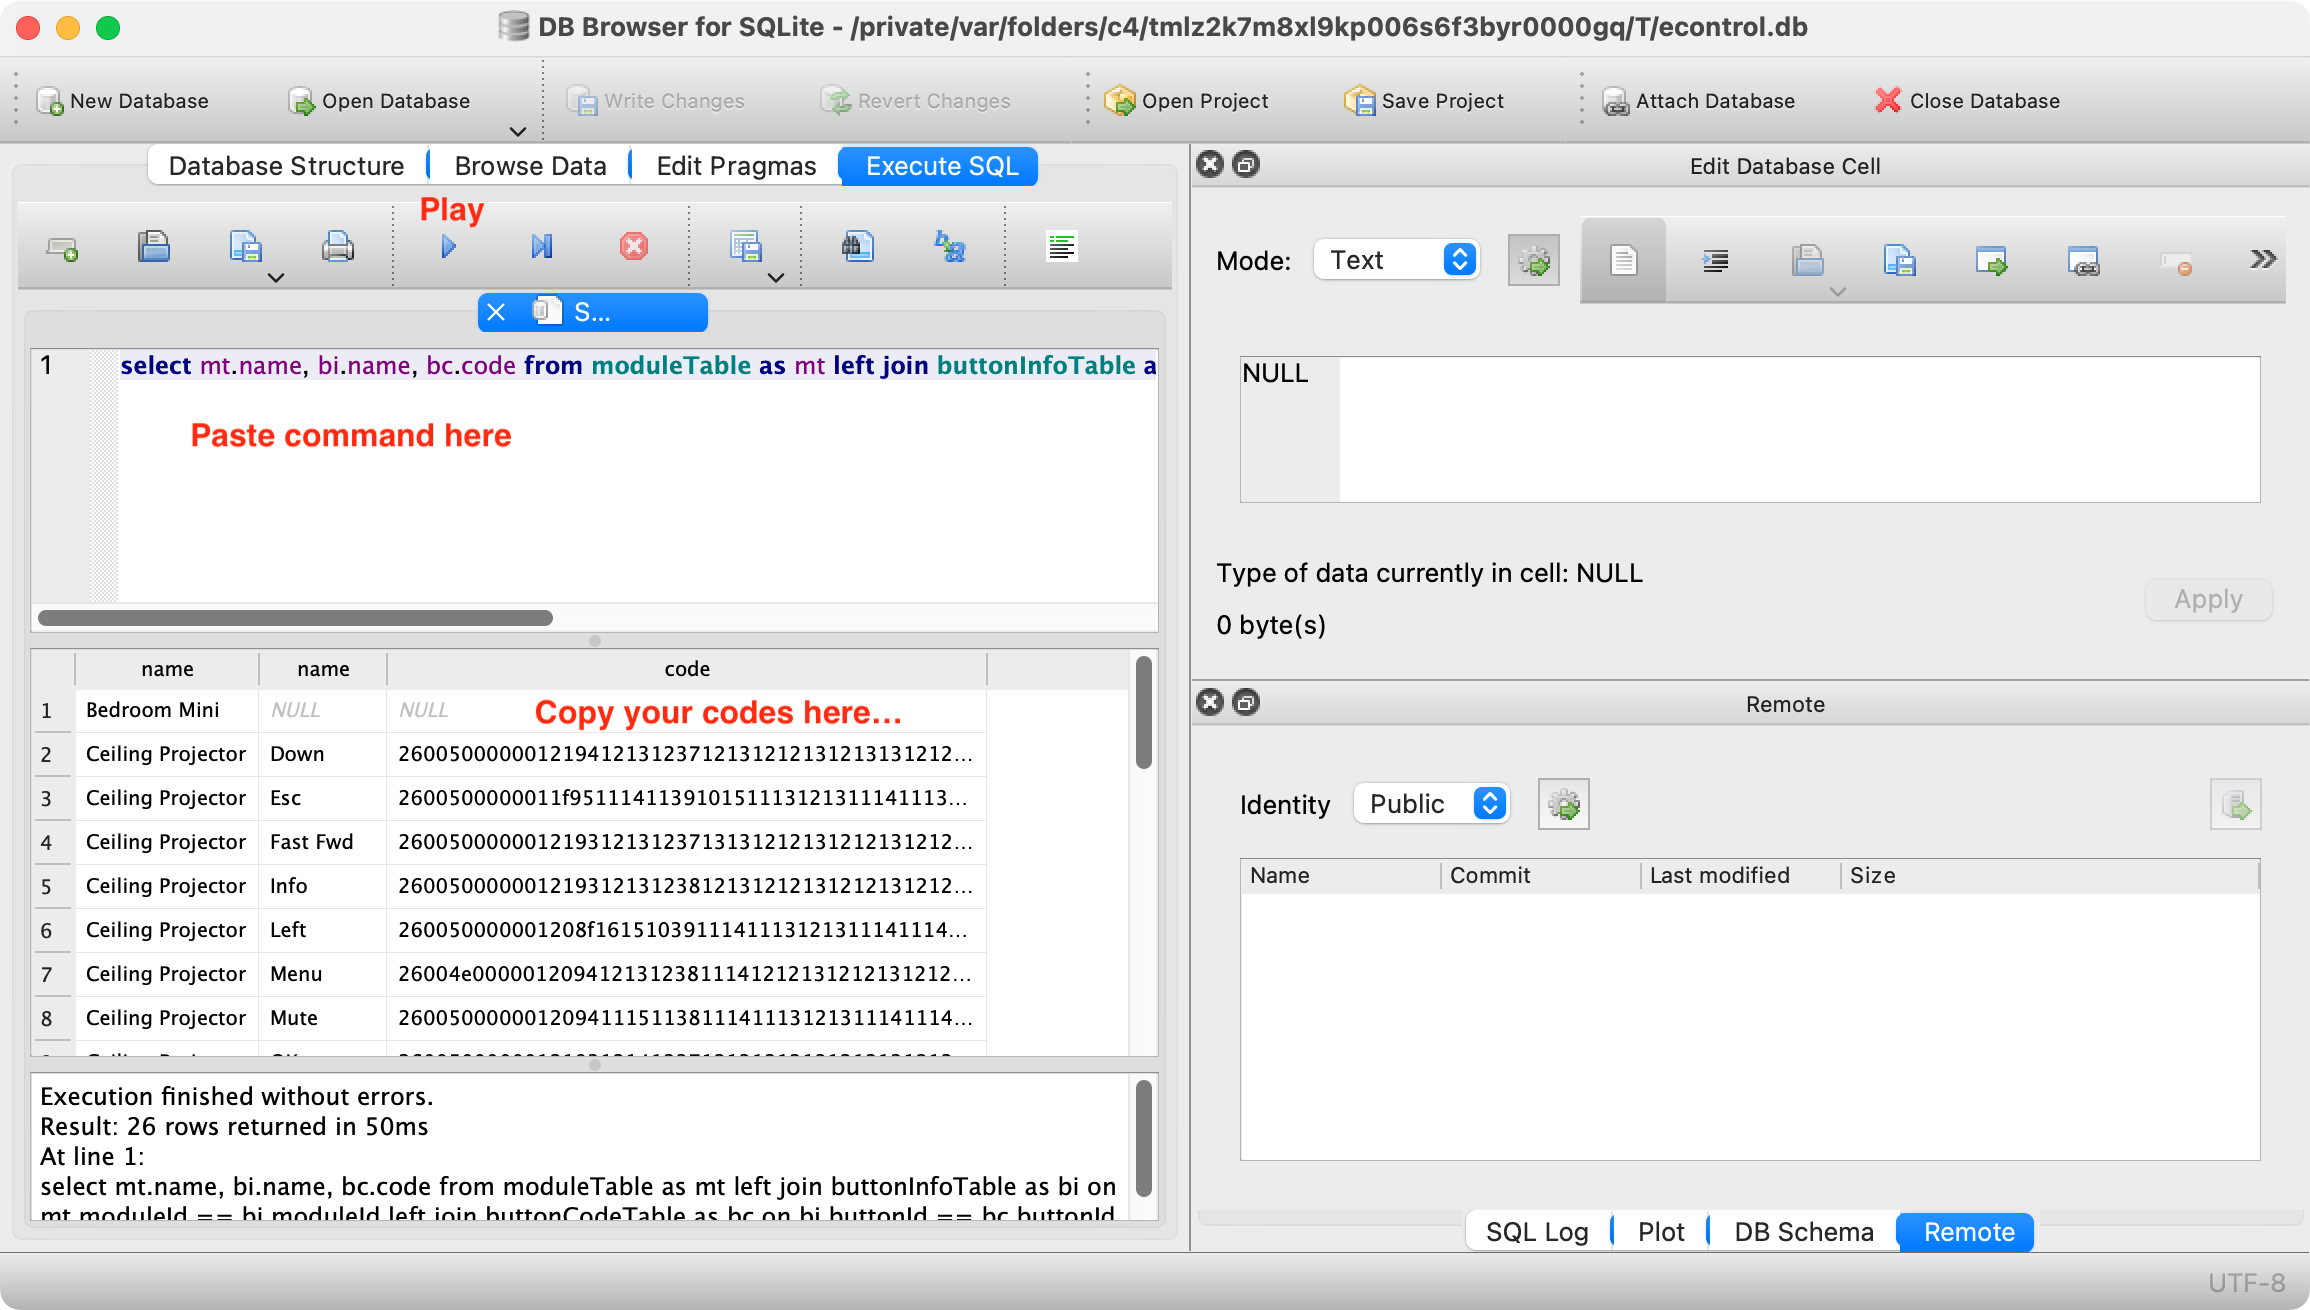
Make sure that the code column is populated. These are your button codes that you are looking for, but they don’t come with the button names. To get every code labeled, we are going to execute an SQL command…
Click the Execute SQL tab
In the top pane, paste this command: select mt.name, bi.name, bc.code from moduleTable as mt left join buttonInfoTable as bi on mt.moduleId == bi.moduleId left join buttonCodeTable as bc on bi.buttonId == bc.buttonId
Click the blue play button
Click in the resulting table in the pane below and copy its contents (e.g. command-a to select all and command-c to copy)
Paste the results into a text file (e.g. using Text Edit.app) or excel document
Use the hex codes in the last column to add accessories to your homebridge config file. (The columns are Remote name, Button Name, Button ID, Code ID, and Hex Code. Note, if you created any combo buttons that send a series of codes, there will be repeated hex codes and Button IDs.)
In your homebridge-broadlink-rm config settings, paste your codes.
Here’s an example of an accessory entry in the homebridge config.json file:
When the Coronavirus Pandemic hit and I started working from home, I started worrying about my elderly parents who could no longer babysit my niece and nephew on a regular basis, go to church, go to restaurants, meet with friends, etc.. They were getting lonely and were starting to feel the strain of their new-found isolation. Since I had recently bought them a Wyze cam for Christmas and had one of my own, and had previously shared those feeds to help me monitor their security feed, I hacked together a sub-standard and annoying “portal” using the cameras and our respective iPads. Theirs was in their family room and I set mine up in my office. For most of the year, I kept them company during the work day and it did wonders for their ability to cope with this new world.
The solution had all sorts of problems though. There was a significant audio delay, the connection would go down from time to time, the Wyze interface was difficult for my parents to use, I had to wear headphones to prevent echo feedback (since Wyze has no echo cancellation), and it seemed that the connection would get choppy whenever they pulled out their phones (seemed like an interference issue). I’d bought them a WiFi Extender , but it didn’t seem to help. During a particularly choppy conversation recently, I started googling for alternate solutions and I happened upon a github project called teleportme by PaperCutSoftware, which was a simple scheduled shell script on a pair of Mac Minis running FaceTime to establish a portal between 2 coastal offices above each office’s water coolers. They were scheduled to establish a FaceTime call every morning and hang up after work. I wouldn’t have thought of using FaceTime running for hours a day, but apparently it was possible and reliable – and you don’t need a cell provider account to use it, so I set out to see if I could do this using a pair of iPads. Using tips from their setup, this is how I figured out how to do it. Continue reading →
UPDATE: A new version of this article was just published, as the procedure in this article no longer works using BroadLink’s new app…
The homebridge-broadlink-rm plugin for homebridge allows you to automate your devices which have an IR (infrared) remote by emitting those button codes from a Broadlink RM Mini3. You can add individual “buttons” that exist in the RM Mini’s iPhone app (e-Control), by adding the button’s hex code to homebridge’s configuration file (~/.homebridge/config.json).
The homebridge plugin provides a way to obtain these codes, one-at-a-time, by using the “Learn” button it adds to your Home app. You tap the Learn button, then point your remote at the RM Mini3 and hit the button you want to be able to control. The hex code can then be retrieved from the homebridge log file.
However, if you have numerous remotes with numerous buttons already programmed into the RM Mini3, and some remotes in a drawer, some without batteries, this can be a quite long and tedious process. I personally had 238 individual codes programmed into my RM Mini3 and some of my remotes took coin batteries that were dead and I had no replacements on hand. So I wanted a way to grab all of the codes at once without having to manually re-record all of the button presses. I worked out the process to do this last night, and googling this stuff was rather laborious, so I am posting what I learned here.
In the “cn.com.broadlink.e-Control” folder you saved on your computer, locate and drag the e-Control database file “cn.com.broadlink.e-Control/Documents/BroadLinkDeviceList.sqlite” onto the DB Browser for SQLite app
Click the “Execute SQL” tab
In the top left text area, paste the following SQL query (without the quotes): “select s.name, b.name, c.buttonID, c.codeID, hex(c.code) from broadlink_subir as s left join broadlink_button as b using(subirID) left join broadlink_code as c using(buttonID)“
Click in the resulting table in the pane below and copy its contents (e.g. command-a to select all and command-c to copy)
Paste the results into a text file (e.g. using Text Edit.app) or excel document
Use the hex codes in the last column to add accessories to your homebridge config file. (The columns are Remote name, Button Name, Button ID, Code ID, and Hex Code. Note, if you created any combo buttons that send a series of codes, there will be repeated hex codes and Button IDs.)
Here’s an example of what you will get:
TV Power 171 177 26003C00211A3E1A20000B97201A211A3E1A201A211A201A211A201A2037201A3F1A20000B962119211A3E1A211A201A201A211A201A2136211A3E1A20000D05000000000000000000000000
TV Source 172 178 26004E00211A3E1A211A201A211A201A2037201A211A3E1A211A20000B96211A3E1A201A211A201A211A2036211A201A3F1A201A20000B97201A3F19211A201A211A201A2037201A211A3E1A211A20000D0500000000000000000000
And here’s an example of an accessory entry in the config.json file:
My wife and I each got new iPhones recently (exactly a month ago today). We had some difficulty getting our phones to make calls initially, but that’s another story, as is the story of the erroneous double charge for the Sprint upgrade/activation (both Apple and Sprint charged for the same activation and I’d been signed up without consent for the Sprint Complete protection plan!). I think in the past month, we’ve spent nearly 10 hours combined speaking to Sprint reps for all the issues, possibly more (and there’s probably a call yet to be had to address an incomplete refund for those erroneous charges).
But I digress, so let me jump straight into the how-to to reconnect your iPhone to the Airave 2.5… Continue reading →
In How to Create Real Recurring Location-based iOS Reminders, I described a method using IFTTT to mark location-based reminders as incomplete. Shortly after that post, I upgraded my iPhone to iOS 13 and quickly discovered that the update broke then IFTTT iOS Reminders service. All triggers and actions in the service no longer worked as expected (or at all), including IFTTT’s Reminder Completed in List trigger. So I was back to dismissing my recurring location-based reminders without marking them as complete. And on top of that, despite the additional functionality of the new Reminders app, I started encountering all sorts of issues, including the fact that Reminders in Notification Center started randomly turning itself off. While I haven’t found a solution to that and other new Reminders issues, I did come up with a solution to replace IFTTT’s broken Reminder Completed in List trigger. Read on to discover how… Continue reading →
My parents are getting up there in age and awhile back, I was dismayed when my dad asked me if a message from “Apple” on his answering machine about his iCloud account being hacked was real (he thought it was!).
I’d been suggesting for awhile that he port his number to google voice so he could stop paying for land line service. I’d looked up how to go about doing it. But I’d been second guessing that option after reading some horror stories about people losing their life-long phone numbers. Plus, I wasn’t too thrilled about google listening in on all their calls.
I had set up Nomorobo for them some time ago, and it was effective for awhile, but the telemarketing industry and scammers started spoofing random local numbers. So they were getting multiple scam calls a day and I worried about them falling for a phishing scam, or worse. Their neighbor had fallen victim to a scam where a caller pretended to be their grandson and needed bail money asap. She ended up being scammed out of $10k.
I had looked through all the services from my parents’ landline provider for blocking callers, etc, but the options were very limited, even though they had a VOIP service through their cable company. There was no way to implement a white list (a list of known callers that are allowed to call you), nor was there a way to implement call screening other than caller ID.
But I recently had an inspiration based on the way nomorobo is set up. I could do both – whitelist all my parents known callers and send the rest through call screening using google voice, without porting their number and without (the majority of) their calls being listened in on by google! Read on to find out how… Continue reading →
Inexplicably, iOS Reminders do not have a repeat option underneath their “Remind me at a location” setting when creating a reminder, or a “Remind me next time” (…I arrive here) selection when you hard-press a reminder notification. The only way to hackily get repeated location-based reminders is to never mark them as completed. The problem with that way of dealing with location-based reminders is that 1. they eventually disappear from your notifications and 2. you cannot tell whether you’ve actually completed the reminded task or it is still yet to be done.
I have figured out a way to create recurring location-based reminders using: