
Validation in Spring Boot is the process of checking whether user input satisfies predefined rules before it is processed by the application. It helps ensure data accuracy, consistency, and security by preventing invalid data from entering the system.
- Uses annotation-based validation for simple implementation.
- Improves application reliability and data integrity.
- Generates meaningful error messages for invalid requests.
Real world Example: In a User Registration System, validation checks user inputs before saving them. For example, @Email ensures a valid email address, @NotBlank prevents empty names, and @Min(18) ensures the user is at least 18 years old. This helps maintain accurate and reliable data.
Step-by-Step Implementation
Step 1: Create a Spring Boot Gradle Project
- Create a new Spring Boot project.
- Configure the project using Gradle.
- Set Java version and project details.
Add the required dependencies in the build.gradle file:
- spring-boot-starter-web
- spring-boot-starter-validation
- spring-boot-starter-data-jpa
- h2-database
Project Structure:
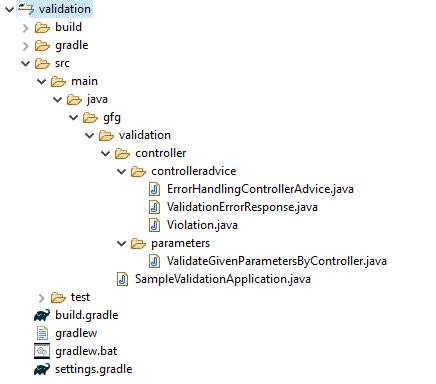
Step 2: Create the Main Application Class
- Create the main Spring Boot class.
- Annotate the class with @SpringBootApplication.
- Run the application using SpringApplication.run().
import org.springframework.boot.SpringApplication;
import org.springframework.boot.autoconfigure.SpringBootApplication;

@SpringBootApplication
public class SampleValidationApplication {

    public static void main(String[] args) {
        SpringApplication.run(SampleValidationApplication.class, args);
    }
}
Step 3: Create a Global Exception Handler
- Create a class named ErrorHandlingControllerAdviceSample.
- Annotate it with @ControllerAdvice.
- Handle validation exceptions using: ConstraintViolationException , MethodArgumentNotValidException
import javax.validation.ConstraintViolation;
import javax.validation.ConstraintViolationException;

import org.springframework.http.HttpStatus;
import org.springframework.validation.FieldError;
import org.springframework.web.bind.MethodArgumentNotValidException;
import org.springframework.web.bind.annotation.ControllerAdvice;
import org.springframework.web.bind.annotation.ExceptionHandler;
import org.springframework.web.bind.annotation.ResponseBody;
import org.springframework.web.bind.annotation.ResponseStatus;

@ControllerAdvice
class ErrorHandlingControllerAdviceSample {

  @ExceptionHandler(ConstraintViolationException.class)
  @ResponseStatus(HttpStatus.BAD_REQUEST)
  @ResponseBody
  ValidationErrorResponse onConstraintValidationException(ConstraintViolationException e) {
    ValidationErrorResponse error = new ValidationErrorResponse();
    for (ConstraintViolation violation : e.getConstraintViolations()) {
      error.getViolations().add(new Violation(violation.getPropertyPath().toString(), violation.getMessage()));
    }
    return error;
  }

  @ExceptionHandler(MethodArgumentNotValidException.class)
  @ResponseStatus(HttpStatus.BAD_REQUEST)
  @ResponseBody
  ValidationErrorResponse onMethodArgumentNotValidException(MethodArgumentNotValidException e) {
    ValidationErrorResponse error = new ValidationErrorResponse();
    for (FieldError fieldError : e.getBindingResult().getFieldErrors()) {
      error.getViolations().add(new Violation(fieldError.getField(), fieldError.getDefaultMessage()));
    }
    return error;
  }

}
Step 4: Create a Validation Error Response Class
- Create a class named ValidationErrorResponse. This class collects all validation errors and sends them as a structured response to the client
- Add a list to store validation violations.
import java.util.ArrayList;
import java.util.List;

public class ValidationErrorResponse {

  private List<Violation> violations = new ArrayList<>();

  public List<Violation> getViolations() {
    return violations;
  }

  public void setViolations(List<Violation> violations) {
    this.violations = violations;
  }
}
Step 5: Create a Violation Class
- Create a class named Violation.
- Add: fieldName , message
- Each object of this class represents a single validation error with its field name and error message.
public class Violation {

  private final String fieldName;

  private final String message;

  public Violation(String fieldName, String message) {
    this.fieldName = fieldName;
    this.message = message;
  }

  public String getFieldName() {
    return fieldName;
  }

  public String getMessage() {
    return message;
  }
}
Step 6: Create a Controller for Validation
- Create a REST controller named ValidateGivenParametersByController.
- Annotate the class with: @RestController , @Validated
- The @Validated annotation enables validation for method parameters and request data.
import javax.validation.ConstraintViolationException;
import javax.validation.constraints.Min;
import javax.validation.constraints.Max;
import javax.validation.constraints.Email;
import javax.validation.constraints.Positive;
import javax.validation.constraints.NegativeOrZero;

import org.springframework.http.HttpStatus;
import org.springframework.http.ResponseEntity;
import org.springframework.validation.annotation.Validated;
import org.springframework.web.bind.annotation.ExceptionHandler;
import org.springframework.web.bind.annotation.GetMapping;
import org.springframework.web.bind.annotation.PathVariable;
import org.springframework.web.bind.annotation.RequestParam;
import org.springframework.web.bind.annotation.ResponseBody;
import org.springframework.web.bind.annotation.ResponseStatus;
import org.springframework.web.bind.annotation.RestController;

@RestController
@Validated
class ValidateGivenParametersByController {

  @GetMapping("/validatePathVariable/{id}")
  ResponseEntity<String> validatePathVariable(@PathVariable("id") @Min(5) int id) {
    return ResponseEntity.ok("valid");
  }

  @GetMapping("/validateRequestParameterWithMin")
  ResponseEntity<String> validateRequestParameterWithMin(@RequestParam("id") @Min(0) int id) {
    return ResponseEntity.ok("valid");
  }

  @GetMapping("/validateRequestParameterWithMax")
  ResponseEntity<String> validateRequestParameterWithMax(@RequestParam("id") @Max(5) int id) {
    return ResponseEntity.ok("valid");
  }

  @GetMapping("/validateRequestParameterWithEmailId")
  ResponseEntity<String> validateRequestParameterWithEmailId(@Email @RequestParam(name = "emailId")  String emailId) {
    return ResponseEntity.ok("valid");
  }

  @GetMapping("/validateRequestParameterWithPositive")
  ResponseEntity<String> validateRequestParameterWithPositive(@Positive @RequestParam(name = "id")  int id) {
    return ResponseEntity.ok("valid");
  }

  @GetMapping("/validateRequestParameterWithNegativeOrZero")
  ResponseEntity<String> validateRequestParameterWithNegativeOrZero(@NegativeOrZero @RequestParam(name = "id")  int id) {
    return ResponseEntity.ok("valid");
  }

  @ExceptionHandler(ConstraintViolationException.class)
  @ResponseStatus(HttpStatus.BAD_REQUEST)
  @ResponseBody
  String handleConstraintViolationException(ConstraintViolationException e) {
    return "Given input is not valid due to validation error: " + e.getMessage();
  }

}
Step 9: Run the Application
The application starts on port 8080 by default and becomes ready to process validation requests.
- Open Terminal or IDE.
- Run the Spring Boot application.
Via the command line, we can execute the project as follows

Now let us test the following
Test 1:
http://localhost:8080/validatePathVariable/90
This is valid as we have the code as id should be @Min(5)). At the same time, if we pass as
http://localhost:8080/validatePathVariable/1
the error will be thrown

Test 2:
http://localhost:8080/validateRequestParameterWithMin?id=-10
Here @Min(0) is applied and hence we can see below the validation error message

Test 3:
http://localhost:8080/validateRequestParameterWithMax?id=10
Here @Max(5) is applied and hence

Test 4:
http://localhost:8080/validateRequestParameterWithEmailId?emailId=a.com
Here emailId is not properly given

Test 5:
http://localhost:8080/validateRequestParameterWithPositive?id=-200
So only positive numbers alone are accepted

Test 6:
http://localhost:8080/validateRequestParameterWithNegativeOrZero?id=100
So only negative or zero only accepted
