The RowMapper interface in Spring JDBC is used to map each row of a ResultSet to a Java object. It works with the JdbcTemplate.query() method, making it easy to convert database records into model objects while reducing boilerplate JDBC code.
- RowMapper is a callback interface provided by Spring JDBC.
- Maps each row of a ResultSet to a Java object.
- Used with the JdbcTemplate.query() method.
Syntax
public interface RowMapper<T> {
T mapRow(ResultSet rs, int rowNum) throws SQLException;
}
- ResultSet rs: Contains the current row data.
- int rowNum: Represents the current row number.
JdbcTemplate query() Method
The query() method executes a SELECT query and internally calls the mapRow() method for each record returned by the database.
Syntax:
public <T> List<T> query(String sql, RowMapper<T> rowMapper)
mapRow() Method
The mapRow() method is the only method of the RowMapper interface. You must implement this method to define how a single row from the database should be converted into a Java object.
Syntax:
public T mapRow(ResultSet rs, int rowNum) throws SQLException
How It Works?
- JdbcTemplate.query() executes the SQL query.
- The database returns a ResultSet.
- Spring calls the mapRow() method for each row.
- mapRow() converts each row into a Java object.
- All objects are collected into a List and returned.
Step By Step Implementation of RowMapper in Spring Application.
Follow these steps to implements RowMapper interface.
Step 1: Create Table
Create a Student table in MySQL and insert sample data.
CREATE TABLE STUDENT(
id INT,
name VARCHAR(45),
department VARCHAR(45));
After creating the table we will insert the following data in our table.
INSERT INTO STUDENT VALUES(1, "geek", "computer science");
Step 2: Create a Maven Project
Create a new Maven project and organize the source files according to the Spring JDBC project structure. Use your preferred IDE to create a new Spring Boot project with the following settings:
- Name: spring-row-mapper
- Language: Java
- Type: Maven
- Packaging: Jar
Click on the Next button
Step 3: Add Dependencies
Add the following dependencies to your pom.xml
<project xmlns="https://maven.apache.org/POM/4.0.0"
         xmlns:xsi="https://www.w3.org/2001/XMLSchema-instance"
         xsi:schemaLocation="https://maven.apache.org/POM/4.0.0
                             https://maven.apache.org/xsd/maven-4.0.0.xsd">
  <modelVersion>4.0.0</modelVersion>
  <groupId>com.geeksforgeeks</groupId>
  <artifactId>RowMapper</artifactId>
  <version>0.0.1-SNAPSHOT</version>

  <dependencies>

   <!-- https://mvnrepository.com/artifact/org.springframework/spring-jdbc -->
   <dependency>
            <groupId>org.springframework</groupId>
            <artifactId>spring-jdbc</artifactId>
            <version>5.3.16</version>
    </dependency>

    <!-- https://mvnrepository.com/artifact/org.springframework/spring-context -->
    <dependency>
            <groupId>org.springframework</groupId>
            <artifactId>spring-context</artifactId>
            <version>5.0.8.RELEASE</version>
    </dependency>

    <dependency>
        <groupId>mysql</groupId>
        <artifactId>mysql-connector-java</artifactId>
        <version>5.1.44</version>
    </dependency>

  </dependencies>

</project>
Step 4: Create the Model Class
Create a model class that represents a row of the Student table. Each database record will be mapped to an object of this class.
package com.geeksforgeeks.model;

public class Student {
    // member variables
    private int id;
    private String name;
    private String department;

    // getters and setters method
    public int getId() {
        return id;
    }
    public void setId(int id) {
        this.id = id;
    }
    public String getName() {
        return name;
    }
    public void setName(String name) {
        this.name = name;
    }
    public String getDepartment() {
        return department;
    }
    public void setDepartment(String department) {
        this.department = department;
    }

    // toString() method
    @Override
    public String toString() {
        return "Student [id=" + id + ", name=" + name + ", department=" + department + "]";
    }
}
Step 5: Create the DAO Interface
Create a DAO interface that declares the methods required to interact with the database.
import java.util.List;

import com.geeksforgeeks.model.Student;

public interface StudentDao {
    // this method will return all
    // the details of the students
    public List<Student> getAllStudentDetails();

}
Step 6: Create the DAO Implementation
Implement the DAO interface and use JdbcTemplate.query() together with the RowMapper interface to fetch and map database records.
import java.sql.ResultSet;
import java.sql.SQLException;
import java.util.List;

import org.springframework.jdbc.core.JdbcTemplate;
import org.springframework.jdbc.core.RowMapper;

import com.geeksforgeeks.model.Student;

public class StudentDaoImpl implements StudentDao{

    // Defining JdbcTemplate as member variable in order
    // to use the query() method of the JdbcTemplate's class
    private JdbcTemplate jdbcTemplate;

    public JdbcTemplate getJdbcTemplate() {
        return jdbcTemplate;
    }

    public void setJdbcTemplate(JdbcTemplate jdbcTemplate) {
        this.jdbcTemplate = jdbcTemplate;
    }

    // This method will return the list
    // of all the details of student
    public List<Student> getAllStudentDetails() {

        // Implementation of RowMapper interface
        return jdbcTemplate.query("SELECT * FROM student", new RowMapper<Student>() {

            public Student mapRow(ResultSet rs, int rowNum) throws SQLException {
                Student student = new Student();
                student.setId(rs.getInt(1));
                student.setName(rs.getString(2));
                student.setDepartment(rs.getString(3));
                return student;
            }
        });
    }
}
Step 7: Configure Spring Beans
Configure the DataSource, JdbcTemplate, and DAO beans. Spring injects the JdbcTemplate into the DAO using setter injection.
<?xml version="1.0" encoding="UTF-8"?>
<beans
    xmlns="http://www.springframework.org/schema/beans/"
    xmlns:xsi="https://www.w3.org/2001/XMLSchema-instance"
    xmlns:p="http://www.springframework.org/schema/p"
    xsi:schemaLocation="http://www.springframework.org/schema/beans/
     http://www.springframework.org/schema/beans//spring-beans-3.0.xsd">

    <bean id="dataSource" class="org.springframework.jdbc.datasource.DriverManagerDataSource">
        <property name="driverClassName" value="com.mysql.jdbc.Driver" />
        <property name="url" value="jdbc:mysql://localhost:3306/student_db?autoReconnect=true&useSSL=false" />
        <property name="username" value="root" />
        <property name="password" value="root" />
    </bean>

    <bean id="jdbcTemplate" class="org.springframework.jdbc.core.JdbcTemplate">
        <property name="dataSource" ref="dataSource"></property>
    </bean>

    <bean id="studentDao" class="com.geeksforgeeks.dao.StudentDaoImpl">
        <property name="jdbcTemplate" ref="jdbcTemplate"></property>
    </bean>

</beans>
Step 8: Create the Utility Class
Create the main class that loads the Spring configuration, retrieves the DAO bean, and displays all student records.
import java.util.List;

import org.springframework.context.support.AbstractApplicationContext;
import org.springframework.context.support.ClassPathXmlApplicationContext;

import com.geeksforgeeks.dao.StudentDaoImpl;
import com.geeksforgeeks.model.Student;

public class TestRowMapper {

    public static void main(String[] args) {

        // Reading the application-context file using
        // class path of spring context xml file
        AbstractApplicationContext context = new ClassPathXmlApplicationContext("application-context.xml");

        // Spring check the blueprint for studentDao bean
        // from application-context.xml file and return it
        StudentDaoImpl studentDaoImpl = (StudentDaoImpl)context.getBean("studentDao");

        // Getting student data
        List<Student> studentDetailList = studentDaoImpl.getAllStudentDetails();

        for(Student index : studentDetailList) {
            System.out.println(index);
        }


    }
}
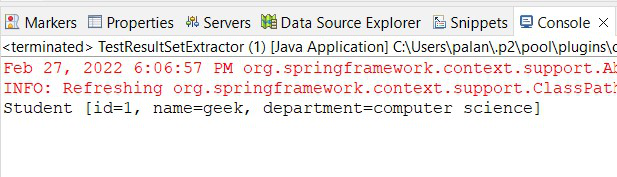
Step 9: Run the Application
- Right Click TestRowMapper.java
- Run As -> Java Application
Now, we will run our application.
Output: