
Database integration is an essential part of most Spring Boot applications, allowing data to be stored, retrieved, updated, and deleted efficiently. Spring Boot simplifies database connectivity by integrating JPA (Java Persistence API) with Hibernate, making it easy to work with relational databases such as MySQL and H2 with minimal configuration.
- Uses Spring Data JPA and Hibernate to simplify database operations.
- Supports multiple relational databases, including MySQL, H2, PostgreSQL, and Oracle.
- Reduces boilerplate code by automatically handling entity mapping and CRUD operations.
Ways to Integrate a Database in Spring Boot
Spring JDBC (JdbcTemplate)
Spring JDBC (JdbcTemplate) is a lightweight data access framework that simplifies working with JDBC by reducing boilerplate code. It allows developers to execute SQL queries directly while handling resource management and exception handling automatically.
- ldeal for applications that require custom SQL queries.
- Best suited for small to medium-sized applications with simple database operations.
Java Persistence API (JPA)
Java Persistence API (JPA) is a Java specification that defines how Java objects are mapped to relational database tables. It provides a standard API for performing database operations without depending on a specific ORM implementation.
- Maps Java classes to database tables.
- Reduces SQL boilerplate code.
Hibernate ORM
Hibernate ORM is a popular Object-Relational Mapping (ORM) framework that maps Java objects to database tables. It automatically generates SQL queries and manages the persistence lifecycle of entities.
- Automatic table mapping.
- Entity lifecycle management.
- Lazy and eager loading.
Spring Data JPA
Spring Data JPA simplifies database access by providing repository interfaces for performing CRUD operations without writing SQL queries. It works on top of JPA and commonly uses Hibernate as its default implementation.
- Built-in CRUD operations.
- Pagination and sorting.
- Custom repository methods.
Steps to Integrate Mysql and H2 DataBase in a Spring Boot Application
Follow these steps to implements Mysql and H2 Database in a Spring boot Application.
Step 1: Create the New Spring Boot Project
Use your preferred IDE to create a new Spring Boot project with the following settings:
- Name: spring-boot-database-integration
- Language: Java
- Type: Maven
- Packaging: Jar
Click on the Next button.

Step 2: Add the Dependencies
Add the following dependencies into the Spring Boot project.
<?xml version="1.0" encoding="UTF-8"?>
<project xmlns="https://maven.apache.org/POM/4.0.0" xmlns:xsi="https://www.w3.org/2001/XMLSchema-instance"
         xsi:schemaLocation="https://maven.apache.org/POM/4.0.0 https://maven.apache.org/xsd/maven-4.0.0.xsd">
    <modelVersion>4.0.0</modelVersion>
    <parent>
        <groupId>org.springframework.boot</groupId>
        <artifactId>spring-boot-starter-parent</artifactId>
        <version>3.3.2</version>
        <relativePath/> <!-- lookup parent from repository -->
    </parent>
    <groupId>com.gfg</groupId>
    <artifactId>spring-boot-database-integration</artifactId>
    <version>0.0.1-SNAPSHOT</version>
    <name>spring-boot-database-integration</name>
    <description>spring-boot-database-integration</description>
    <url/>
    <licenses>
        <license/>
    </licenses>
    <developers>
        <developer/>
    </developers>
    <scm>
        <connection/>
        <developerConnection/>
        <tag/>
        <url/>
    </scm>
    <properties>
        <java.version>17</java.version>
    </properties>
    <dependencies>
        <dependency>
            <groupId>org.springframework.boot</groupId>
            <artifactId>spring-boot-starter-data-jpa</artifactId>
        </dependency>
        <dependency>
            <groupId>org.springframework.boot</groupId>
            <artifactId>spring-boot-starter-web</artifactId>
        </dependency>

        <dependency>
            <groupId>org.springframework.boot</groupId>
            <artifactId>spring-boot-devtools</artifactId>
            <scope>runtime</scope>
            <optional>true</optional>
        </dependency>
        <dependency>
            <groupId>com.mysql</groupId>
            <artifactId>mysql-connector-j</artifactId>
            <scope>runtime</scope>
        </dependency>

        <dependency>
            <groupId>com.h2database</groupId>
            <artifactId>h2</artifactId>
            <scope>runtime</scope>
        </dependency>
        <dependency>
            <groupId>org.projectlombok</groupId>
            <artifactId>lombok</artifactId>
            <optional>true</optional>
        </dependency>
        <dependency>
            <groupId>org.springframework.boot</groupId>
            <artifactId>spring-boot-starter-test</artifactId>
            <scope>test</scope>
        </dependency>
    </dependencies>

    <build>
        <plugins>
            <plugin>
                <groupId>org.springframework.boot</groupId>
                <artifactId>spring-boot-maven-plugin</artifactId>
                <configuration>
                    <excludes>
                        <exclude>
                            <groupId>org.projectlombok</groupId>
                            <artifactId>lombok</artifactId>
                        </exclude>
                    </excludes>
                </configuration>
            </plugin>
        </plugins>
    </build>

</project>
The project structure will look like this:

Step 3: Configure Application Properties
Open application.properties and add the MySQL configuration. This file configures the connection details required to integrate MySQL with your Spring Boot application.
spring.application.name=spring-boot-database-integration
# MySQL Configuration
spring.datasource.url=jdbc:mysql://localhost:3306/testdb
spring.datasource.username=root
spring.datasource.password=mypassword
spring.jpa.hibernate.ddl-auto=update
spring.jpa.show-sql=true
spring.jpa.properties.hibernate.dialect=org.hibernate.dialect.MySQL8Dialect
Step 4: Configure Application Dev Properties
Create application-dev.properties and add the H2 configuration. This file sets up the H2 in-memory database for development and testing purposes.
# H2 Database Configuration
spring.datasource.url=jdbc:h2:mem:testdb
spring.datasource.driverClassName=org.h2.Driver
spring.datasource.username=sa
spring.datasource.password=password
spring.jpa.hibernate.ddl-auto=update
spring.h2.console.enabled=true
spring.h2.console.path=/h2-console
Step 5: Customer Entity
Customer is an entity class representing the Customer table in the database. It defines the fields, constructors, and getter/setter methods required for the entity.
package com.gfg.springbootdatabaseintegration;

import jakarta.persistence.Entity;
import jakarta.persistence.GeneratedValue;
import jakarta.persistence.GenerationType;
import jakarta.persistence.Id;

@Entity
public class Customer {

    @Id
    @GeneratedValue(strategy = GenerationType.IDENTITY)
    private Long id;

    private String firstName;
    private String lastName;
    private String email;

    // Constructors
    public Customer() {
    }

    public Customer(String firstName, String lastName, String email) {
        this.firstName = firstName;
        this.lastName = lastName;
        this.email = email;
    }

    // Getters and Setters
    public Long getId() {
        return id;
    }

    public void setId(Long id) {
        this.id = id;
    }

    public String getFirstName() {
        return firstName;
    }

    public void setFirstName(String firstName) {
        this.firstName = firstName;
    }

    public String getLastName() {
        return lastName;
    }

    public void setLastName(String lastName) {
        this.lastName = lastName;
    }

    public String getEmail() {
        return email;
    }

    public void setEmail(String email) {
        this.email = email;
    }
}
Step 6: Customer Repository
CustomerRepository is a Spring Data JPA repository that provides CRUD operations for the Customer entity. It extends JpaRepository to inherit standard data access methods.
package com.gfg.springbootdatabaseintegration;

import org.springframework.data.jpa.repository.JpaRepository;

public interface CustomerRepository extends JpaRepository<Customer, Long> {
}
Step 7: Customer Controller
CustomerController is a REST controller that handles HTTP requests for Customer entities. It provides endpoints for CRUD operations, allowing you to manage customers via RESTful services.
package com.gfg.springbootdatabaseintegration;

import org.springframework.beans.factory.annotation.Autowired;
import org.springframework.web.bind.annotation.*;

import java.util.List;
import java.util.Optional;

@RestController
@RequestMapping("/customers")
public class CustomerController {

    @Autowired
    private CustomerRepository customerRepository;

    @GetMapping
    public List<Customer> getAllCustomers() {
        return customerRepository.findAll();
    }

    @GetMapping("/{id}")
    public Customer getCustomerById(@PathVariable Long id) {
        Optional<Customer> customer = customerRepository.findById(id);
        return customer.orElse(null);
    }

    @PostMapping
    public Customer createCustomer(@RequestBody Customer customer) {
        return customerRepository.save(customer);
    }

    @PutMapping("/{id}")
    public Customer updateCustomer(@PathVariable Long id, @RequestBody Customer updatedCustomer) {
        Optional<Customer> customer = customerRepository.findById(id);
        if (customer.isPresent()) {
            Customer existingCustomer = customer.get();
            existingCustomer.setFirstName(updatedCustomer.getFirstName());
            existingCustomer.setLastName(updatedCustomer.getLastName());
            existingCustomer.setEmail(updatedCustomer.getEmail());
            return customerRepository.save(existingCustomer);
        }
        return null;
    }

    @DeleteMapping("/{id}")
    public void deleteCustomer(@PathVariable Long id) {
        customerRepository.deleteById(id);
    }
}
Step 8: Main Class
Create the Spring Boot application class.
package com.gfg.springbootdatabaseintegration;

import org.springframework.boot.SpringApplication;
import org.springframework.boot.autoconfigure.SpringBootApplication;

@SpringBootApplication
public class SpringBootDatabaseIntegrationApplication {

    public static void main(String[] args) {
        SpringApplication.run(SpringBootDatabaseIntegrationApplication.class, args);
    }

}
Step 10: Run the Application
In Spring Tool Suite (STS) or IntelliJ IDEA, navigate to run Your Application.
- Right-click Project
- Run As -> Spring Boot App
Now, run the application and it will start at port 8080.
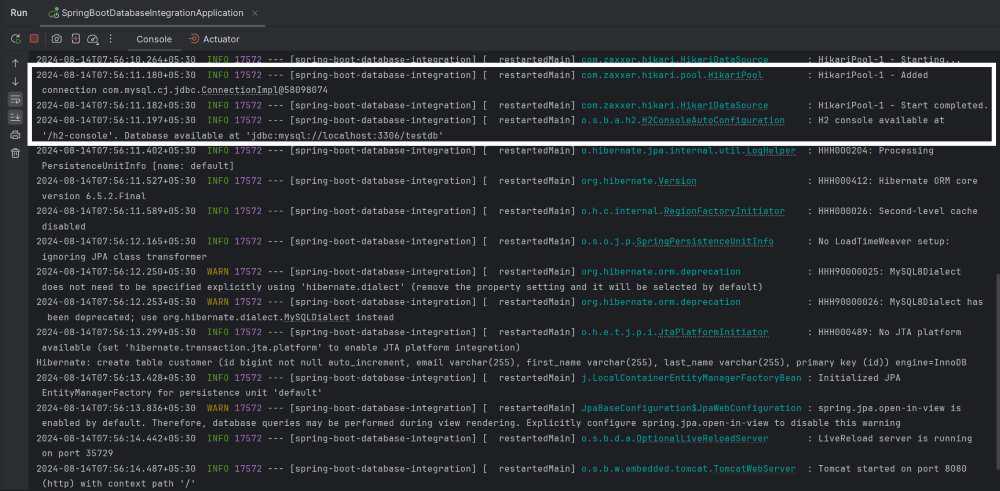
Explanation: This application demonstrates how to integrate MySQL and H2 databases in a Spring Boot application using Spring Data JPA and Hibernate. It performs CRUD operations on the Customer entity through REST APIs, while Hibernate automatically maps Java objects to database tables. When the application starts, the console logs confirm that the database connection has been established successfully.