<?xml version="1.0" encoding="UTF-8"?>
<feed xmlns="http://www.w3.org/2005/Atom">
    <title>Knowledge Base</title>
    <link rel="alternate" type="text/html" href="https://wker.com/kb/" />
    <link rel="self" type="application/atom+xml" href="https://wker.com/kb/atom.xml" />
    <id>tag:wker.com,2021-01-11:/kb//2</id>
    <updated>2021-03-12T01:05:51Z</updated>
    

<entry>
    <title>How to Update cURL to the Latest Version on CentOS</title>
    <link rel="alternate" type="text/html" href="https://wker.com/kb/2021/03/how-to-update-curl-to-the-latest-version-on-centos.php" />
    <id>tag:wker.com,2021:/kb//2.10</id>

    <published>2021-03-12T00:31:08Z</published>
    <updated>2021-03-12T01:05:51Z</updated>

    <summary>cURL shipped with the OS may not be up-to-date, and if you need the newer version for a particular requiment, you need to update it to the latest version. In this post, I will guide you to update cURL to...</summary>
    <author>
        <name>admin</name>
        
    </author>
    
        <category term="Server Management"/>
    
    <category term="centos" label="centos"/>
    <category term="curl" label="curl"/>
    <category term="update" label="update"/>
    <category term="yum" label="yum"/>
    
    <content type="html" xml:lang="en-us" xml:base="https://wker.com/kb/">
        <![CDATA[<p>cURL shipped with the OS may not be up-to-date, and if you need the newer version for a particular requiment, you need to update it to the latest version. In this post, I will guide you to update cURL to the latest version on CentOS.</p>
<p>1. Create a new file <code>/etc/yum.repos.d/city-fan.repo</code>, then paste the following contents:</p>
<pre>vi /etc/yum.repos.d/city-fan.repo</pre>
<pre>[CityFan]<br />name=City Fan Repo<br />baseurl=http://www.city-fan.org/ftp/contrib/yum-repo/rhel$releasever/$basearch/<br />enabled=1<br />gpgcheck=0</pre>]]>
        <![CDATA[<p>2. Yum install cURL.</p>
<pre>yum clean all<br />yum update curl</pre>
<p>It's done, you could use <code>curl -V</code> to check the version of cURL.</p>
<p><img src="https://s.wker.com/uploads/2021/03/curl-v.png" width="1702" height="268" alt="How to Update cURL to the Latest Version on CentOS" title="curl, centos, yum, update" /></p>
<p>This yum repo works for both RHEL and CentOS, all you have to do is specify the appropriate city-fan url.</p>]]>
    </content>
</entry>

<entry>
    <title>How to Manage MySQL Databases and Users from the Command Line</title>
    <link rel="alternate" type="text/html" href="https://wker.com/kb/2021/02/how-to-manage-mysql-databases-and-users-from-the-command-line.php" />
    <id>tag:wker.com,2021:/kb//2.9</id>

    <published>2021-02-07T07:26:29Z</published>
    <updated>2021-02-08T00:20:15Z</updated>

    <summary>MySQL or MariaDB is the most popular open-source relational database system. MySQL server allows us to create numerous users and databases and grant appropriate privileges so that the users can access and manage databases. In this post, I will explains...</summary>
    <author>
        <name>admin</name>
        
    </author>
    
        <category term="Server Management"/>
    
    <category term="command" label="command"/>
    <category term="database" label="database"/>
    <category term="mysql" label="mysql"/>
    <category term="root" label="root"/>
    
    <content type="html" xml:lang="en-us" xml:base="https://wker.com/kb/">
        <![CDATA[<p>MySQL or MariaDB is the most popular open-source relational database system. MySQL server allows us to create numerous users and databases and grant appropriate privileges so that the users can access and manage databases.</p>
<p>In this post, I will explains how to use the command line to manage MySQL or MariaDB databases and users. I assuming that you already have MySQL server installed on your system and all the commands will be executed as root user.</p>
<p>To open the MySQL prompt, type the following command and enter the MySQL root user password when prompted:</p>
<pre># mysql -u root -p</pre>]]>
        <![CDATA[<h3>Create a new MySQL database</h3>
<p>Run the following command and replace <em>db_name</em> with the name of database you want to create:</p>
<pre>mysql &gt; CREATE DATABASE db_name;</pre>
<p>If you try to create a database that already exists, you will see the following error message:</p>
<pre>ERROR 1007 (HY000): Can't create database 'database_name'; database exists</pre>
<p>To avoid creating duplicate database, we should use the following command:</p>
<pre>mysql &gt; CREATE DATABASE IF NOT EXISTS db_name;</pre>
<h3>Delete a MySQL database</h3>
<p>Deleting a MySQL database is simple, but it is a non-reversible action, double check before executing the command. To delete a MySQL database, run the following command:</p>
<pre>mysql &gt; DROP DATABASE db_name;</pre>
<p>If you try to delete a database that doesn't exists, you will see an error message, in order to avoid it, run the following command:</p>
<pre>mysql &gt; DROP DATABASE IF EXISTS db_name;</pre>
<h3>List all MySQL databases</h3>
<p>You can list all the databases on your MySQL server with the following command:</p>
<pre>mysql &gt; SHOW DATABASES;</pre>
<p>From the output, you may find that there are four databases not created by yourself. Don't worry, the <em>information_schema</em>, <em>mysql</em>, <em>performance_schema</em>, and <em>sys</em> databases are created by system and they are storing information about all other databases, system configuration, users, permission and other important data. These databases are necessary for the proper functionality of the MySQL installation.</p>
<h3>Create a new MySQL user account</h3>
<p>Run the following command, replace <em>db_user</em> with the user you want to create and <em>user_password</em> with the password you want to use:</p>
<pre>mysql &gt; CREATE USER 'db_user'@'localhost' IDENTIFIED BY 'user_password';</pre>
<p>In the command above we have set the hostname part to <code>localhost</code> which means that this user will be able to connect to the MySQL server only from the localhost ( i.e from the system where MySQL Server runs). If you want to grant access from another host(s) just change the localhost with the remote machine IP or use '%' wildcard for the host part, which means that the user account will be able to connect from any host.</p>
<p>You also can add <em>IF NOT EXISTS</em> to the command to avoid creating duplicate user account:</p>
<pre>mysql &gt; CREATE USER IF NOT EXISTS 'db_user'@'localhost' IDENTIFIED BY 'user_password';</pre>
<h3>List all MySQL user account</h3>
<p>It is pretty easy to list all MySQL user accounts by querying the <em>mysql.users</em> table:</p>
<pre>mysql &gt; SELECT user, host FROM mysql.user;</pre>
<p>The output should looks similar to below:</p>
<pre>+------------------+-----------+
| user             | host      |
+------------------+-----------+
| database_user    | %         |
| database_user    | localhost |
| debian-sys-maint | localhost |
| mysql.session    | localhost |
| mysql.sys        | localhost |
| root             | localhost |
+------------------+-----------+
6 rows in set (0.00 sec)
</pre>
<h3>Delete MySQL user account</h3>
<p>Run the following command to delete a user account, you can find the host part from the above command of listing all the user account:</p>
<pre>mysql &gt; DROP USER 'db_user@'localhost';</pre>
<p>You also can add <em>IF NOT EXISTS</em> to the command:</p>
<pre>mysql &gt; DROP USER IF EXISTS 'db_user'@'localhost';</pre>
<h3>Display MySQL user account privileges</h3>
<p>Run the following command to find the privileges granted to a specific user account:</p>
<pre>mysql &gt; SHOW GRANTS FOR 'db_user'@'localhost';</pre>
<h3>Change a MySQL user account password</h3>
<p>According to different MySQL versions, there are different commands. You can find your MySQL server version by running the following command:</p>
<pre># mysql --version</pre>
<p>If you have MySQL 5.7.6 and newer or MariaDB 10.1.20 and newer, to change the password use the following command:</p>
<pre>mysql &gt; ALTER USER 'db_user'@'localhost' IDENTIFIED BY 'new_password';</pre>
<p>If you have MySQL 5.7.5 and older or MariaDB 10.1.20 and older, then use:</p>
<pre>mysql &gt; SET PASSWORD FOR 'db_user'@'localhost' = PASSWORD('new_password');</pre>
<h3>Grant permissions to a MySQL user account</h3>
<p>To grand all privileges to a user account over a specific database, use the following command:</p>
<pre>mysql &gt; GRANT ALL PRIVILEGES ON db_name.* TO 'db_user'@'localhost';</pre>
<p>To grand all privileges to a user account over all databases, use the following command:</p>
<pre>mysql &gt; GRANT ALL PRIVILEGES ON *.* TO 'db_user'@'localhost';</pre>
<p>To grand all privileges to a user account over a specific table from a database, use the following command:</p>
<pre>mysql &gt; GRANT ALL PRIVILEGES ON db_name.table_name TO 'db_user'@'localhost';</pre>
<p>To grant only specific privileges to a user account over a specific database, use the following command:</p>
<pre>GRANT SELECT, INSERT, DELETE ON db_name.* TO db_user@'localhost';</pre>
<h3>Revoke permissions from a MySQL user account</h3>
<p>If you need to revoke one or more privileges or all privileges from a user account, the command is almost identical to granting it. For example, if you want to revoke all privileges from a user account over a specific database, use the following command:</p>
<pre>mysql &gt; REVOKE ALL PRIVILEGES ON db_name.* TO 'db_user'@'localhost';</pre>]]>
    </content>
</entry>

<entry>
    <title>How to Secure a SSH Server</title>
    <link rel="alternate" type="text/html" href="https://wker.com/kb/2021/01/how-to-secure-a-ssh-server.php" />
    <id>tag:wker.com,2021:/kb//2.8</id>

    <published>2021-01-25T01:49:36Z</published>
    <updated>2021-01-25T06:42:58Z</updated>

    <summary>Security is the first priority for server management. Although there were some vulnerabilities, OpenSSH is fairly secure by default. There are still some steps left that can be improved. In this post, I&apos;ll show you how to secure SSH Server....</summary>
    <author>
        <name>admin</name>
        
    </author>
    
        <category term="Server Management"/>
    
    <category term="linux" label="linux"/>
    <category term="security" label="security"/>
    <category term="ssh" label="ssh"/>
    
    <content type="html" xml:lang="en-us" xml:base="https://wker.com/kb/">
        <![CDATA[<p>Security is the first priority for server management. Although there were some vulnerabilities, OpenSSH is fairly secure by default. There are still some steps left that can be improved. In this post, I'll show you how to secure SSH Server.</p>
<h2>Preparation</h2>
<h3>Backup the configuration file</h3>
<p>Before we start making changes to our configuration, let's make a backup.</p>
<pre>cp /etc/ssh/sshd_config /root/sshd_config</pre>
<h3>Deploy in small steps</h3>
<p>While it makes sense to do a full deployment of your new SSH configuration to all systems, you might want to be careful. One example is that some older SSH clients can't use the newer key types. So have a look at the oldest Linux distributions that are used to get an idea on compatibility issues.</p>
<h3>Use the SSH configuration test</h3>
<p>If you make changes to your SSH configuration, it makes sense to restart the service. I strongly recommend to always check your configuration (sshd_config) first. This can be done by using the test mode flag. This additional step ensures the syntax and options are correct before you end up with a nonfunctioning service.</p>
<p>This command should not return any text or errors.</p>
<pre>sshd -t</pre>]]>
        <![CDATA[<h2>SSH security settings</h2>
<h3>Disable X11 Forwarding</h3>
<pre>X11Forwarding no</pre>
<p>The X11 protocol was never built with security in mind. As it opens up channel back to the client, the server could send malicious commands back to the client. To protect clients, disable X11Forwarding when it is not needed.</p>
<h3>Disable rhosts</h3>
<pre>IgnoreRhosts yes</pre>
<p>While not common anymore, rhosts was a weak method to authenticate systems. It defines a way to trust another system simply by its IP address. By default, the use of rhosts is already disabled. Make sure to check if it really is.</p>
<h3>Disable empty passwords</h3>
<pre>PermitEmptyPasswords no</pre>
<p>Accounts should be protected and users should be accountable. For this reason, the usage of empty passwords should not be allowed. This can be disabled with the PermitEmptyPasswords option, which is the default.</p>
<h3>Maximum authentication attempts</h3>
<pre>MaxAuthTries 3</pre>
<p>To protect against brute-force attacks on the password of a user, limit the number of attempts. This can be done with the MaxAuthTries setting.</p>
<h3>Public key authentication</h3>
<pre>PubkeyAuthentication yes<br />PasswordAuthentication no</pre>
<p>Instead of using a normal password-based login, a better way is using <a href="https://wker.com/kb/2021/01/connect-to-a-server-using-an-ssh-key.php" target="_blank">public key authentication</a>. Keys are considered much safer and less prone to brute-force attacks. Disable <code>PasswordAuthentication</code> to force users using keys.</p>
<h3>Disable root login</h3>
<pre>PermitRootLogin no</pre>
<p>It is best practice not to log in as the root user. Use a normal user account to initiate your connection instead, together with <code>sudo</code>. Direct root logins may result in bad accountability of the actions performed by this user account.</p>
<h3>Set SSH protocol</h3>
<pre>Protocol 2</pre>
<p>If you are running an older system, version 1 of the SSH protocol might still be available. This version has weaknesses and should no longer be used. Since version 7.0 of OpenSSH, protocol 1 is automatically disabled during compile time. If your version is older than that, enforce the protocol version:</p>]]>
    </content>
</entry>

<entry>
    <title>Manage Linux Users with Command passwd</title>
    <link rel="alternate" type="text/html" href="https://wker.com/kb/2021/01/manage-linux-users-with-command-passwd.php" />
    <id>tag:wker.com,2021:/kb//2.7</id>

    <published>2021-01-19T11:32:04Z</published>
    <updated>2021-01-19T11:33:02Z</updated>

    <summary>Linux is a multi-user system, because it allows multiple people to use a computer and not affect each other&apos;s files, processes, preferences, etc. As there could be multiple users on the system, it is necessary to manage their authentication. In...</summary>
    <author>
        <name>admin</name>
        
    </author>
    
        <category term="Server Management"/>
    
    <category term="command" label="command"/>
    <category term="linux" label="linux"/>
    <category term="passwd" label="passwd"/>
    <category term="user" label="user"/>
    
    <content type="html" xml:lang="en-us" xml:base="https://wker.com/kb/">
        <![CDATA[<p>Linux is a multi-user system, because it allows multiple people to use a computer and not affect each other's files, processes, preferences, etc. As there could be multiple users on the system, it is necessary to manage their authentication. In this post, I will show you how to manage users with command <code>passwd</code>.</p>
<p>The passwd command changes passwords for user accounts for basic use. A normal user may only change the password for their own account, while the superuser may change the password for any account.</p>
<pre>[root@server ~]# passwd [options] &lt;username&gt;</pre>
<p>Running the passwd command without any argument will ask for a change of password for the user logged in.</p>]]>
        <![CDATA[<p>Here is a list of some of the options for the passwd command:</p>
<pre>[root@server ~]# passwd -S &lt;username&gt;</pre>
<p>The <code>-S</code> option displays the status of user account password settings.</p>
<pre>[root@server ~]# passwd -l &lt;username&gt;</pre>
<p>The <code>-l</code> option is used to lock the password of a specified account, and it is available to root only. The result is that the user cannot use the password to log in to the system but can use other means such as <a href="https://wker.com/kb/2021/01/connect-to-a-server-using-an-ssh-key.php" target="_blank" rel="noopener">SSH public key authentication</a>.</p>
<pre>[root@server ~]# passwd -u &lt;username&gt;</pre>
<p>The <code>-u</code> option will unlock the password. This option works for an account that already has the password locked.</p>
<pre>[root@server ~]# passwd -d &lt;username&gt;</pre>
<p>The <code>-d</code> option is a quick way to delete a password for an account.</p>
<pre>[root@server ~]# passwd -e &lt;username&gt;</pre>
<p>The <code>-e</code> option is a quick way to expire a password for an account. The user will be forced to change the password during the next login attempt.</p>
<pre>[root@server ~]# passwd -n &lt;number of days&gt; &lt;username&gt;</pre>
<p>The <code>-n</code> option sets the number of days before a password can be changed. By default, a value of zero is set, which indicates that the user may change their password at any time.</p>
<p>To confirm the password setting made with the <code>-n</code> option above, run the following command:</p>
<pre>[root@server ~]# passwd -S example_user<br />example_user PS 2020-12-04 10 99999 7 -1 (Password set, SHA512 crypt.)</pre>
<p>The value of 10 after the date indicates the minimum number of days until the password can be changed.</p>
<pre>[root@server ~]# passwd -x &lt;number of MAX_DAYS&gt; &lt;username&gt;</pre>
<p>The <code>-x</code> option sets the maximum number of days a password remains valid. After MAX_DAYS, the password is required to be changed.</p>
<p>Confirm the setting with running the following command:</p>
<pre>[root@server ~]# passwd -S example_user<br />example_user PS 2020-12-04 10 90 7 -1 (Password set, SHA512 crypt.)</pre>
<p>The value of 90 after 10 indicates the maximum password lifetime.</p>
<pre>[root@server ~]# passwd -w &lt;number of days&gt; &lt;username&gt;</pre>
<p>The <code>-w</code> option will set the number of days in advance the user will begin receiving warnings that the password will expire.</p>
<pre>[root@server ~]# passwd -i &lt;number of INACTIVE days&gt; &lt;username&gt;</pre>
<p>The <code>-i</code> option is used to disable an account after the password has been expired for a number of days. After a user account has had an expired password for INACTIVE days, the user may no longer sign on to the account.</p>]]>
    </content>
</entry>

<entry>
    <title>How to Recover MySQL Root Password</title>
    <link rel="alternate" type="text/html" href="https://wker.com/kb/2021/01/how-to-recover-mysql-root-password.php" />
    <id>tag:wker.com,2021:/kb//2.6</id>

    <published>2021-01-18T08:26:56Z</published>
    <updated>2021-01-18T08:33:01Z</updated>

    <summary>If you are a system administrator, you may have forgotten your mysql root password, don&apos;t worry, it happens to all of us. In this post, I will show you how to recover mysql root password for Linux system. First, by...</summary>
    <author>
        <name>admin</name>
        
    </author>
    
        <category term="Server Management"/>
    
    <category term="mariadb" label="mariadb"/>
    <category term="mysql" label="mysql"/>
    <category term="password" label="password"/>
    <category term="root" label="root"/>
    
    <content type="html" xml:lang="en-us" xml:base="https://wker.com/kb/">
        <![CDATA[<p>If you are a system administrator, you may have forgotten your mysql root password, don't worry, it happens to all of us. In this post, I will show you how to recover mysql root password for Linux system.</p>
<p>First, by running the following command to identify the version of MySQL or MariaDB, because we will use different commands to recover the root passwords:</p>
<pre>$ mysql --version</pre>
<p>After you've known your version of MySQL or MariaDB, following the steps to recover the root passowrd.</p>
<p><strong>1. Stop the MySQL or MariaDB Service</strong></p>
<pre>$ systemctl stop mysql</pre>
<p><strong>2. Start the MySQL or MariaDB server without loading the grant tables</strong></p>
<pre>$ mysqld_safe --skip-grant-tables &amp;</pre>
<p>The ampersand <code>&amp;</code> at the end of the command above will cause the program to run in the background , so you can continue to use the shell. When the <code>--skip-grant-tables</code> option is used, anyone can to connect to the MySQL or MariaDB server without a password and with all privileges granted.</p>]]>
        <![CDATA[<p><strong>3. Log in to the MySQL Server</strong></p>
<pre>$ mysql -u root</pre>
<p><strong>4. Set a new root password</strong></p>
<p>Be careful, you need to run different commands to reset the root password according to the version, run the following commands if you run MySQL 5.7.6 and later or MariaDB 10.1.20 and later, replace NEW_PASSWORD with your own new password:</p>
<pre>mysql&gt; ALTER USER 'root'@'localhost' IDENTIFIED BY 'NEW_PASSWORD';<br />mysql&gt; FLUSH PRIVILEGES;</pre>
<p>Run the following commands if you have MySQL 5.7.5 and earlier or MariaDB 10.1.20 and earlier:</p>
<pre>mysql&gt; SET PASSWORD FOR 'root'@'localhost' = PASSWORD('NEW_PASSWORD');<br />mysql&gt; FLUSH PRIVILEGES;</pre>
<p><strong>5. Stop and Start the database server normally</strong></p>
<pre>$ mysqladmin -u root -p shutdown</pre>
<p>You will be prompted to enter the new root password, then start the service normally by running the following if you are using MySQL:</p>
<pre>$ systemctl start mysql</pre>
<p>Run the following commands if you are using MariaDB:</p>
<pre>$ systemctl start mariadb</pre>
<p>That's all and you have recovered the root password of MySQL or MariaDB successfully.</p>]]>
    </content>
</entry>

<entry>
    <title>Connect to a Server Using an SSH Key</title>
    <link rel="alternate" type="text/html" href="https://wker.com/kb/2021/01/connect-to-a-server-using-an-ssh-key.php" />
    <id>tag:wker.com,2021:/kb//2.5</id>

    <published>2021-01-17T07:33:55Z</published>
    <updated>2021-01-17T08:41:10Z</updated>

    <summary>In this post I will describe how to connect to remote server using SSH Key instead of password. Prerequisites An SSH Key A Linux server with SSH Key login enabled Connect via PuTTY PuTTY is the most popular SSH client...</summary>
    <author>
        <name>admin</name>
        
    </author>
    
        <category term="Server Management"/>
    
    <category term="linux" label="linux"/>
    <category term="ssh" label="ssh"/>
    <category term="windows" label="windows"/>
    
    <content type="html" xml:lang="en-us" xml:base="https://wker.com/kb/">
        <![CDATA[<p>In this post I will describe how to connect to remote server using SSH Key instead of password.</p>
<p><strong>Prerequisites</strong></p>
<ul>
<li><a href="https://wker.com/kb/2021/01/how-do-i-generate-ssh-keys.php" target="_blank" rel="noopener">An SSH Key</a></li>
<li><a href="https://wker.com/kb/2021/01/how-to-add-ssh-keys-to-remote-server.php">A Linux server with SSH Key login enabled</a></li>
</ul>
<h2>Connect via PuTTY</h2>
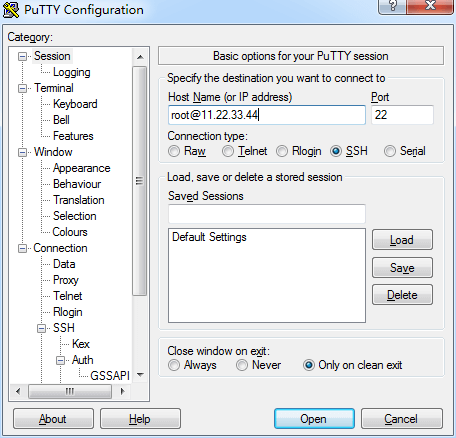
<p><img src="https://s.wker.com/uploads/2021/01/putty-login.png" alt="putty, Connect to a Server Using an SSH Key" width="456" height="438" /></p>
<p><a href="https://www.chiark.greenend.org.uk/~sgtatham/putty/latest.html" target="_blank" rel="noopener">PuTTY</a> is the most popular SSH client for Windows users, and it is available for all versions of Windows. Download and install it, and PuTTY is ready to use.</p>
<p>1. Enter the username and IP address (root@11.22.33.44, for example) in the Host Name field. If your server has a domain name, you may use that in place of the IP address.</p>
<p>2. Select <code>SSH</code> as the connection type.</p>]]>
        <![CDATA[<p><img src="https://s.wker.com/uploads/2021/01/putty-ssh-login.png" alt="putty ssh login, Connect to a Server Using an SSH Key" width="456" height="438" /></p>
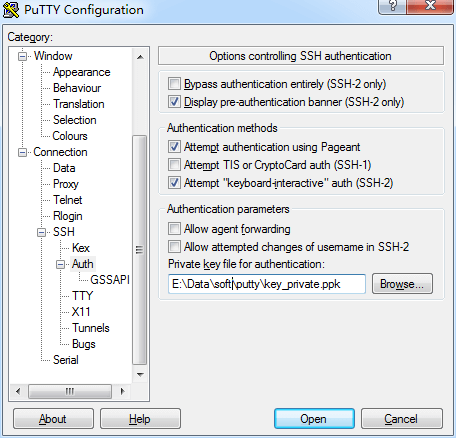
<p>3. In the left-hand menu, select Connection -&gt; SSH -&gt; Auth.</p>
<p>4. Click the Browse... button and choose your PuTTY private key file with the .ppk extension.</p>
<p>5. Click Open to connect to your server. When finished, end your session with CTRL + D.</p>
<h2>Connect via OpenSSH Client</h2>
<p>Linux and macOS typically have SSH clients pre-installed, you can verify whether your workstation has an SSH client installed by running the following command:</p>
<pre>$ ssh -V</pre>
<p>If your workstation has an SSH client installed, initiate an SSH connection, substitutue your username and IP for the example. If your SSH Key is in the default location ~/.ssh/id_rsa :</p>
<pre>$ ssh root@11.22.33.44</pre>
<p>If your SSH Key is in a different location, use -i parameter to identify SSH Key location:</p>
<p>$ ssh -i /path/to/id_rsa root@11.22.33.44</p>
<p>If you have a passphrase for protecting your private key, enter the passphrase and you are now connect to remote server successfully. When finished, end your session with CTRL + D.</p>]]>
    </content>
</entry>

<entry>
    <title>How to Add SSH Keys to Remote Server</title>
    <link rel="alternate" type="text/html" href="https://wker.com/kb/2021/01/how-to-add-ssh-keys-to-remote-server.php" />
    <id>tag:wker.com,2021:/kb//2.4</id>

    <published>2021-01-14T02:15:49Z</published>
    <updated>2021-01-14T07:13:56Z</updated>

    <summary>After generating ssh keys, we have to add public key to remote server before we use them. In this post, I will quickguide how to add ssh keys to remote server. Add SSH Keys with ssh-copy-id Utility The ssh-copy-id utility...</summary>
    <author>
        <name>admin</name>
        
    </author>
    
        <category term="Server Management"/>
    
    <category term="linux" label="linux"/>
    <category term="ssh" label="ssh"/>
    
    <content type="html" xml:lang="en-us" xml:base="https://wker.com/kb/">
        <![CDATA[<p>After <a href="https://wker.com/kb/2021/01/how-do-i-generate-ssh-keys.php" target="_blank" rel="noopener">generating ssh keys</a>, we have to add public key to remote server before we use them. In this post, I will quickguide how to add ssh keys to remote server.</p>
<h2>Add SSH Keys with ssh-copy-id Utility</h2>
<p>The <code>ssh-copy-id</code> utility is pre-installed on most Linux distributions. macOS users can install it via Homebrew.</p>
<pre>$ ssh-copy-id -i ~/.ssh/id_rsa.pub root@11.22.33.44</pre>
<ul>
<li>Specify the correct public key with the -i [path to public key] parameter.</li>
<li>Specify the username and server IP address (or domain name) as shown. For example, the root user at 11.22.33.44.</li>
</ul>
<p>The utility will print some basic information and prompt for your password, enter your password and the utility will install ssh key to remote server.</p>]]>
        <![CDATA[<h2>Add SSH Keys Manually</h2>
<p>Log into your remote server using password authentication and create the ~/.ssh/ directory if it does not already exist.</p>
<pre>mkdir -p ~/.ssh</pre>
<p>You'll need to append your SSH Key ( public key ) to an <code>authorized_keys</code> file in this directory, create it if it does not already exist, then update permissions of the files. The <code>~/.ssh</code> directory and <code>authorized_keys</code> file must have specific restricted permissions (700 for ~/.ssh and 600 for authorized_keys). If they don't, you won't be able to log in.</p>
<pre>chmod 600 ~/.ssh/authorized_keys<br />chmod 700 ~/.ssh/</pre>
<p>If you created those file with either root or your own admin accounts for some other user, you need to change the ownership to the user:</p>
<pre>chown -R username:username /home/username/.ssh</pre>
<p>Replace username with the real user name, and now you can log into your server with SSH Key.</p>]]>
    </content>
</entry>

<entry>
    <title>How Do I Generate SSH Keys?</title>
    <link rel="alternate" type="text/html" href="https://wker.com/kb/2021/01/how-do-i-generate-ssh-keys.php" />
    <id>tag:wker.com,2021:/kb//2.3</id>

    <published>2021-01-11T06:41:21Z</published>
    <updated>2021-01-14T01:36:29Z</updated>

    <summary>An SSH key allows you to log into your server without a password. This guide describes how to create SSH keys using a Linux or Mac system. Create an SSH Key with OpenSSH OpenSSH is standard and should be present...</summary>
    <author>
        <name>admin</name>
        
    </author>
    
        <category term="Server Management"/>
    
    <category term="linux" label="linux"/>
    <category term="macos" label="macos"/>
    <category term="openssh" label="openssh"/>
    <category term="ssh" label="ssh"/>
    <category term="windows" label="windows"/>
    
    <content type="html" xml:lang="en-us" xml:base="https://wker.com/kb/">
        <![CDATA[<p>An SSH key allows you to log into your server without a password. This guide describes how to create SSH keys using a Linux or Mac system.</p>
<h2>Create an SSH Key with OpenSSH</h2>
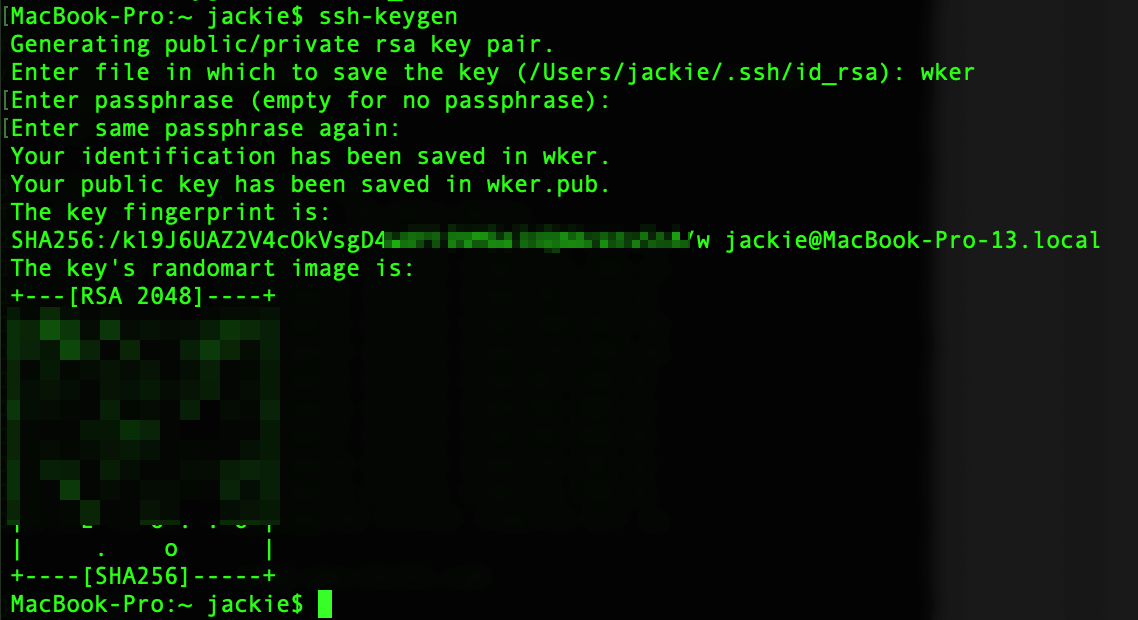
<p><img src="https://s.wker.com/uploads/2019/08/ssh-keygen.png" alt="ssh-keygen generate ssh key" width="1138" height="620" /></p>
<p>OpenSSH is standard and should be present on macOS and most Linux distributions. Follow these steps to create an SSH key with the OpenSSH utilities.</p>
<p>1. Generate your key with <strong>ssh-keygen</strong> using these parameters:</p>
<pre>$ ssh-keygen -t rsa -b 4096 -C "Example comment"</pre>
<p>Generate an RSA format key with the <code>-t rsa</code> parameter. For a more secure 4096-bit key, use the <code>-b 4096</code> parameter. To enter a comment, use the <code>-C [comment]</code> parameter.</p>]]>
        <![CDATA[<p>2. Press ENTER to save the key in the default location. By default, the keys are stored in the ~/.ssh directory. Using the default filename is convenient because most SSH clients automatically use the default filenames of id_rsa for the private key and id_rsa.pub for the public key.</p>
<pre>Generating public/private rsa key pair.<br />Enter file in which to save the key (/home/example_user/.ssh/id_rsa):</pre>
<p>3. You may enter a passphrase for your key. We recommend using a passphrase, but you can press ENTER to bypass this prompt. If you use a passphrase, you will enter it each time you use the key unless you also use ssh-agent.</p>
<pre>Enter passphrase (empty for no passphrase): <br />Enter same passphrase again:</pre>
<p>4. Your key is generated and saved.</p>
<p>The default filename for the public key is <code>/home/example/.ssh/id_rsa.pub</code> on Mac and Linux.</p>
<h2>Create an SSH Key on Windows with PuTTYgen</h2>
<p><img src="https://s.wker.com/uploads/2019/08/putty-ssh-key-generator.png" alt="putty generate ssh key" width="493" height="477" /></p>
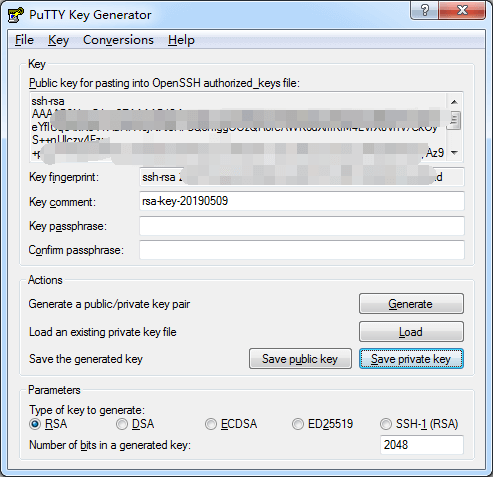
<p>1. Download the latest version of the <a href="https://www.chiark.greenend.org.uk/~sgtatham/putty/latest.html" target="_blank" rel="noopener">PuTTY</a>, install the package and run PuTTYgen.</p>
<p>2. At the bottom of the program window, select RSA for the key type.</p>
<p>3. In the lower-right corner, set the number of bits for your key. 2048-bit keys are reasonably safe, and 4096-bit keys are very secure.</p>
<p>4. Click the <strong>Generate</strong> button. Move the mouse in the blank area to generate some random data.</p>
<p>5. Enter a Key comment to make the key easier to identify later.</p>
<p>6. The private key must be kept secure from unauthorized use. I recommend entering a Key passphrase to protect the SSH key.</p>
<p>7. Click <strong>Save private key</strong> and store it securely. It is not possible to recover this file if it is lost. This file is your public/private key pair in PuTTY format. You can re-import this file with PuTTYgen in the future to export or convert the format of your public key.</p>
<p>8. Click <strong>Conversions &gt; Export OpenSSH key</strong>. Save this file and store it securely. This file is your private SSH key in OpenSSH format. You may need this file if you use an SSH client other than PuTTY.</p>
<p>9. Select the text in the Public key for pasting into OpenSSH <code>authorized_keys</code> file box and save it to a file. This is your public key in OpenSSH format.</p>]]>
    </content>
</entry>

</feed>