
1. Introduction to the Media Library
The WordPress Media Library is a centralized hub for managing all your media files, including images, videos, audio files, and documents. It simplifies the process of uploading, organizing, and inserting media into your posts, pages, or other areas of your website. To access the Media Library, log in to your WordPress dashboard and navigate to “Media” in the left-hand menu. From there, you can view all uploaded files, search for specific items, and perform actions like editing or deleting files. This powerful tool is essential for enhancing your website’s visual and interactive elements.
2. Uploading Media Files
Uploading media to the Media Library is straightforward and can be done in two primary ways: directly through the Media Library or while editing content.
To upload from the Media Library:
- Navigate to Media > Add Media Files.
- Click the “Select Files” button or drag and drop your files into the upload area.
- Wait for the upload to complete, after which the files will appear in the Media Library.
Alternatively, when working on a post or page, click the “Add Media” button above the editor to upload files directly into your content. WordPress supports a variety of file formats to accommodate different media types.

2.1 Supported File Types
WordPress supports the following default file types:
- Images: .jpg, .jpeg, .png, .gif, .ico
- Documents: .pdf, .doc, .docx, .ppt, .pptx, .pps, .ppsx, .odt, .xls, .xlsx, .psd
- Audio: .mp3, .m4a, .ogg, .wav
- Video: .mp4, .m4v, .mov, .wmv, .avi, .mpg, .ogv, .3gp, .3g2
Some hosting providers may impose restrictions on certain file types (e.g., .svg files are blocked by default for security reasons). If you need to upload restricted formats, you can use plugins or adjust server settings, though you may need to consult your hosting provider for support.
2.2 File Size Limitations (Adjustable)
The maximum file size for uploads depends on your server’s PHP settings, specifically the upload_max_filesize and post_max_size directives. This limit is typically between 2MB and 8MB but varies by hosting provider. To check your limit, go to Media > Add New File, where it’s displayed.
To increase the limit for larger files, consider these options:
- Edit the
php.inifile on your server (requires server access). - Modify your
.htaccessfile with appropriate directives. - Install a plugin like “Increase Maximum Upload File Size.”
Adjusting these settings might also require tweaking related parameters, such as max_execution_time, to avoid upload timeouts. Technical assistance from your hosting provider may be necessary.
3. Editing Media File Information
Once a media file is uploaded, you can edit its details to enhance its context, accessibility, and search engine optimization (SEO). To edit a file:
- Go to the Media > Library.
- Click the file you want to edit.
- In the “Attachment Details” window, update the fields as needed.
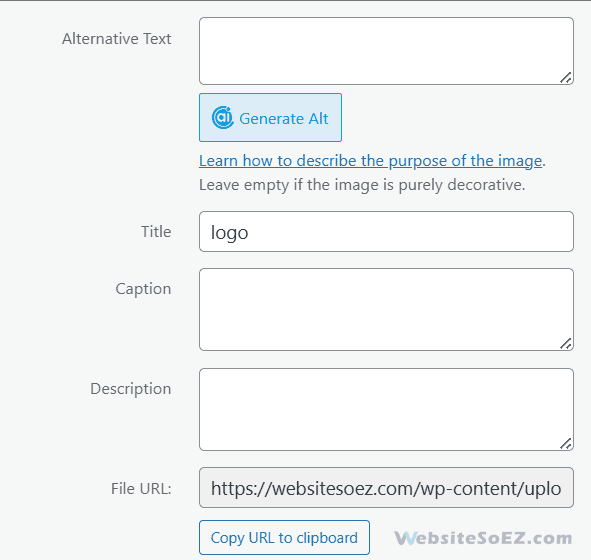
For more options, click “Edit” to access the full editing screen. Key fields include:
3.1 Alternative Text (Alt Text) – Importance for SEO
Alt text is a critical feature for images, serving dual purposes:
- Accessibility: It provides a description for screen readers, aiding visually impaired users.
- SEO: Search engines use alt text to understand and index images, boosting your site’s visibility in image searches.
Tips for effective alt text:
- Be descriptive (e.g., “A red rose in a glass vase on a wooden table”).
- Keep it concise (under 125 characters).
- Use relevant keywords naturally, avoiding overstuffing.
For example, replace “img123.jpg” with “A sunset over the ocean with palm trees in the foreground.”
3.2 Title, Caption, Description
- Title: The file’s name, shown in the Media Library and used in galleries or attachment pages. Make it descriptive (e.g., “Ocean Sunset”).
- Caption: A brief text displayed beneath the media in posts or pages, offering immediate context (e.g., “A serene sunset view”).
- Description: A longer explanation, typically used on attachment pages or in certain themes (e.g., “This photo captures a sunset on a tropical beach with vibrant colors”).
While titles and descriptions are optional, captions can significantly improve user engagement.
4. Inserting Media into Posts and Pages
WordPress makes it easy to add media to your content. Here’s how to handle different types:
Images:
- In the editor, position your cursor where you want the image.
- Click “Add Media.”
- Select or upload an image.
- Set alignment (left, center, right, none), size (thumbnail, medium, large, full), and link options (media file, attachment page, custom URL, none).
- Click “Insert into post.”
You can also designate an image as the “Featured Image” for prominent display in your theme.
Galleries:
- Click “Add Media.”
- Select multiple images and click “Create Gallery.”
- Arrange images, set column numbers, and adjust link settings.
- Click “Insert gallery.”

Videos and Audio:
- Upload the file to the Media Library.
- Insert it with the “Embed Media Player” option for an in-content player, or link to it for external playback.
Documents:
- Upload the file (e.g., a PDF).
- Use “Add Media” to insert a link into your content.
Plugins can enhance functionality, such as embedding document viewers.
5. Basic Image Optimization
WordPress offers a built-in image editor for basic adjustments. To use it:
- Go to the Media > Library.
- Click an image and select “Edit Image.”
Available tools include:
- Crop: Trim the image by selecting an area, with options for aspect ratios (e.g., 1:1) or free cropping.
- Rotate: Turn the image 90 degrees left/right or flip it horizontally/vertically.
- Scale: Resize by entering new dimensions (downscaling only, to preserve quality).

Edits are non-destructive; revert to the original by selecting “Restore Original Image.” For advanced edits, use external tools like Photoshop or GIMP before uploading.
6. Organizing Media Files
WordPress stores files in the wp-content/uploads directory by year and month, but the Media Library lacks native folder support. To organize:
- Install plugins like “Media Library Folders” or “WP Media Folder” for virtual folders.
- Use search and filter options (by date, type, or name).
- Add tags or categories with plugins like “Enhanced Media Library.”
Effective organization is key for managing extensive libraries.
7. Best Practices for Media Management
Optimize your Media Library with these tips:
- Image Optimization: Compress images pre-upload with tools like TinyPNG to reduce file size.
- External Hosting: Use platforms like YouTube or SoundCloud for large video/audio files, embedding them to save bandwidth.
- Cleanup: Remove unused files periodically, aided by plugins like “Media Cleaner.”
- Backups: Include media in site backups via hosting services or plugins.
These practices ensure efficiency and performance.
Conclusion
The WordPress Media Library is a vital tool for managing your site’s media. By mastering uploading, editing, inserting, and optimizing media, you can elevate your website’s appeal, accessibility, and speed. Regularly maintain your library with meaningful alt text and organization strategies for the best results.


