

Properly cooling a Raspberry Pi helps it run better. especially when temperatures rise due to the performance of a specific task that requires the use of greater resources, generating some instability until it cools down.
It is true that The Raspberry Pi can function without a heat dissipating device at temperatures between 60 and 110 degreesHowever, many experts recommend using a fan compatible with the model you are using.
In this guide We're going to show you the reasons why you should consider installing a fan on your Raspberry Pi.the correct way to place it without making any mistakes y the best kits that you will find in the market to improve the cooling of the plate.
What is the purpose of a fan on a Raspberry Pi, and how many can I connect per board?
A fan properly installed on the Raspberry Pi allows the board to work better. When the processor is under heavy use and the temperature reaches a certain level, the system protects itself, which leads to a decrease in speed and tasks becoming very slow, in order to prevent failures.
That's what we want to avoid, that the process slows down and that The mini computer overheats. For this, it is recommended to install a small fan. According to the motherboard specifications, It is possible to connect up to two fans to the 5V ports to give them greater speed.
Learn step by step how to connect a fan to a Raspberry Pi single-board computer from scratch and without errors
Installing a fan is simple; with just a few steps, you'll have it up and running in minutes. Before starting the setup, The mini computer must be disconnected from the electrical system.That way you won't run the risk of causing damage.
In the case of the Raspberry Pi 3, have a more powerful processor than the previous ones, which makes It gets very hot when it's under full load.The data shows that it can reach temperatures of 85 degrees. Therefore, we will explain how to connect an external fan.
The Pi 4Because of the power of this plate, it also gives off a lot of heat., This is evidenced by the faster USB ports, as well as the Ethernet port, in addition to the improved CPU and GPU combination. All of this It requires more energy and therefore increases its temperature levels. The various comparative tables that have been made have shown that there is a marked difference between having heat sinks and fans placed on a motherboard.
Therefore, if you are going to use the Raspberry Pi for a long time, it is best to install it:
Connect to any Raspberry Pi model

Adding a fan to the motherboard is not complicated at all; the steps to install it are the same for any of the models:
- Disconnect the power supply of the Raspberry Pi.
- Locate the 5V pins, which are the first two on the left side, and GND that they are together.
- On the 5V pin You connect the red fan wire y Connect the black one to GND.
- Now connect the power supply to see if the fan starts to spin.
- Si The fan isn't working.Turn it off again and check the connections.
Another option is buy a box that already has the fan connected And it comes with all the printed instructions. There are many models, but we'll talk about those next. Also, You can opt for a heatsink that lowers the temperature. There are also different models available with specific features that might be useful to us.
Discover the best fan and heatsink kits you can buy for your Raspberry Pi
By now you've probably already realized you need a cooling system for your Raspberry Pi. Here's what you need. We've included some of the kits available online, evaluating their price and quality..
Among them you can choose the one that suits you best, adjusting to your budget and needs:
GeeekPi Raspberry Pi 4
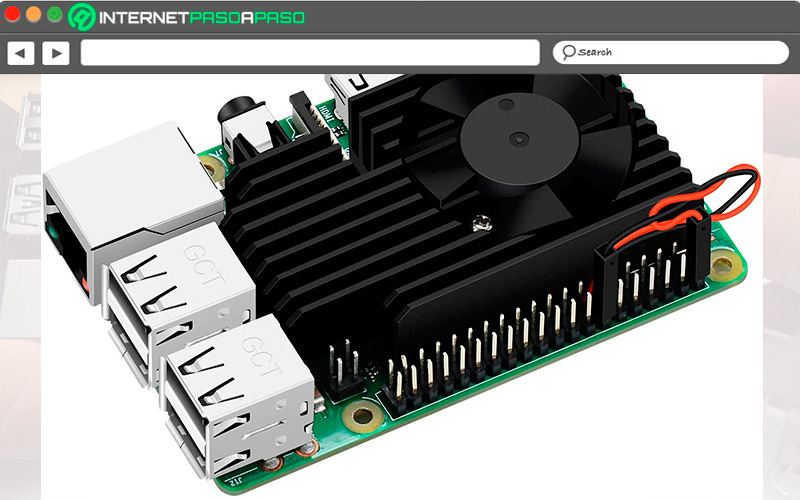
Es Compatible with Pi 4B and Pi 3B+ modelsThe heatsink is made of aluminum and features a pair of straps for secure attachment. The kit includes the heatsink, a fan, another copper heatsink, and four thermal strips: two for the 4B and two for the 3B+.
Easycargo Raspberry Pi

The model presented is compatible with Raspberry Pi series 2 and 3 in all its updates. The kit includes a 1.181-inch fan, two aluminum pieces, and a copper heatsink.
Ultimate 3510 Fan Kit

Now we show a cooling system Designed for Raspberry Pi 3 B+It includes a protective back cover. It has two aluminum blocks that help dissipate heat and a powerful yet quiet fan.
Seamuing Raspberry Pi

This cooling tool It works on Pi 4, 3B, 3+ models. Zero and Zero W among other computersThe 5V fan is presented as a good cooling option, with installation screws and very low noise that does not interfere with daily activities.
The prices of the kits vary depending on what they include.However, if you only buy the fan, you can find them for $5 and up, a good investment considering the features it offers. lowering the processor temperature by half.


