

anime icon tutorial
How to make this icon: 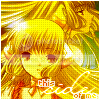
This is my first tutorial, so please forgive me if it sucks. I forgot to save the images for the steps, so I only have images of the gradients I used, the image I used, and the end resualt. I hope this is clear enough for you to understand
chobits icon
steps:
Note. I used PSP7 to make this icon
1: I took this image and cropped it so it was 98 x 98 (explain that later)

2: I used the sharpen tool
3: I created a new layer and used the motion blur filter and put it at 1.00
4: then I set the blend mode to mutiply and set the opacity to 30
5: then i created a new layer and added this gradient and set the blend mode to burn
6: then i created another new layer and filled it with this gradient and set it to burn and set the opacity at 40
7: I then flattened the image and set the contrast at 20
8: I then duplicated the layer, went to effects > weave(setting: gap size 1, width 1, opacity 1, gap color black, weave color white.) and then set the blend mode to nornal with the opacity at 10
9: now it's time for text. I created a new layer and set it to hard light at opacity 100
10: for the word "side" I used the lainie day font at 28 px in white. I then I used this color (#E8A600) for the drop shadow (settings: vertical 0, horizontal 0, opacity 100, blur 2.5)
11: almost done. I created one more layer and also created a new image for the last bit of text. I wrote the word "this" on the new image (make sure the new image is white) and the text color #DE8C00. I used the BM Mini font at 6px. while the text is still selected, go to selections > modify > expaned 1px, then cut the text and paste it onto the icon and set the blend mode to normal, opacity 80
12: Do the same for the other text ("of me")
13: After all that is done, flatten the image
13: Last but not leaset is the border. I set the background color to white and went to image > add border > 1px each side.
Tada! your done!</lj>
This is my first tutorial, so please forgive me if it sucks. I forgot to save the images for the steps, so I only have images of the gradients I used, the image I used, and the end resualt. I hope this is clear enough for you to understand
chobits icon
steps:
Note. I used PSP7 to make this icon
1: I took this image and cropped it so it was 98 x 98 (explain that later)
2: I used the sharpen tool
3: I created a new layer and used the motion blur filter and put it at 1.00
4: then I set the blend mode to mutiply and set the opacity to 30
5: then i created a new layer and added this gradient
and set the blend mode to burn6: then i created another new layer and filled it with this gradient
and set it to burn and set the opacity at 407: I then flattened the image and set the contrast at 20
8: I then duplicated the layer, went to effects > weave(setting: gap size 1, width 1, opacity 1, gap color black, weave color white.) and then set the blend mode to nornal with the opacity at 10
9: now it's time for text. I created a new layer and set it to hard light at opacity 100
10: for the word "side" I used the lainie day font at 28 px in white. I then I used this color (#E8A600) for the drop shadow (settings: vertical 0, horizontal 0, opacity 100, blur 2.5)
11: almost done. I created one more layer and also created a new image for the last bit of text. I wrote the word "this" on the new image (make sure the new image is white) and the text color #DE8C00. I used the BM Mini font at 6px. while the text is still selected, go to selections > modify > expaned 1px, then cut the text and paste it onto the icon and set the blend mode to normal, opacity 80
12: Do the same for the other text ("of me")
13: After all that is done, flatten the image
13: Last but not leaset is the border. I set the background color to white and went to image > add border > 1px each side.
Tada! your done!
</lj>