
Full Icon Tutorial - no brushes or gradients needed!
I've been reading the tutorials on this community for a while now and I've learnt so much! So I thought I'd share some of the stuff I've come up with.
This is an easy Full Tutorial for this Icon in PS7:
I didn't use any brushes or gradients! Just some simple tricks anyone can try!
Firstly we start with this base - since I reduced it from a larger image I have Sharpened it (Filter>Sharpen>Sharpen) twice to make it clear: Now we go to Image>Adjustments>Hue/Saturation and move the Saturation slider down to -45 or so to dull the colours:
 Create a new Layer above and Flood fill it with colour - I've chosen 00D0FF
 I set this layer to Exclusion @ 23% Opacity to get:
 Now it's a bit dull looking, so I duplicated the Base layer, moved this new layer above my Colour layer, and set it to Screen @ 64% Opacity:
 Lets give it some Colour!
Create a new layer above all the rest and pick any old Photoshop brush (I chose a round blurred edged brush at size 17, but it doesn't really matter) and scribble random colour all over your new layer! Like this: Now go to Filter>Blur>Gaussian Blur and play with the slider until all your colours blend together so it looks something like this:
 Now set this Layer at Color Burn @ 37% Opacity and we get:
 You can make your colours bolder if you like, but I only want a tint.
I want the picture to be focused on Rinoa, so I'm going to blur out the left of the picture a little. Create another new layer and using the brush tool again cover the left of the picture in white: Ok, it looks really silly at the moment but we're gonna make it better - go to Filter>Blur>Motion Blur. I used these settings, but you should experiment to get the look you want:
And we get: So much better! But still too bold, so I reduce the Opacity to 72% and we get:
 I like it! Now we're going to make a border.
Create a new transparent layer and then use the select tool to select a square a few pixels from the edge of your icon like this:
 Now right click and from the menu choose Select Inverse. This will select the small border around the edge of your icon like this:
 Now use the flood fill tool to fill in the selected area in whatever colour you like. I coloured it in a dark blue:
 Change the settings to Overlay @ 50% Opacity and we get:
 Now for a bit of Texture, I'm going add this texture by
  inxsomniax:
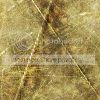 And set at Soft Light (100% Opacity) above all the other layers we get:
 All we need now is Text! I'm gonna use Times New Roman, 10 pt, Anti-Alias set at Sharp, and with an Outer Glow Blending Option at these settings:
Woohoo! We're Done! We now have: Using these Layers:
