
Another PS7 Tutorial
Just wanted to say I adore this community and thought it was high time I contributed. This icon has been made exclusively from techniques I've learned from our great icon makers here and probably contains snippets from four or five different tutorials. I made it in Photoshop 7 but no doubt it's translatable.
Let's make this icon

ETA: This tutorial is a variation of and borrows heavily from this work of art tutorial by grass_stained. Hope you don't mind the re-hash, mate!
1. Here's the image I started with (the lovely Olivia Benson from the L&O:SVU season 4 episode Disappearing Acts):

2. Either use the crop tool or the rectangular marquee tool
  to make your base (100 x 100). Tip, I prefer the marquee tool and to get a perfect square, I hold my shift key down while dragging. This is what I came up with:

3. Sharpen it once. (Filter --> Sharpen --> Sharpen)

4. I created a new layer and pasted this brush on top of the base

5. Using the magic wand tool , I selected the left portion of the above brush:

and hit the "delete" key to get this:

I then used the magic wand/delete technique on the right side of the brush to get this:

6. Next I duplicated the original layer twice (Layer --> Duplicate Layer)
7. Selecting the top copy below the brush, I clicked, held and dragged the image to the right:

8. Selecting the layer closest to the original, I then clicked, held and dragged this image slightly to the left:

9. I then flattened the image (Layer --> Flatten Image)
10. Next I duplicated the flattened image three times (Layer --> Duplicate Layer)
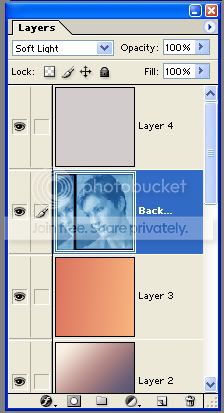
11. I set all copies to Soft Light 100%.

12. I then selected the top copy and went to Image --> Adjustments --> Desaturate
13. Using the same layer, I then went to Image --> Adjustments --> Variations. I clicked More Cyan x 3 and More Blue x 4 and Lighter x 3 so the very top layer below the brush should now look similar to this:

14. I created the following new layers above all the image layers:
 # 013460 set to exclusion 100%
then
 Set to Overlay 100%
then
 Set to Colour 100%
then
 # D2CCCC set to Overlay 100%
15. I then repositioned the blue image of Olivia layer at 13 between the top two layers
to get this:

16. Finally I added a new layer for text between the top and 2nd layers. I used a font called "Shopping List" (which I can't remember where I found - sorry!) set at 30 pt, colour #000000, lower case, regular and Strong. I selected and rotated the text 90 deg CW (Edit --> Transform --> Rotate 90 deg CW), changed the vertical ratio to 70% and moved it to the top right hand corner of the image to finish with this:
If you have any questions or if something is not clear, please don't hesitate to comment. I'm more than happy to help.
Let's make this icon
ETA: This tutorial is a variation of and borrows heavily from this work of art tutorial by
grass_stained. Hope you don't mind the re-hash, mate!1. Here's the image I started with (the lovely Olivia Benson from the L&O:SVU season 4 episode Disappearing Acts):
2. Either use the crop tool
or the rectangular marquee tool to make your base (100 x 100). Tip, I prefer the marquee tool and to get a perfect square, I hold my shift key down while dragging. This is what I came up with:3. Sharpen it once. (Filter --> Sharpen --> Sharpen)
4. I created a new layer and pasted this brush on top of the base
5. Using the magic wand tool
, I selected the left portion of the above brush:and hit the "delete" key to get this:
I then used the magic wand/delete technique on the right side of the brush to get this:
6. Next I duplicated the original layer twice (Layer --> Duplicate Layer)
7. Selecting the top copy below the brush, I clicked, held and dragged the image to the right:
8. Selecting the layer closest to the original, I then clicked, held and dragged this image slightly to the left:
9. I then flattened the image (Layer --> Flatten Image)
10. Next I duplicated the flattened image three times (Layer --> Duplicate Layer)
11. I set all copies to Soft Light 100%.
12. I then selected the top copy and went to Image --> Adjustments --> Desaturate
13. Using the same layer, I then went to Image --> Adjustments --> Variations. I clicked More Cyan x 3 and More Blue x 4 and Lighter x 3 so the very top layer below the brush should now look similar to this:
14. I created the following new layers above all the image layers:
# 013460 set to exclusion 100%then
Set to Overlay 100%then
Set to Colour 100%then
# D2CCCC set to Overlay 100%15. I then repositioned the blue image of Olivia layer at 13 between the top two layers
to get this:
16. Finally I added a new layer for text between the top and 2nd layers. I used a font called "Shopping List" (which I can't remember where I found - sorry!) set at 30 pt, colour #000000, lower case, regular and Strong. I selected and rotated the text 90 deg CW (Edit --> Transform --> Rotate 90 deg CW), changed the vertical ratio to 70% and moved it to the top right hand corner of the image to finish with this:
If you have any questions or if something is not clear, please don't hesitate to comment. I'm more than happy to help.