AI Assistant answers your users’ questions instantly, right in your app. Powered by the latest large language models (LLMs), it learns from your knowledge base and website content to provide accurate, automated responses - reducing support tickets and enabling users to get the help they need without waiting.
Setup only takes minutes. Just add your website URL or integrate with common knowledge base systems, and AI Assistant handles the rest.
How the AI Assistant works
Create an AI Assistant by connecting your content sources - your website, knowledge base, support center, or all three. Click to train it, and it’s ready to answer questions based on your content, including follow-up questions that build on the conversation.
Users access AI Assistant through your Resource Center.

Training your AI Assistant
AI Assistants are created, managed, and published in a similar manner to other Userflow content, such as Flows and Checklists. However, they also require a brief training step before publishing.
Step 1: Create the AI Assistant
Select AI Assistants in the sidebar and click Create AI assistant.

Enter a name and click Create assistant.

Step 2: Add sources and train the AI Assistant
Click Add source and select an option. Learn more about the Web crawler and other source types below.

Enter the source information in the right-hand panel.
Click Train. Userflow will fetch all source information and train the assistant. Depending on the amount of content, it may take several seconds to minutes.
Adding multiple sources
You can add multiple sources if you have content on different domains, such as yourdomain.com and help.yourdomain.com.
Whenever you change the assistant settings, you must click Train to apply the changes.
Step 3: Test the assistant
After training is complete, click Test chat and enter search criteria relevant to your source to view how the assistant responds. The result will display in the test chat window. Test follow-up questions as well.

AI Assistant Limits
Note that test chats count against your AI Assistant message limits. To learn more about assistant-level limits ang global limits and how test chats are considered, refer to our documentation.

Refine your source settings to improve the AI Assistant’s accuracy. Common adjustments include:
Exclude irrelevant pages: Block the crawler from specific URLs to prevent training on unrelated content. Activate the Control URLs to visit option and add URLs to the Do not visit URLs matching field. Use the "+” to add multiple URLs.
Filter page content: Remove headers, footers, and navigation menus using CSS selectors by adding them to the Only include HTML matching CSS selector and/or Exclude HTML matching CSS selector settings. You can verify the text stored for each page the AI Assistant trained on by clicking the number of documents trained and selecting a document in the list to view it. Read more about this in the Web crawler section below.

Step 4: Configure your assistant settings
The AI Assistant settings include advanced customizations, assistant-level limit settings to help you stay within your usage budget, and customizations for your standard message placeholders, UI copy, and set feedback settings. Learn more in our AI Assistant settings and advanced customizations documentation.
Step 5: Publish your assistant
Click Publish when you are satisfied with your test results.
The assistant is now usable but not yet visible to users. Follow the steps in the next section to add it to your Resource Center.
Step 6: Add the AI Assistant to your Resource Center
After you publish your AI Assistant, add it to your Resource Center to make it visible to your users.
Select Resource centers in the sidebar.
Find your Resource Center in the list and click it. If you don’t have one yet, either create one or refer to the Minimal resource center solution for additional options.
Select Add block > AI Assistant.

Select your assistant from the dropdown list in the side panel, then configure:
- How it will appear (text input or button)
- Placeholder text or button tooltip text
- Whether you want to show a “contact support” button
- Conditions that must be met for the block to appear
We recommend placing the AI Assistant block at the bottom of the Resource Center and using the Text input option under Appearance. This creates an eye-catching design that captures users’ attention when they open the resource center.
Click Preview to test the Resource Center with the assistant before publishing.
When ready, click Publish to make the assistant available for users.
Content source types
You can add multiple content sources and refinements to an AI Assistant. You can also publish more than one AI Assistant for a single site.
Web crawler
The Web crawler starts at the given Starting URL and recursively follows all links.
It will only follow links within the same path as the Starting URL. Examples: If your Starting URL is https://example.com/docs, it will read https://example.com/docs/page, https://example.com/docs/sub/page, and anything else under that path, but it will not read https://example.com/other-page since it’s not under the /docs prefix. It also won’t follow links to other domains.
To prevent the crawler from visiting certain pages, enable Control URLs to visit and add URL patterns to include or exclude. When a page is not visited, the crawler will not load it, meaning it won’t store its content or follow its links.
If you want the crawler to visit certain pages but not store them as source information, enable Control URLs to store. When a page is marked as not stored, the crawler will load it and follow its links, but not store its content. This feature is useful for following links from index-like pages without including their content. For example, on a blog, you want the crawler to visit /blog and /blog/page/:page to find all old blog posts, so you can’t use the Control URLs to visit feature.
The crawler will attempt to extract only the text bits from each page’s HTML content and transform it to Markdown, which helps the assistant understand headings, sections, code, and other formatting. It’s a good idea to remove all text that’s not the main content of the page. To do this, use the Only include HTML matching CSS selector and Exclude HTML matching CSS selector settings. Examples:
If your documentation site wraps the main content in an
<article>HTML tag, enterarticleunder Only include HTML matching CSS selector.If your website has
<header>and<footer>HTML elements on all pages containing the top and bottom menus, enterheader, footerunder Exclude HTML matching CSS selector.
After training the assistant, click the x documents link in the builder header and explore some of the URLs to ensure the text is clean and free of irrelevant content.
If your website uses JavaScript to dynamically fetch content and render it asynchronously, you may find that your pages’ content is empty. If this occurs, enable Render JavaScript. You can also enter a number of milliseconds to wait before capturing the content. Choose a duration you feel confident that your page will load within. If unsure, enter the maximum value of 10,000 (10 seconds), but note that higher values may slow down training.
If your website uses special proxies or captchas, you may not see any documents under x documents and may encounter error messages in the Training log. If this happens, try enabling Captcha/proxy work-around. If the issue persists, contact Userflow support for assistance.
Note that Userflow caches your web pages for up to one week. This speeds up retraining, as it only needs to reevaluate your URL patterns, CSS selectors, etc., without waiting for your website to respond with the full HTML. If your website content has changed, click the Clear cache and train button under the top-right three-dot menu in the builder.
Text
The Text source is beneficial for providing the assistant with information that you prefer not to display directly on your website.
For instance, during the early-access phase of our AI Assistant feature, this public guide was unavailable. However, we still wanted to offer helpful information to customers inquiring about getting an assistant of their own. To achieve this, we added the following text in a Text source:
Users can get a Userflow AI Assistant of their own by contacting us via the HUMAN live-chat. We maintain a waitlist and will extend invitations soon.
Salesforce
The Salesforce source loads your Knowledge Base articles directly via the Salesforce API. It works even if your help center requires user authentication. You can easily filter which data categories you want to include.
How to set up:
Connect to Salesforce under Settings > Integrations.
Fill in your Article URL template under Salesforce Knowledge Base settings. This is how the assistant will know how to link to your articles. Example:
https://help.mysite.com/s/article/{{ article.urlName }}. If you don’t fill this field in, articles’ content will be used for answering, but the assistant will not provide any source links.Optional: By default, we’ll use the content of your articles’ Title, Question and Answer fields from Salesforce. If you’re using a different format for your articles, you can use a custom Article content template. If your articles have a custom field called,
CustomText__c, then you can use it like this:{{ layout_items.CustomText__c }}.Salesforce will now appear under the Add source button in the assistant builder.
Zendesk
The Zendesk source loads your help center articles directly via the Zendesk API. It works even if your help center requires user authentication. You can easily filter which categories/sections you want to include.
First, connect to Zendesk under Settings > Integrations. After that, Zendesk will appear in the Add source button under the assistant builder.
Intercom
The Intercom source loads your help center articles directly via the Intercom API. It works even if your help center requires user authentication. You can easily filter which categories/sections you want to include.
First, connect to Intercom under Settings > Integrations. After that, Intercom will appear in the Add source button under the assistant builder.
Minimal resource center solution
If you are not using the full Resource Center but want to implement the AI Assistant in your app, you can create a new Resource Center containing only a single AI Assistant block.

Next, have your developers disable the default Resource Center Launcher by adding the following line before your userflow.init() call. This will prevent the round Userflow help button from appearing in the corner of your app:
userflow.setResourceCenterLauncherHidden(true)Then, click Publish in the resource center builder. As the default launcher is hidden, nothing will be displayed to users.
Finally, request your developers to open the assistant chat programmatically, such as when users click a custom button in your app:
userflow.openResourceCenter()An example of an event handler on a button:
<button onclick="userflow.openResourceCenter()">
  Chat with our AI Assistant
</button>
User ratings and feedback
Users can rate the assistant’s replies using the thumbs-up and thumbs-down icons located below each response.
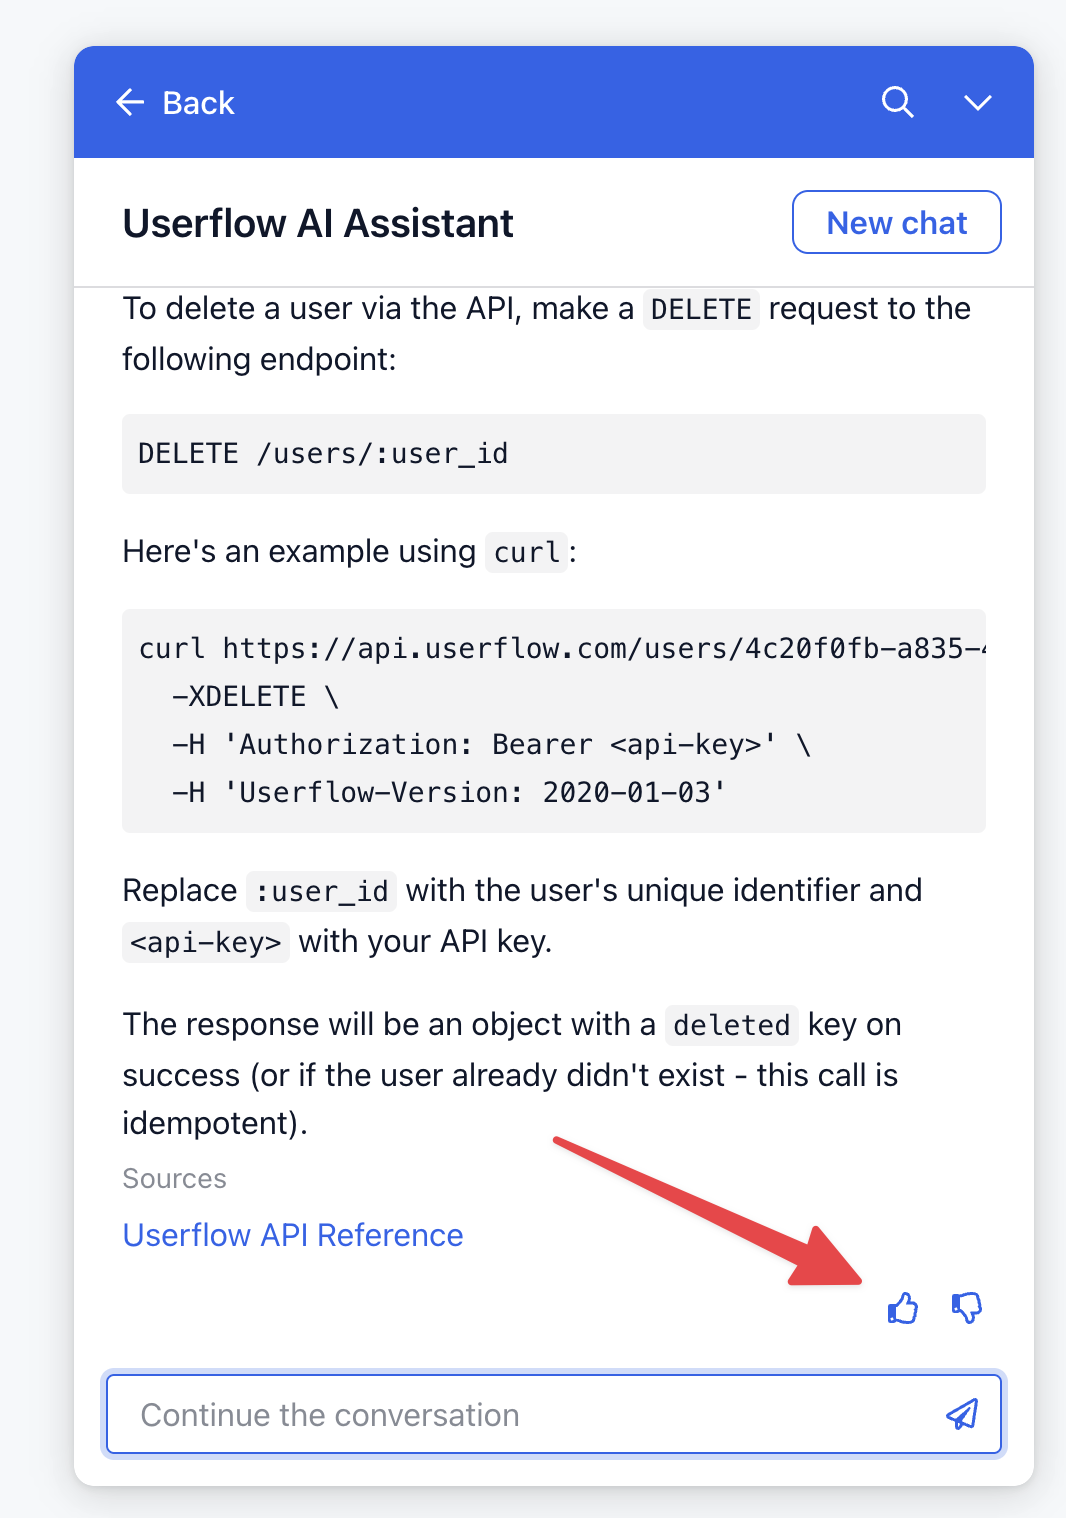
Upon liking or disliking a reply, users can provide additional feedback in a free-form text field.

You can view both the ratings and the feedback on the assistant’s Analytics tab.
Analytics
The Analytics tab includes a chart that displays the counts of messages, likes, and dislikes, with date ranges, filters, and day/week/month view options.

Additionally, the AI Assistant's analytics display all interactions it has had with users. Select a conversation to see each message, along with ratings and feedback comments. AI conversations can also be exported as a CSV by clicking the Export button next to the conversations.
