This example shows how to implement a GraphQL server with TypeScript with the following stack:
- Apollo Server: HTTP server for GraphQL APIs
- GraphQL Nexus: GraphQL schema definition and resolver implementation
- GraphQL Shield: Authorization/permission layer for GraphQL schemas
- Prisma Client: Databases access (ORM)
- Prisma Migrate: Database migrations
- Prisma Postgres: A serverless PostgreSQL database built on unikernels.
Download this example:
npx try-prisma@latest --template orm/graphql-auth --install npm --name graphql-auth
Then, navigate into the project directory:
cd graphql-auth
Alternative: Clone the entire repo
Clone this repository:
git clone git@github.com:prisma/prisma-examples.git --depth=1
Install npm dependencies:
cd prisma-examples/orm/graphql-auth
npm install
Create a new Prisma Postgres database by executing:
npx prisma init --db
If you don't have a Prisma Data Platform account yet, or if you are not logged in, the command will prompt you to log in using one of the available authentication providers. A browser window will open so you can log in or create an account. Return to the CLI after you have completed this step.
Once logged in (or if you were already logged in), the CLI will prompt you to:
- Select a region (e.g.
us-east-1) - Enter a project name
After successful creation, you will see output similar to the following:
CLI output
Let's set up your Prisma Postgres database!
? Select your region: ap-northeast-1 - Asia Pacific (Tokyo)
? Enter a project name: testing-migration
✔ Success! Your Prisma Postgres database is ready ✅

We found an existing schema.prisma file in your current project directory.

--- Database URL ---

Connect Prisma ORM to your Prisma Postgres database with this URL:

prisma+postgres://accelerate.prisma-data.net/?api_key=...

--- Next steps ---

Go to https://pris.ly/ppg-init for detailed instructions.

1. Install and use the Prisma Accelerate extension
Prisma Postgres requires the Prisma Accelerate extension for querying. If you haven't already installed it, install it in your project:
npm install @prisma/extension-accelerate

...and add it to your Prisma Client instance:
import { withAccelerate } from "@prisma/extension-accelerate"

const prisma = new PrismaClient().$extends(withAccelerate())

2. Apply migrations
Run the following command to create and apply a migration:
npx prisma migrate dev

3. Manage your data
View and edit your data locally by running this command:
npx prisma studio

...or online in Console:
https://console.prisma.io/{workspaceId}/{projectId}/studio

4. Send queries from your app
If you already have an existing app with Prisma ORM, you can now run it and it will send queries against your newly created Prisma Postgres instance.

5. Learn more
For more info, visit the Prisma Postgres docs: https://pris.ly/ppg-docs
Locate and copy the database URL provided in the CLI output. Then, create a .env file in the project root:
touch .envNow, paste the URL into it as a value for the DATABASE_URL environment variable. For example:
# .env
DATABASE_URL=prisma+postgres://accelerate.prisma-data.net/?api_key=ey...
Run the following command to create tables in your database. This creates the User and Post tables that are defined in prisma/schema.prisma:
npx prisma migrate dev --name init
Execute the seed file in prisma/seed.ts to populate your database with some sample data, by running:
npx prisma db seed
Launch your GraphQL server with this command:
npm run dev
Navigate to http://localhost:4000 in your browser to explore the API of your GraphQL server in a GraphQL Playground.
The schema that specifies the API operations of your GraphQL server is defined in ./schema.graphql. Below are a number of operations that you can send to the API using the GraphQL Playground.
Feel free to adjust any operation by adding or removing fields. The GraphQL Playground helps you with its auto-completion and query validation features.
query {
  feed {
    id
    title
    content
    published
    author {
      id
      name
      email
    }
  }
}
See more API operations
You can send the following mutation in the Playground to sign up a new user and retrieve an authentication token for them:
mutation {
  signup(name: "Sarah", email: "sarah@prisma.io", password: "HelloWorld42") {
    token
  }
}This mutation will log in an existing user by requesting a new authentication token for them.
mutation {
  login(email: "sarah@prisma.io", password: "HelloWorld42") {
    token
  }
}
If you seeded the database with sample data in step 2. of this README, you can use the following email and password combinations (from prisma/seed.ts) for the login mutation as well:
| Password | |
|---|---|
alice@prisma.io |
myPassword42 |
nilu@prisma.io |
random42 |
mahmoud@prisma.io |
iLikeTurtles42 |
For this query, you need to make sure a valid authentication token is sent along with the Bearer-prefix in the Authorization header of the request:
{
  "Authorization": "Bearer __YOUR_TOKEN__"
}
With a real token, this looks similar to this:
{
  "Authorization": "Bearer eyJhbGciOiJIUzI1NiIsInR5cCI6IkpXVCJ9.eyJ1c2VySWQiOiJjanAydHJyczFmczE1MGEwM3kxaWl6c285IiwiaWF0IjoxNTQzNTA5NjY1fQ.Vx6ad6DuXA0FSQVyaIngOHYVzjKwbwq45flQslnqX04"
}
Inside the Playground, you can set HTTP headers in the bottom-left corner:
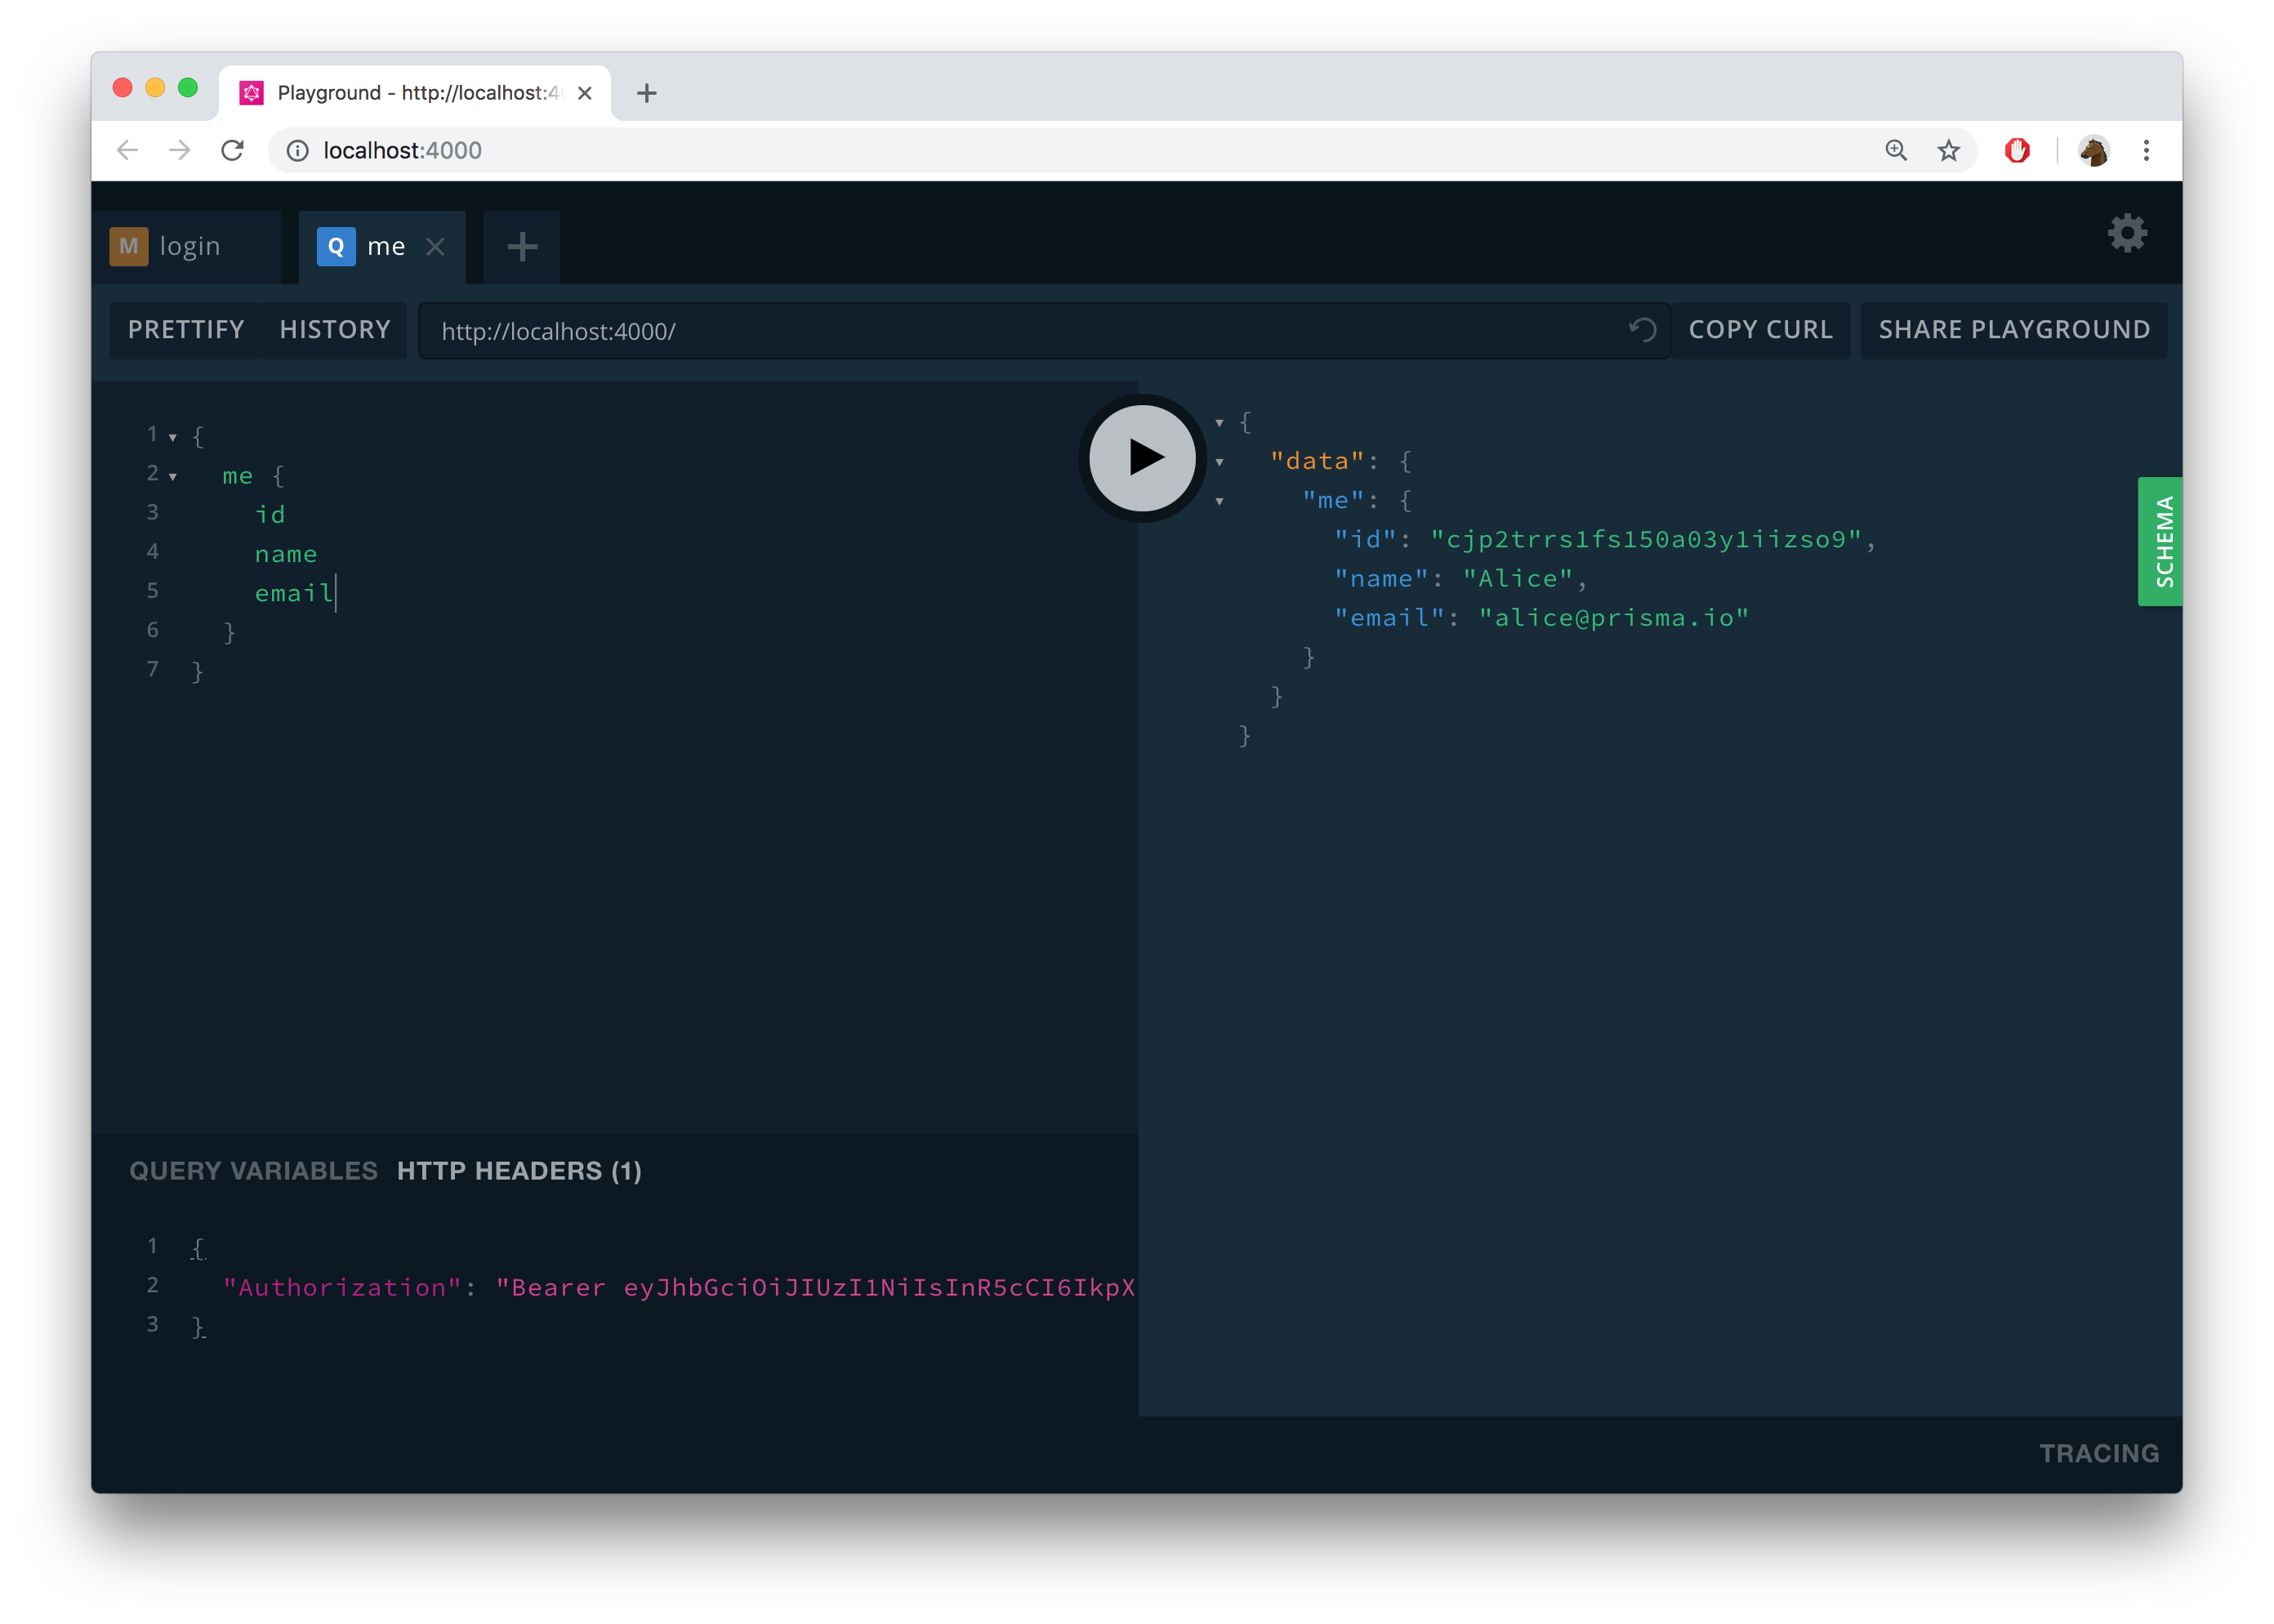
Once you've set the header, you can send the following query to check whether the token is valid:
{
  me {
    id
    name
    email
  }
}You need to be logged in for this query to work, i.e. an authentication token that was retrieved through a signup or login mutation needs to be added to the Authorization header in the GraphQL Playground.
mutation {
  createDraft(
    data: {
      title: "Join the Prisma Discord"
      content: "https://pris.ly/discord"
    }
  ) {
    id
    published
  }
}You need to be logged in for this query to work, i.e. an authentication token that was retrieved through a signup or login mutation needs to be added to the Authorization header in the GraphQL Playground. The authentication token must belong to the user who created the post.
mutation {
  togglePublishPost(id: __POST_ID__) {
    id
    published
  }
}
Note that you need to replace the __POST_ID__ placeholder with an actual id from a Post record in the database, e.g.5:
mutation {
  togglePublishPost(id: 5) {
    id
    published
  }
}{
feed(
searchString: "prisma"
) {
id
title
content
published
}
}You need to be logged in for this query to work, i.e. an authentication token that was retrieved through a signup or login mutation needs to be added to the Authorization header in the GraphQL Playground.
{
  postById(id: __POST_ID__ ) {
    id
    title
    content
    published
  }
}
Note that you need to replace the __POST_ID__ placeholder with an actual id from a Post record in the database, e.g.5:
{
  postById(id: 5 ) {
    id
    title
    content
    published
  }
}You need to be logged in for this query to work, i.e. an authentication token that was retrieved through a signup or login mutation needs to be added to the Authorization header in the GraphQL Playground. The authentication token must belong to the user who created the post.
mutation {
  deletePost(id: __POST_ID__) {
    id
  }
}
Note that you need to replace the __POST_ID__ placeholder with an actual id from a Post record in the database, e.g.5:
mutation {
  deletePost(id: 5) {
    id
  }
}You need to be logged in for this query to work, i.e. an authentication token that was retrieved through a signup or login mutation needs to be added to the Authorization header in the GraphQL Playground.
{
  draftsByUser(
    userUniqueInput: {
      email: "mahmoud@prisma.io"
    }
  ) {
    id
    title
    content
    published
    author {
      id
      name
      email
    }
  }
}In this example, you authenticate your GraphQL requests using the Authorization header field of the HTTP requests which are sent from clients to your GraphQL server. The required authentication token is returned by successful signup and login mutations.
Using the GraphQL Playground, the Authorization header can be configured in the HTTP HEADERS tab in the bottom-left corner of the GraphQL Playground. The values for the HTTP headers are defined in JSON format. Note that the authentication token needs to be sent with the Bearer -prefix:
{
  "Authorization": "Bearer __YOUR_TOKEN__"
}
With a "real" authentication token, it looks similar to this:
{
  "Authorization": "Bearer eyJhbGciOiJIUzI1NiIsInR5cCI6IkpXVCJ9.eyJ1c2VySWQiOiJjanAydHJyczFmczE1MGEwM3kxaWl6c285IiwiaWF0IjoxNTQzNTA5NjY1fQ.Vx6ad6DuXA0FSQVyaIngOHYVzjKwbwq45flQslnqX04"
}
As mentioned before, you can set HTTP headers in the bottom-left corner of the GraphQL Playground:
The following authorization rules are defined for the GraphQL API via GraphQL Shield:
| Operation name | Operation type | Rule | Description |
|---|---|---|---|
me |
Query | isAuthenticatedUser |
Requires a user to be authenticated |
draftsByUser |
Query | isAuthenticatedUser |
Requires a user to be authenticated |
postById |
Query | isAuthenticatedUser |
Requires a user to be authenticated |
createDraft |
Mutation | isAuthenticatedUser |
Requires a user to be authenticated |
deletePost |
Mutation | isPostOwner |
Requires the authenticated user to be the author of the post to be deleted |
incrementPostViewCount |
Mutation | isAuthenticatedUser |
Requires a user to be authenticated |
togglePublishPost |
Mutation | isPostOwner |
Requires the authenticated user to be the author of the post to be published/unpublished |
The isAuthenticatedUser rule requires you to send a valid authentication token. The isPostOwner rule additionaly requires the user to whom this authentication token belongs to be the author of the post on which the operation is applied.
Evolving the application typically requires two steps:
- Migrate your database using Prisma Migrate
- Update your application code
For the following example scenario, assume you want to add a "profile" feature to the app where users can create a profile and write a short bio about themselves.
The first step is to add a new table, e.g. called Profile, to the database. You can do this by adding a new model to your Prisma schema file file and then running a migration afterwards:
// ./prisma/schema.prisma

model User {
  id      Int      @default(autoincrement()) @id
  name    String?
  email   String   @unique
  posts   Post[]
+ profile Profile?
}

model Post {
  id        Int      @id @default(autoincrement())
  createdAt DateTime @default(now())
  updatedAt DateTime @updatedAt
  title     String
  content   String?
  published Boolean  @default(false)
  viewCount Int      @default(0)
  author    User?    @relation(fields: [authorId], references: [id])
  authorId  Int?
}

+model Profile {
+  id     Int     @default(autoincrement()) @id
+  bio    String?
+  user   User    @relation(fields: [userId], references: [id])
+  userId Int     @unique
+}
Once you've updated your data model, you can execute the changes against your database with the following command:
npx prisma migrate dev --name add-profile
This adds another migration to the prisma/migrations directory and creates the new Profile table in the database.
You can now use your PrismaClient instance to perform operations against the new Profile table. Those operations can be used to implement queries and mutations in the GraphQL API.
First, add a new GraphQL type via Nexus' objectType function:
// ./src/schema.ts

+const Profile = objectType({
+  name: 'Profile',
+  definition(t) {
+    t.nonNull.int('id')
+    t.string('bio')
+    t.field('user', {
+      type: 'User',
+      resolve: async (parent, _, context) => {
+      const profile = await context.prisma.profile.findUnique({
+        where: { id: parent?.id },
+         include: { user: true }
+      })
+       return profile.user
+      },
+    })
+  },
+})

const User = objectType({
  name: 'User',
  definition(t) {
    t.nonNull.int('id');
    t.string('name');
    t.nonNull.string('email');
    t.nonNull.list.nonNull.field('posts', {
      type: 'Post',
      resolve: (parent, _, context) => {
        return context.prisma.user
          .findUnique({
            where: { id: parent.id || undefined },
          })
          .posts();
      },
+    t.field('profile', {
+      type: 'Profile',
+      resolve: (parent, _, context) => {
+      return context.prisma.profile.findUnique({
+        where: { userId: parent?.id }
+      })
+      },
+    });
  },
});
Don't forget to include the new type in the types array that's passed to makeSchema:
export const schema = makeSchema({
  types: [
    Query,
    Mutation,
    Post,
    User,
+   Profile,
    UserUniqueInput,
    UserCreateInput,
    PostCreateInput,
    PostOrderBy,
    DateTime,
  ],
  // ... as before
}
Note that in order to resolve any type errors, your development server needs to be running so that the Nexus types can be generated. If it's not running, you can start it with npm run dev.
// ./src/schema.ts

const Mutation = objectType({
  name: 'Mutation',
  definition(t) {

    // other mutations

+   t.field('addProfileForUser', {
+     type: 'Profile',
+     args: {
+       userUniqueInput: nonNull(
+         arg({
+           type: 'UserUniqueInput',
+         }),
+       ),
+       bio: stringArg()
+     },
+     resolve: async (_, args, context) => {
+       return context.prisma.profile.create({
+         data: {
+           bio: args.bio,
+           user: {
+             connect: {
+               id: args.userUniqueInput.id || undefined,
+               email: args.userUniqueInput.email || undefined,
+             }
+           }
+         }
+       })
+     }
+   })

  }
})
Finally, you can test the new mutation like this:
mutation {
  addProfileForUser(
    userUniqueInput: {
      email: "mahmoud@prisma.io"
    }
    bio: "I like turtles"
  ) {
    id
    bio
    user {
      id
      name
    }
  }
}
Expand to view more sample Prisma Client queries on Profile
Here are some more sample Prisma Client queries on the new Profile model:
const profile = await prisma.profile.create({
  data: {
    bio: 'Hello World',
    user: {
      connect: { email: 'alice@prisma.io' },
    },
  },
})const user = await prisma.user.create({
data: {
email: 'john@prisma.io',
name: 'John',
profile: {
create: {
bio: 'Hello World',
},
},
},
})const userWithUpdatedProfile = await prisma.user.update({
where: { email: 'alice@prisma.io' },
data: {
profile: {
update: {
bio: 'Hello Friends',
},
},
},
})If you want to try this example with another database than Postgres, you can adjust the the database connection in prisma/schema.prisma by reconfiguring the datasource block.
Learn more about the different connection configurations in the docs.
Expand for an overview of example configurations with different databases
Before you proceed to use your own database, you should remove the Prisma client extension required for Prisma Postgres:
npm uninstall @prisma/extension-accelerate
Remove the client extension from your PrismaClient:
- const prisma = new PrismaClient().$extends(withAccelerate())
+ const prisma = new PrismaClient()To use your own PostgreSQL database remove the @prisma/extension-accelerate package and remove the Prisma client extension.
Modify the provider value in the datasource block in the prisma.schema file:
datasource db {
  provider = "sqlite"
  url      = env("DATABASE_URL")
}
Create an .env file and add the SQLite database connection string in it. For example:
DATABASE_URL="file:./dev.db""
Modify the provider value in the datasource block in the prisma.schema file:
datasource db {
  provider = "mysql"
  url      = env("DATABASE_URL")
}
Create an .env file and add a MySQL database connection string in it. For example:
## This is a placeholder url
DATABASE_URL="mysql://janedoe:mypassword@localhost:3306/notesapi"
Modify the provider value in the datasource block in the prisma.schema file:
datasource db {
  provider = "sqlserver"
  url      = env("DATABASE_URL")
}
Create an .env file and add a Microsoft SQL Server database connection string in it. For example:
## This is a placeholder url
DATABASE_URL="sqlserver://localhost:1433;initial catalog=sample;user=sa;password=mypassword;"
Modify the provider value in the datasource block in the prisma.schema file:
datasource db {
  provider = "mongodb"
  url      = env("DATABASE_URL")
}
Create an .env file and add a local MongoDB database connection string in it. For example:
## This is a placeholder url
DATABASE_URL="mongodb://USERNAME:PASSWORD@HOST/DATABASE?authSource=admin&retryWrites=true&w=majority"
- Check out the Prisma docs
- Join our community on Discord to share feedback and interact with other users.
- Subscribe to our YouTube channel for live demos and video tutorials.
- Follow us on X for the latest updates.
- Report issues or ask questions on GitHub.