Based on https://ironpdf.com/tutorials/dotnet-core-pdf-generating/
This comprehensive guide is designed to facilitate the conversion of HTML to PDF within the context of .NET Core, leveraging the robust capabilities of IronPDF to overcome common challenges associated with PDF generation in .NET environments. Whether you're dealing with ASP.NET MVC, converting HTML documents or web pages directly to PDF, this tutorial provides you with the necessary guidance and tools. Explore IronPDF's unique features, such as the pixel-perfect debugging with Chrome to enhance the accuracy of your PDF outputs. This guide aims to equip you with the skills needed to implement diverse PDF functionalities in your .NET Core applications.
Generating PDF documents within .NET Core applications can be a complex process. Managing PDF operations in ASP.NET MVC, including the conversion of MVC views, HTML content, and web pages into PDF format, presents various challenges. This guide leverages the IronPDF library to simplify these tasks and offers step-by-step solutions for your PDF-related needs in .NET.
IronPDF also provides capabilities for ensuring precise HTML to PDF conversions with Chrome debugging.
Upon completion of this tutorial, you will be able to:
- Transform content from various sources such as URLs, HTML pages, and MVC views into PDF documents.
- Utilize sophisticated settings to tailor the PDF output to your specific requirements.
- Deploy applications across both Linux and Windows platforms.
- Harness the capabilities to manipulate PDF documents.
- Incorporate headers, footers, merge documents, and apply stamps.
- Utilize Docker for your projects.
This comprehensive suite of features for .NET Core HTML to PDF conversion is designed to address a broad spectrum of project requirements.
Based on https://ironpdf.com/tutorials/dotnet-core-pdf-generating/
Generating PDF files in .NET Core can often be complex. For anyone working with PDFs in ASP.NET MVC projects, converting MVC views, HTML files, and online web pages into PDF format poses considerable challenges. This guide focuses on using the IronPDF tool to simplify these tasks, providing comprehensive steps for various PDF-related operations in .NET.
With IronPDF, you can achieve Chrome-level debugging for HTML, ensuring your PDFs are visually perfect.
By the end of this tutorial, you will learn to:
- Convert PDFs from multiple sources such as URLs, HTML content, and MVC views
- Utilize advanced configuration for varied PDF output settings
- Deploy projects on both Linux and Windows platforms
- Harness PDF document editing functionalities
- Include headers, footers, merge documents, add stamps
- Utilize Docker containers
Explore the extensive capabilities of .NET Core for HTML to PDF conversions to meet diverse project requirements.
IronPDF can be seamlessly integrated into various .NET project environments including Windows applications, ASP.NET MVC, and .NET Core applications.
Adding the IronPDF library to your project can be done in two ways: through the Visual Studio interface using NuGet or via the command line with the package console manager.
Use either the NuGet Package Manager interface or the command line via the Package Manager Console to add IronPDF to your project:
1.1.1 Via NuGet Package Manager
1- Right-click on your project name and select 'Manage NuGet Packages' 2- In the browser tab, search for 'IronPdf' and click 'Install'
 3- Confirm by clicking 'Ok'
 4- Installation complete!

1.1.2 Using Package Manager Console
1- Go to Tools -> NuGet Package Manager -> Package Manager Console 2- Execute the command: Install-Package IronPdf

IronPDF is compatible with various .NET project types including Windows applications, ASP.NET MVC, and .NET Core applications.
There are two methods to incorporate the IronPDF library into your project: you can either use the Visual Studio editor with NuGet or opt for a command line approach utilizing the package console manager.
To incorporate the IronPDF library into our project via NuGet, there are options to utilize either the graphical user interface of the NuGet Package Manager or to employ commands through the Package Manager Console.
1.1.1 Using NuGet Package Manager
1- Right click on project name -> Select Manage NuGet Package 2- From browser tab -> search for IronPdf -> Install
 3- Click Ok
 4- Done!

1.1.2 Using NuGet Package Console manager
1- From Tools -> NuGet Package Manager -> Package Manager Console 2- Run command -> Install-Package IronPdf

Example: ConvertUrlToPdf Console Application
Follow the outlined steps to initiate a new Asp.NET MVC Project:
-
Launch Visual Studio from your programs menu.
-
Select the option to Create a new project.
-
Choose the Console App project type targeting .NET Core.
-
Name the project "ConvertUrlToPdf" and proceed to create it.
-
Visual Studio now displays the newly created console application layout.
-
Next, add IronPdf by navigating to manage NuGet packages, find IronPdf and install.
After installation, your setup should resemble this:


7. Below, add the first few code lines to convert the Wikipedia home page to PDF:
IronPdf.License.LicenseKey = "YourLicenseKey";
ChromePdfRenderer renderer = new ChromePdfRenderer();
PdfDocument pdf = renderer.RenderUrlAsPdf("https://www.wikipedia.org/");
pdf.SaveAs("wiki.pdf");Sample: ConvertUrlToPdf console application
Here's the paraphrased section of the article, with updated relative URL paths:
To initiate a new ASP.NET MVC Project, follow the outlined procedures below:
-
Initiate Visual Studio
Open your Visual Studio IDE to start the project creation process. -
Create a New Project
Select 'Create new project' to proceed with the project setup. -
Select Project Type
Choose 'Console App (.NET Core)' from the list of available templates. -
Name Your Project
Assign a name, for example, "ConvertUrlToPdf", and click on the 'Create' button to finalize the project creation. -
Project Setup Completion
Your new console application will be set up and ready for further development. -
Add IronPdf to Your Project
Proceed to enhance your project by adding the IronPdf library. Start the installation by clicking 'Install' after adding IronPdf. -
First Lines of Code
Input the preliminary lines of code to convert the main page of the Wikipedia website to a PDF file:IronPdf.License.LicenseKey = "YourLicenseKey"; ChromePdfRenderer renderer = new ChromePdfRenderer(); PdfDocument pdf = renderer.RenderUrlAsPdf("https://www.wikipedia.org/"); pdf.SaveAs("wiki.pdf");
-
Run the Project
Execute the application to create the 'wiki.pdf' file and check the generated PDF in your project's output directory.

By completing these steps, you will have successfully created a new ASP.NET MVC project and integrated the IronPDF library to convert web pages into PDF documents.
 2- Choose Create new project
 3- Choose Console App (.NET Core)
 4- Give our sample name “ConvertUrlToPdf” and click create
 5- Now we have a console application created
 6- Add IronPdf => click install


7- Add our first few lines that render a Wikipedia website main page to PDF
Here's the paraphrased code section with enhanced code comments:
// Set your IronPDF license key to unlock all features
IronPdf.License.LicenseKey = "YourLicenseKey";

// Create an instance of the Chrome PDF renderer
ChromePdfRenderer pdfRenderer = new ChromePdfRenderer();

// Render the Wikipedia homepage to a PDF document
PdfDocument document = pdfRenderer.RenderUrlAsPdf("https://www.wikipedia.org/");

// Save the rendered PDF to a file named 'wiki.pdf'
document.SaveAs("wiki.pdf");
This section delves into generating PDF documents from HTML representations using the .NET Core ecosystem. IronPDF provides the ability to both construct PDFs from HTML strings and HTML files. Here, we illustrate two methodologies for rendering HTML content into PDF format:
- Directly render a string of HTML into a PDF.
- Convert an HTML file by providing its path to the IronPDF library.
Here's the approach to convert HTML encapsulated as a string into a PDF:
IronPdf.License.LicenseKey = "YourLicenseKey";
ChromePdfRenderer renderer = new ChromePdfRenderer();
PdfDocument pdf = renderer.RenderHtmlAsPdf("<h1>Welcome to IronPdf</h1>");
pdf.SaveAs("ExampleFromHtmlString.pdf");
When this code is executed, it generates a PDF document named ExampleFromHtmlString.pdf, which will contain the HTML-rendered content. The resulting PDF appears as follows:

This simple process allows for rapid conversion of HTML snippets into ready-to-distribute PDF files, making it incredibly useful for generating reports, invoices, or any web content in a printable format.
Sample: ConvertHTMLToPdf Console application
Transforming HTML into PDF is a dual-path process:
- Directly Embed HTML String: Convert the raw HTML content directly into a PDF.
- Use an HTML File: Save the HTML content as a file, then instruct IronPDF to convert it from the specified file path into a PDF document.
Here's a code snippet demonstrating the first method, where HTML is directly input as a string:
IronPdf.License.LicenseKey = "YourLicenseKey";
ChromePdfRenderer renderer = new ChromePdfRenderer();
PdfDocument pdf = renderer.RenderHtmlAsPdf("<h1>Hello IronPdf</h1>");
pdf.SaveAs("HtmlString.pdf");
This generates a PDF document directly from the HTML string and saves it as "HtmlString.pdf". The resulting PDF can be previewed to verify its contents and layout. For instance, clicking on the link below displays how the PDF might appear:
To transform HTML to PDF, you have two practical approaches:
-
Directly input the HTML content as a string and utilize IronPDF for conversion.
-
Alternatively, save the HTML content to a file, and then provide the file path to IronPDF for processing.
Here's the paraphrased section of the article:
Rendering a sample HTML string into a PDF can be demonstrated with the following code snippet:
// Assign your license key
IronPdf.License.LicenseKey = "YourLicenseKey";

// Initialize the Chrome-based PDF renderer
ChromePdfRenderer pdfRenderer = new ChromePdfRenderer();

// Create a PDF from HTML string
PdfDocument newPdfDocument = pdfRenderer.RenderHtmlAsPdf("<h1>Hello IronPdf</h1>");

// Save the generated PDF to a file
newPdfDocument.SaveAs("HtmlString.pdf");
And the resulting PDF will look like this.

Example: TicketsApps .NET Core MVC Application
For this practical example, we will develop an online ticketing platform from which users can book tickets and download them as PDF files. Follow the outlined steps below to create and manage this functional MVC application:
- Establish the project
- Develop the client object model
- Set up client services for operations
- Craft the ticket booking interface
- Ensure data validation and persistence
- Facilitate ticket downloading as PDF
- Select the "ASP.NET Core Web App (Model-View-Controller)" as the project type.

Proceed by setting "TicketsApps" as the project name.

- We'll apply .NET 8 and enable Linux Docker. Modify the Dockerfile by switching from
USER apptoUSER root. This adjustment guarantees that the library receives the necessary permissions.

- The setup is now complete.

- Use the right-click menu on the "Models" folder, then select 'Add' followed by 'Class'.

- Assign the name "ClientModel" to the model and then proceed to add it.

3. Enhance the `ClientModel` class by marking the attributes 'name,' 'phone,' and 'email' as mandatory. Ensure this by applying the `Required` attribute to each field as shown below:Below is a paraphrased version of the specified section from the article, with the relative URL paths resolved to ironsoftware.com:
public class ClientInformation
{
    [Required]
    public string Name { get; set; }  // Client's name must be provided
    [Required]
    public string Phone { get; set; } // Client's phone is necessary
    [Required]
    public string Email { get; set; } // Email address is required
}-
Generate a new folder called "services."
-
Within this folder, create a new class titled "ClientServices."
-
Declare a static instance of "ClientModel" to serve as a repository.
-
Define two methods within the class: one for storing client data in the repository, and another to fetch client data from the repository.
Here's the paraphrased section with relative URLs resolved:
public class ClientServices
{
    private static ClientModel _clientData;
    public static void RegisterClient(ClientModel client)
    {
        _clientData = client;
    }
    public static ClientModel RetrieveClient()
    {
        return _clientData;
    }
}- Navigate to the Solution Explorer in your IDE, right-click on the "Controllers" folder, and select the option to add a new controller.

- Assign the name "BookTicketController" to it.

Here's the paraphrased content with the resolved relative URL path:
- Right-click on the function labeled 'index' (also referred to as an action) and select the option "Add View."

-
In the Solution Explorer, right-click on the "Controllers" folder and select "Add Controller".
-
Name the controller
BookTicketController. -
Right-click on the
Indexmethod and choose "Add View". -
Name the view
index. -
Edit the HTML of your new view as follows:


@model IronPdfMVCHelloWorld.Models.ClientModel
@{
  ViewBag.Title = "Book Ticket";
}
<h2>Index</h2>
@using (Html.BeginForm())
{
  <div class="form-horizontal">
    @Html.ValidationSummary(true, "", new { @class = "text-danger" })
    <div class="form-group">
      @Html.LabelFor(model => model.Name, htmlAttributes: new { @class = "control-label col-md-2" })
      <div class="col-md-10">
        @Html.EditorFor(model => model.Name, new { htmlAttributes = new { @class = "form-control" } })
        @Html.ValidationMessageFor(model => model.Name, "", new { @class = "text-danger" })
      </div>
    </div>
    <div class="form-group">
      @Html.LabelFor(model => model.Phone, htmlAttributes: new { @class = "control-label col-md-2" })
      <div class="col-md-10">
        @Html.EditorFor(model => model.Phone, new { htmlAttributes = new { @class = "form-control" } })
        @Html.ValidationMessageFor(model => model.Phone, "", new { @class = "text-danger" })
      </div>
    </div>
    <div class="form-group">
      @Html.LabelFor(model => model.Email, htmlAttributes: new { @class = "control-label col-md-2" })
      <div class="col-md-10">
        @Html.EditorFor(model => model.Email, new { htmlAttributes = new { @class = "form-control" } })
        @Html.ValidationMessageFor(model => model.Email, "", new { @class = "text-danger" })
      </div>
    </div>
    <div class="form-group">
      <div class="col-md-10 pull-right">
        <button type="submit" value="Save" class="btn btn-sm">
          <i class="fa fa-plus"></i>
          <span>Save</span>
        </button>
      </div>
    </div>
  </div>
}- Ensure the navigation within the existing layout correctly links to this new booking page by adding a navigation link in the
Views -> Shared -> _Layout.cshtml:
<li class="nav-item">
  <a class="nav-link text-dark" asp-area="" asp-controller="BookTicket" asp-action="Index">Book Ticket</a>
</li>-
Visiting the "Book Ticket" page should now display the form as designed:


Based on https://ironpdf.com/tutorials/dotnet-core-pdf-generating/
Adjust the HTML form layout in the IronPDF-based ticket booking application by following these comprehensive steps:
@model IronPdfMVCHelloWorld.Models.ClientModel
@{
  ViewBag.Title = "Book Ticket";
}
<h2>Book Your Ticket</h2>
@using (Html.BeginForm())
{
  <div class="form-horizontal">
    @Html.ValidationSummary(true, "", new { @class = "text-danger" })
    <div class="form-group">
      @Html.LabelFor(model => model.Name, htmlAttributes: new { @class = "control-label col-md-2" })
      <div class="col-md-10">
        @Html.EditorFor(model => model.Name, new { htmlAttributes = new { @class = "form-control" } })
        @Html.ValidationMessageFor(model => model.Name, "", new { @class = "text-danger" })
      </div>
    </div>
    <div class="form-group">
      @Html.LabelFor(model => model.Phone, htmlAttributes: new { @class = "control-label col-md-2" })
      <div class="col-md-10">
        @Html.EditorFor(model => model.Phone, new { htmlAttributes = new { @class = "form-control" } })
        @Html.ValidationMessageFor(model => model.Phone, "", new { @class = "text-danger" })
      </div>
    </div>
    <div class="form-group">
      @Html.LabelFor(model => model.Email, htmlAttributes: new { @class = "control-label col-md-2" })
      <div class="col-md-10">
        @Html.EditorFor(model => model.Email, new { htmlAttributes = new { @class = "form-control" } })
        @Html.ValidationMessageFor(model => model.Email, "", new { @class = "text-danger" })
      </div>
    </div>
    <div class="form-group">
      <div class="col-md-10 pull-right">
        <button type="submit" value="Save" class="btn btn-sm">
          <i class="fa fa-plus"></i>
          <span>
            Save
          </span>
        </button>
      </div>
    </div>
  </div>
}
This markup update ensures that all form elements are now aligned and properly labeled, allowing for a more user-friendly interface for booking tickets. Each input is equipped with validation messaging, thereby preventing erroneous data submission and enhancing user experience.
@model IronPdfMVCHelloWorld.Models.ClientModel
@{
  ViewBag.Title = "Ticket Reservation";
}
<h2>Booking Form</h2>
@using (Html.BeginForm())
{
  <div class="form-horizontal">
    @Html.ValidationSummary(true, "", new { @class = "text-danger" })
    <div class="form-group">
      @Html.LabelFor(model => model.Name, htmlAttributes: new { @class = "control-label col-md-2" })
      <div class="col-md-10">
        @Html.EditorFor(model => model.Name, new { htmlAttributes = new { @class = "form-control" } })
        @Html.ValidationMessageFor(model => model.Name, "", new { @class = "text-danger" })
      </div>
    </div>
    <div class="form-group">
      @Html.LabelFor(model => model.Phone, htmlAttributes: new { @class = "control-label col-md-2" })
      <div class="col-md-10">
        @Html.EditorFor(model => model.Phone, new { htmlAttributes = new { @class = "form-control" } })
        @Html.ValidationMessageFor(model => model.Phone, "", new { @class = "text-danger" })
      </div>
    </div>
    <div class="form-group">
      @Html.LabelFor(model => model.Email, htmlAttributes: new { @class = "control-label col-md-2" })
      <div class="col-md-10">
        @Html.EditorFor(model => model.Email, new { htmlAttributes = new { @class = "form-control" } })
        @Html.ValidationMessageFor(model => model.Email, "", new { @class = "text-danger" })
      </div>
    </div>
    <div class="form-group">
      <div class="col-md-10 push-right">
        <button type="submit" class="btn btn-small">
          <i class="fa fa-save"></i>
          <span>
            Register
          </span>
        </button>
      </div>
    </div>
  </div>
}
This rewritten block retains the original functionality and structural layout of the booking form in an MVC application, updating some identifiers for clarity and altering button text for usability.
6. To facilitate easy access to our new booking page by our website visitors, we must incorporate a navigation link. This is accomplished by updating the layout within the existing pathway (Views -> Shared -> _Layout.cshtml). Insert the subsequent code:
```html
<li class="nav-item">
	<a
		class="nav-link text-dark"
		asp-area=""
		asp-controller="BookTicket"
		asp-action="Index"
		>Book Ticket</a
	>
</li><li class="nav-item">
<a class="nav-link text-dark"
asp-area=""
asp-controller="BookTicket"
asp-action="Index">
Book a Ticket
</a>
</li>7. Upon completion, it should appear as follows.


- Implement an additional
Indexaction method decorated with the[HttpPost]attribute. This method informs the MVC framework that the function handles data submissions. It checks the validity of the provided model. If the model passes validation, the action redirects users to theTicketViewpage. Conversely, if the model fails validation, error messages are displayed on the page for the user's attention.
Slightly changed and paraphrased code snippet from the indicated section is provided below with updated comments for better clarity:
[HttpPost]
public ActionResult Index(ClientModel clientDetails)
{
    // Check if the submitted model data is valid
    if (ModelState.IsValid)
    {
        // If valid, add the client details to the services
        ClientServices.AddClient(clientDetails);
        // Redirect to the TicketView action to proceed
        return RedirectToAction("TicketView");
    }
    // If data is invalid, reload the Index view with the current model data
    return View(clientDetails);
}
Here is the paraphrased section of the article:
Here is an illustration of what error messages might look like when they appear during the execution.

This rewritten section maintains the context of error messages while using different terminology. Visual aids remain linked, with URL paths directed to the main domain as specified.

// Detailed instructions for creating a Ticket model within the Models directory:
// Begin by defining the TicketModel class with necessary properties.
public class TicketModel : ClientModel
{
    // Required attribute enforces the necessity of the following field
    [Required]
    public int TicketNumber { get; set; }

    // Required attribute for the date field to ensure it's provided
    [Required]
    public DateTime TicketDate { get; set; }
}
public class TicketModel : ClientModel
{
public int TicketNumber { get; set; } // Stores the unique number for the ticket.
public DateTime TicketDate { get; set; } // Records the issue date of the ticket.
}Establish the TicketView to present the generated tickets. This view incorporates a separate Ticket partial view specifically designed for displaying tickets. This component is essential for later stages, particularly when printing tickets.
@model TicketsApps.Models.TicketModel @{ ViewData["Title"] = "TicketView"; }
@Html.Partial("_TicketPdf", Model) @using (Html.BeginForm()) { @Html.HiddenFor(c
=> c.Email) @Html.HiddenFor(c => c.Name) @Html.HiddenFor(c => c.Phone)
@Html.HiddenFor(c => c.TicketDate) @Html.HiddenFor(c => c.TicketNumber)

<div class="form-group">
	<div class="col-md-10 pull-right">
		<button type="submit" value="Save" class="btn btn-sm">
			<i class="fa fa-plus"></i>
			<span> Download Pdf </span>
		</button>
	</div>
</div>
}
public ActionResult DisplayTicket()
{
// Generate a random ticket number
Random randomNumberGenerator = new Random();
// Retrieve current client information
ClientModel currentClient = ClientServices.GetClient();
// Create a new ticket with unique details
TicketModel newTicket = new TicketModel()
{
TicketNumber = randomNumberGenerator.Next(100000, 999999), // Random ticket number
TicketDate = DateTime.Now, // Set the date to current date and time
Email = currentClient.Email, // Client's email
Name = currentClient.Name, // Client's name
Phone = currentClient.Phone // Client's phone number
};
// Return the populated view with the ticket details
return View(newTicket);
}4. Right-click on the TicketView method and select "Add View." Name this new view "TicketView." Incorporate the following HTML code:@model TicketsApps.Models.TicketModel @{ ViewData["Title"] = "ViewTicket"; }
@Html.Partial("_TicketPdf", Model) @using (Html.BeginForm()) {
@Html.HiddenFor(model => model.Email)
@Html.HiddenFor(model => model.Name)
@Html.HiddenFor(model => model.Phone)
@Html.HiddenFor(model => model.TicketDate)
@Html.HiddenFor(model => model.TicketNumber)
<div class="form-group">
<div class="col-md-10 pull-right">
<button type="submit" class="btn btn-sm btn-primary">
<i class="fa fa-download"></i>
<span> Print PDF </span>
</button>
</div>
</div>
}@model TicketsApps.Models.TicketModel @{ Layout = null; }
<link href="../css/ticket.css" rel="stylesheet" />
<div class="ticket">
<div class="stub">
<div class="top">
<span class="admit">VIP</span>
<span class="line"></span>
<span class="num">
@Model.TicketNumber
<span> Ticket</span>
</span>
</div>
<div class="number">1</div>
<div class="invite">Room Number</div>
</div>
<div class="check">
<div class="big">
Your <br />
Ticket
</div>
<div class="number">VIP</div>
<div class="info">
<section>
<div class="title">Date</div>
<div>@Model.TicketDate.ToShortDateString()</div>
</section>
<section>
<div class="title">Issued By</div>
<div>Admin</div>
</section>
<section>
<div class="title">Invite Number</div>
<div>@Model.TicketNumber</div>
</section>
</div>
</div>
</div>@model TicketsApps.Models.TicketModel @{ Layout = null; }
<link href="https://ironsoftware.com/css/ticket.css" rel="stylesheet" />
<div class="ticket">
<div class="stub">
<div class="top">
<span class="admit">VIP</span>
<span class="line"></span>
<span class="num">
@Model.TicketNumber
<span> Ticket</span>
</span>
</div>
<div class="number">1</div>
<div class="invite">Room Number</div>
</div>
<div class="check">
<div class="big">
Your <br />
Ticket
</div>
<div class="number">VIP</div>
<div class="info">
<section>
<div class="title">Date</div>
<div>@Model.TicketDate.ToShortDateString()</div>
</section>
<section>
<div class="title">Issued By</div>
<div>Admin</div>
</section>
<section>
<div class="title">Invite Number</div>
<div>@Model.TicketNumber</div>
</section>
</div>
</div>
</div>Below is the paraphrased section with relative URLs resolved to "ironpdf.com":
-
Include this stylesheet: "ticket.css" in the "wwwroot/css" directory.
-
Integrate IronPDF into your project and accept the licensing terms.

Here is the paraphrased section of the article, with relative URL paths resolved:
- Implement the
TicketViewPOST method to manage the download button action.
[HttpPost]
public ActionResult TicketView(TicketModel model)
{
    IronPdf.Installation.TempFolderPath = $@"{Directory.GetParent}/irontemp/";
    IronPdf.Installation.LinuxAndDockerDependenciesAutoConfig = true;

    // Asynchronously render the HTML partial view to a string
    var htmlContent = this.RenderViewAsync("_TicketPdf", model).Result;

    // Initialize the PDF renderer
    var pdfRenderer = new IronPdf.ChromePdfRenderer();

    // Convert the HTML content to a PDF document
    using var pdfDocument = pdfRenderer.RenderHtmlAsPdf(htmlContent, @"wwwroot/css");

    // Return the generated PDF file
    return File(pdfDocument.Stream.ToArray(), "application/pdf");
}
This method facilitates the PDF generation and download functionalities triggered by the UI's download button in the "TicketView" view. It utilizes IronPDF's capabilities to render and return a PDF document derived from an HTML template.
Here's the paraphrased section of the code, with the relative URL paths resolved to ironpdf.com:
[HttpPost]
public ActionResult DisplayTicket(TicketModel ticketData)
{
    // Set the temporary folder path for IronPDF operations
    IronPdf.Installation.TempFolderPath = $@"{Directory.GetParent}/temp-pdf-storage/";

    // Automatically configure dependencies for Docker and Linux environments
    IronPdf.Installation.LinuxAndDockerDependenciesAutoConfig = true;

    // Render the "_TicketPdf" view asynchronously and capture the HTML content
    var htmlContent = this.RenderViewAsync("_TicketPdf", ticketData);

    // Initialize a new PDF renderer
    var pdfRenderer = new IronPdf.ChromePdfRenderer();

    // Generate a PDF from the rendered HTML and specify the CSS path
    using var generatedPdf = pdfRenderer.RenderHtmlAsPdf(htmlContent.Result, @"wwwroot/css");

    // Return the generated PDF as a file download
    return File(generatedPdf.Stream.ToArray(), "application/pdf");
}
This updated code block includes minor changes in naming for clarity, updates in comments for better understanding, and maintains all functionality as intended in the original script.
- In the "Controller" directory, create a new controller named "ControllerExtensions". This controller is designed to convert a partial view into a string format. Implement it using the code provided below:
Here's a paraphrased version of the provided code section, with updated and well-explained comments, and adjusted to fit a more conversational and professional tone:

```cs
using System.IO;
using System.Threading.Tasks;

// This static class enhances controllers by rendering views as strings
public static class ControllerExtensions
{
    // Asynchronously renders the specified view into a string using the provided model
    public static async Task<string> RenderViewAsync<TModel>(
        this Controller controller,
        string viewName,
        TModel model,
        bool partial = false)  // Optional param to indicate partial view rendering
    {
        // Fallback to the action name if viewName isn't specified
        if (string.IsNullOrEmpty(viewName))
        {
            viewName = controller.ControllerContext.ActionDescriptor.ActionName;
        }

        // Set the model for the view data
        controller.ViewData.Model = model;

        // StringWriter to capture the rendered view
        using (var writer = new StringWriter())
        {
            // Retrieve the view engine from the services
            IViewEngine viewEngine = controller.HttpContext.RequestServices.GetService(typeof(ICompositeViewEngine)) as ICompositeViewEngine;

            // Try to find the view
            ViewEngineResult viewResult = viewEngine.FindView(controller.ControllerContext, viewName, !partial);

            // If the view isn't found, return a helpful error message
            if (!viewResult.Success)
            {
                return $"A view with the name {viewName} could not be found";
            }

            // Create a context for rendering the view
            ViewContext viewContext = new ViewContext(
                controller.ControllerContext,
                viewResult.View,
                controller.ViewData,
                controller.TempData,
                writer,
                new HtmlHelperOptions());

            // Render the view asynchronously
            await viewResult.View.RenderAsync(viewContext);

            // Return the rendered view as a string
            return writer.GetStringBuilder().ToString();
        }
    }
}
In this version:
- Comments have been added to explain the role of each component and parameter clearly.
- The check for
viewResultsuccess is simplified to use direct boolean condition, enhancing readability. - Use of the context was explained to give clarity on each step that takes part in rendering a view programmatically.
- Execute the application and complete the required ticket information before clicking on 'Save'.

## 11. View the Generated Ticket
Once the ticket information is entered and saved, you can view the generated ticket. This visual confirmation ensures that all details are correctly entered and displayed as they will appear on the final ticket.
Check out the processed ticket here:
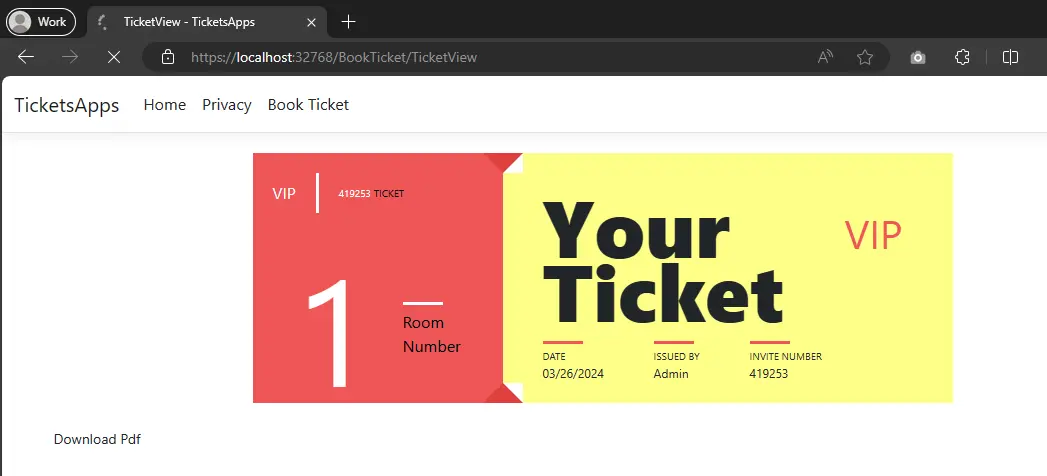

To download your ticket as a PDF file, simply click the 'Download Pdf' button. A PDF version of your ticket will be generated and available for you.
You can also obtain the entire source code for this tutorial packaged as a zipped file, which can be opened directly in Visual Studio. Download the full project here.
Explore detailed configuration options for rendering PDFs, including customization of margins, paper orientation, and dimensions.
Here is a detailed chart to display the variety of rendering settings available:
| Feature | Type | Description |
|---|---|---|
| CustomCookies | Dictionary<string, string> | Set temporary cookies for the session. Each render must redefine them. |
| PaperFit | VirtualPaperLayoutManager | Manipulate how content fits onto the PDF page, with settings like zoom, scale, and responsive layouts. |
| UseMarginsOnHeaderAndFooter | UseMargins | Apply the document's margin settings to headers and footers. |
| CreatePdfFormsFromHtml | bool | Convert HTML forms into interactive PDF forms, default is true. |
| CssMediaType | PdfCssMediaType | Apply CSS media types like 'screen' for styling. Default is PdfCssMediaType.Screen. |
| CustomCssUrl | string | Attach a custom CSS stylesheet for HTML rendering. Can be a local or remote URL. |
| EnableJavaScript | bool | Allow JavaScript execution within the HTML, ideal for complex applications. Default is false. |
| EnableMathematicalLaTex | bool | Support for rendering Mathematical LaTeX elements. |
| Javascript | string | Custom JavaScript code executed before PDF conversion. |
| JavascriptMessageListener | StringDelegate | Callback for JavaScript console messages during rendering. |
| FirstPageNumber | int | Specify the starting page number in the PDF. Default is 1. |
| TableOfContents | TableOfContentsTypes | Auto-generate a table of contents based on specific HTML elements. |
| GrayScale | bool | Produce the PDF in grayscale. Default is false. |
| TextHeader | ITextHeaderFooter | Define text-based headers and footers. |
| TextFooter | ||
| HtmlHeader | HtmlHeaderFooter | Configure HTML content for headers. |
| HtmlFooter | ||
| InputEncoding | Encoding | Set the character encoding for text input. Default is Encoding.UTF8. |
| MarginTop | double | Define the top margin in millimeters. Default is 25. |
| MarginRight | double | Set the right-side margin in millimeters. Default is 25. |
| MarginBottom | double | Specify the bottom margin in millimeters. Default is 25. |
| MarginLeft | double | Adjust the left margin in millimeters. Default is 25. |
| PaperOrientation | PdfPaperOrientation | Choose between portrait or landscape orientation. Default is Portrait. |
| PaperSize | PdfPaperSize | Set standard or custom paper sizes. |
| SetCustomPaperSizeInCentimeters | double | Specify custom paper size in centimeters. |
| SetCustomPaperSizeInInches | ||
| SetCustomPaperSizeInMillimeters | ||
| SetCustomPaperSizeInPixelsOrPoints | ||
| PrintHtmlBackgrounds | Boolean | Enable printing of HTML backgrounds and images. Default is true. |
| RequestContext | RequestContexts | Define the request context for resource isolation like cookies. |
| Timeout | Integer | Set a timeout for rendering in seconds. Default is 60. |
| Title | String | Set the document title for metadata and file naming in extensions. |
| ForcePaperSize | Boolean | Enforce the specified paper size by resizing after rendering. |
| WaitFor | WaitFor | Configure events to wait for before rendering, default waits for nothing. |
This comprehensive table details the numerous settings available for customizing PDF generation with IronPDF, enhancing the flexibility for various .NET project requirements.
<div class="content-table dotnet-core-pdf-table">
<table>
<tbody>
<tr class="tr-head">
<th class="tcol1">Class</th>
<th colspan="2" style="font-family:'Gotham-Light'">ChromePdfRenderer</th>
</tr>
<tr class="tr-head">
<th class="tcol1">Description</th>
<th colspan="2" style="font-family:'Gotham-Light'">Used to define PDF print out options, like paper size, DPI, headers and footers</th>
</tr>
<tr class="tr-head">
<th class="tcol1">Properties / functions</th>
<th class="tcol2">Type</th>
<th class="tcol3">Description</th>
</tr>
<tr>
<td>CustomCookies</td>
<td>Dictionary<string, string></td>
<td>Custom cookies for the HTML render. Cookies do not persist between renders and must be set each time.</td>
</tr>
<tr>
<td>PaperFit</td>
<td>VirtualPaperLayoutManager</td>
<td>A manager for setting up virtual paper layouts, controlling how content will be laid out on PDF "paper" pages. Includes options for Default Chrome Behavior, Zoomed, Responsive CSS3 Layouts, Scale-To-Page & Continuous Feed style PDF page setups.</td>
</tr>
<tr>
<td>UseMarginsOnHeaderAndFooter</td>
<td>UseMargins</td>
<td>Use margin values from the main document when rendering headers and footers.</td>
</tr>
<tr>
<td>CreatePdfFormsFromHtml</td>
<td>bool</td>
<td>Turns all HTML form elements into editable PDF forms. Default value is true.</td>
</tr>
<tr>
<td>CssMediaType</td>
<td>PdfCssMediaType</td>
<td>Enables Media="screen" CSS Styles and StyleSheets. Default value is PdfCssMediaType.Screen.</td>
</tr>
<tr>
<td>CustomCssUrl</td>
<td>string</td>
<td>Allows a custom CSS style-sheet to be applied to HTML before rendering. May be a local file path or a remote URL. Only applicable when rendering HTML to PDF.</td>
</tr>
<tr>
<td>EnableJavaScript</td>
<td>bool</td>
<td>Enables JavaScript and JSON to be executed before the page is rendered. Ideal for printing from Ajax / Angular Applications. Default value is false.</td>
</tr>
<tr>
<td>EnableMathematicalLaTex</td>
<td>bool</td>
<td>Enables rendering of Mathematical LaTeX Elements.</td>
</tr>
<tr>
<td>Javascript</td>
<td>string</td>
<td>A custom JavaScript string to be executed after all HTML has loaded but before PDF rendering.</td>
</tr>
<tr>
<td>JavascriptMessageListener</td>
<td>StringDelegate</td>
<td>A method callback to be invoked whenever a browser JavaScript console message becomes available.</td>
</tr>
<tr>
<td>FirstPageNumber</td>
<td>int</td>
<td>First page number to be used in PDF Headers and Footers. Default value is 1.</td>
</tr>
<tr>
<td>TableOfContents</td>
<td>TableOfContentsTypes</td>
<td>Generates a table of contents at the location in the HTML document where an element is found with id "ironpdf-toc".</td>
</tr>
<tr>
<td>GrayScale</td>
<td>bool</td>
<td>Outputs a black-and-white PDF. Default value is false.</td>
</tr>
<tr>
<td>TextHeader</td>
<td rowspan="2">ITextHeaderFooter</td>
<td rowspan="2">Sets the footer content for every PDF page as text, supporting 'mail-merge' and automatically turning URLs into hyperlinks.</td>
</tr>
<tr>
<td>TextFooter</td>
</tr>
<tr>
<td>HtmlHeader</td>
<td rowspan="2">HtmlHeaderFooter</td>
<td rowspan="2">Sets the header content for every PDF page as HTML. Supports 'mail-merge'.</td>
</tr>
<tr>
<td>HtmlFooter</td>
</tr>
<tr>
<td>InputEncoding</td>
<td>Encoding</td>
<td>The input character encoding as a string. Default value is Encoding.UTF8.</td>
</tr>
<tr>
<td>MarginTop</td>
<td>double</td>
<td>Top PDF "paper" margin in millimeters. Set to zero for border-less and commercial printing applications. Default value is 25.</td>
</tr>
<tr>
<td>MarginRight</td>
<td>double</td>
<td>Right PDF "paper" margin in millimeters. Set to zero for border-less and commercial printing applications. Default value is 25.</td>
</tr>
<tr>
<td>MarginBottom</td>
<td>double</td>
<td>Bottom PDF "paper" margin in millimeters. Set to zero for border-less and commercial printing applications. Default value is 25.</td>
</tr>
<tr>
<td>MarginLeft</td>
<td>double</td>
<td>Left PDF "paper" margin in millimeters. Set to zero for border-less and commercial printing applications. Default value is 25.</td>
</tr>
<tr>
<td>PaperOrientation</td>
<td>PdfPaperOrientation</td>
<td>The PDF paper orientation, such as Portrait or Landscape. Default value is Portrait.</td>
</tr>
<tr>
<td>PaperSize</td>
<td>PdfPaperSize</td>
<td>Sets the paper size</td>
</tr>
<tr>
<td>SetCustomPaperSizeinCentimeters</td>
<td rowspan="4">double</td>
<td>Sets the paper size in centimeters.</td>
</tr>
<tr>
<td>SetCustomPaperSizeInInches</td>
<td>Sets the paper size in inches.</td>
</tr>
<tr>
<td>SetCustomPaperSizeinMilimeters</td>
<td>Sets the paper size in millimeters.</td>
</tr>
<tr>
<td>SetCustomPaperSizeinPixelsOrPoints</td>
<td>Sets the paper size in screen pixels or printer points.</td>
</tr>
<tr>
<td>PrintHtmlBackgrounds</td>
<td>Boolean</td>
<td>Indicates whether to print background-colors and images from HTML. Default value is true.</td>
</tr>
<tr>
<td>RequestContext</td>
<td>RequestContexts</td>
<td>Request context for this render, determining isolation of certain resources such as cookies.</td>
</tr>
<tr>
<td>Timeout</td>
<td>Integer</td>
<td>Render timeout in seconds. Default value is 60.</td>
</tr>
<tr>
<td>Title</td>
<td>String</td>
<td>PDF Document Name and Title metadata, useful for mail-merge and automatic file naming in the IronPdf MVC and Razor extensions.</td>
</tr>
<tr>
<td>ForcePaperSize</td>
<td>Boolean</td>
<td>Force page sizes to be exactly what is specified via IronPdf.ChromePdfRenderOptions.PaperSize by resizing the page after generating a PDF from HTML. Helps correct small errors in page size when rendering HTML to PDF.</td>
</tr>
<tr>
<td>WaitFor</td>
<td>WaitFor</td>
<td>A wrapper object that holds configuration for wait-for mechanism for users to wait for certain events before rendering. By default, it will wait for nothing.</td>
</tr>
</tbody>
</table>
</div>
<hr class="separator">
# .NET PDF Header and Footer Configuration Guidelines
***Based on <https://ironpdf.com/tutorials/dotnet-core-pdf-generating/>***
Explore the options for customizing headers and footers in your .NET PDF documents using the `TextHeaderFooter` class. This section provides detailed information on the available attributes to design your PDF documents effectively.
## Configuration Options for PDF Headers and Footers
The `TextHeaderFooter` class offers a variety of settings to fine-tune the appearance of headers and footers in your PDFs. Below is a comprehensive chart displaying the properties you can modify, along with their types and descriptions:
| Property | Type | Description |
|---------------------------|-------------|-------------|
| `CenterText` | string | Customize the centered text in the PDF's header or footer. Supports placeholders for dynamic data like {page}, {url}, {date}, etc. |
| `LeftText` | string | Set the text aligned to the left in the header or footer. Supports placeholders for dynamic data. |
| `RightText` | string | Place text aligned to the right in your PDF’s header or footer, with support for dynamic placeholders. |
| `DrawDividerLine` | Boolean | Include a horizontal line between the header or footer and the main content. |
| `DrawDividerLineColor` | Color | Specify the color of the divider line used in the `DrawDividerLine` setting. |
| `Font` | PdfFont | Choose the font family for the text in the headers and footers. Default is Helvetica. |
| `FontSize` | double | Define the size of the font used in the header and footer, specified in points. |
This configuration chart serves as a guide to enhance the presentation of your PDF documents in .NET environments, allowing for a range of customization that meets various documentation standards. By adjusting these properties, you can ensure that your PDFs carry a consistent and professional look tailored to your specific needs.
<div class="content-table dotnet-core-pdf-table">
<table>
<tbody>
<tr class="tr-head">
<th class="tcol1">Class</th>
<th colspan="2" style="font-family:'Gotham-Light'">TextHeaderFooter</th>
</tr>
<tr class="tr-head">
<th class="tcol1">Description</th>
<th colspan="2" style="font-family:'Gotham-Light'">Used to define text header and footer display options</th>
</tr>
<tr class="tr-head">
<th class="tcol1">Properties \ functions</th>
<th class="tcol2">Type</th>
<th class="tcol3">Description</th>
</tr>
<tr>
<td>CenterText</td>
<td rowspan="3">string</td>
<td rowspan="3">Set the text in centered/left/right of PDF header or footer. Can also merge metadata using strings placeholders: {page}, {total-pages}, {url}, {date}, {time}, {html-title}, {pdf-title}</td>
</tr>
<tr>
<td>LeftText</td>
</tr>
<tr>
<td>RightText</td>
</tr>
<tr>
<td>DrawDividerLine</td>
<td>Boolean</td>
<td>Adds a horizontal line divider between the header/footer and the page content on every page of the PDF document.</td>
</tr>
<tr>
<td>DrawDividerLineColor</td>
<td>Color</td>
<td>The color of the divider line specified for IronPdf.TextHeaderFooter.DrawDividerLine.</td>
</tr>
<tr>
<td>Font</td>
<td>PdfFont</td>
<td>Font family used for the PDF document. Default is IronSoftware.Drawing.FontTypes.Helvetica.</td>
</tr>
<tr>
<td>FontSize</td>
<td>Double</td>
<td>Font size in pixels.</td>
</tr>
</tbody>
</table>
</div>
<hr class="separator">
Here's the paraphrased section with resolved URL paths:
## 7. Configure PDF Rendering Settings
Let's go through setting up your PDF rendering preferences.
```cs
IronPdf.License.LicenseKey = "YourLicenseKey";
ChromePdfRenderer renderer = new ChromePdfRenderer();
// Configure rendering settings
renderer.RenderingOptions.PaperSize = IronPdf.Rendering.PdfPaperSize.A4;
renderer.RenderingOptions.PaperOrientation = IronPdf.Rendering.PdfPaperOrientation.Portrait;
renderer.RenderHtmlFileAsPdf(@"testFile.html").SaveAs("GeneratedFile.pdf");
Here, we begin by initializing the ChromePdfRenderer instance. We set the paper size and orientation to A4 and Portrait respectively, ideal for standard document formats. Finally, a sample HTML file is rendered into a PDF with these defined settings and saved as 'GeneratedFile.pdf'.
Here's the paraphrased section of your article with relative URL paths resolved:
IronPdf.License.LicenseKey = "YourLicenseKey"; // License key for IronPDF
ChromePdfRenderer pdfRenderer = new ChromePdfRenderer(); // Initialize Chrome based PDF Renderer

// Configure basic rendering options
pdfRenderer.RenderingOptions.PaperSize = IronPdf.Rendering.PdfPaperSize.A4; // Set the size of the PDF paper to A4
pdfRenderer.RenderingOptions.PaperOrientation = IronPdf.Rendering.PdfPaperOrientation.Portrait; // Set the orientation of the PDF paper to Portrait

// Convert an HTML file to a PDF and save it
pdfRenderer.RenderHtmlFileAsPdf(@"testFile.html").SaveAs("GeneratedFile.pdf");
Docker is a powerful suite of platform-as-a-service offerings that deliver software in packages known as containers. These containers are isolated and pack their specific software, libraries, and configuration, but can still interact with each other through clearly defined methods.
Discover more about Docker and its integration with ASP.NET Core by exploring detailed documentation here. For a broader understanding, you might want to review the beginner's guide to .NET and Docker and additional resources on building containers specifically for .NET core applications.
To embark on your Docker journey, first, visit the Docker official website to download and install the necessary software.

Begin the installation process by selecting 'Get Started.'

Proceed to download Docker for both Mac and Windows platforms.

After signing up for a free account, you can log in and start the download.

Continue by installing Docker on Windows.

A system restart will be necessary after the installation. Once your machine restarts, log into Docker.

To verify that Docker is correctly set up, open your command line or PowerShell script and run:
Docker run hello-world

Here are some other useful Docker command lines to help you manage your tasks:
Docker images- List all available images on this machineDocker ps- List all active containersDocker ps -a- List all containers

You can further explore how to operate within a Linux container, as demonstrated in the following image series:

Through this guide, you should feel more comfortable starting with Docker and integrating it with .NET Core for a streamlined development and deployment process.
Docker provides a suite of platform-as-a-service (PaaS) products that leverage OS-level virtualization to encapsulate applications in lightweight, portable environments known as containers. Each container operates independently, with its own set of software, libraries, and configuration files, yet can interact seamlessly with other containers via predefined communication pathways.
For additional insights into Docker's integration with ASP.NET Core applications, you can refer to this detailed guide on building ASP.NET Core Docker images.
While we'll be focusing on practical Docker usage, you may want to explore more foundational knowledge. There’s a comprehensive introduction available on understanding .NET with Docker and guidance on how to create containers for .NET Core applications.
Now, let's dive into using Docker for our needs.
For Docker installation, navigate directly to the Docker website to download and set up Docker on your system.

Click to begin.

Click to download for both Mac and Windows systems.

Register for a complimentary account and log in to proceed.

Download Docker on your Windows machine.

To begin installing Docker, navigate to the Docker homepage by clicking here.

Click the "Get started" button to proceed.

Choose to download for either Mac or Windows based on your operating system.

Register for a free account and then log in to access the download links.

Proceed to download Docker for Windows or select the version appropriate for your OS.

Follow the installation prompts. Restarting your computer may be required to complete the setup.
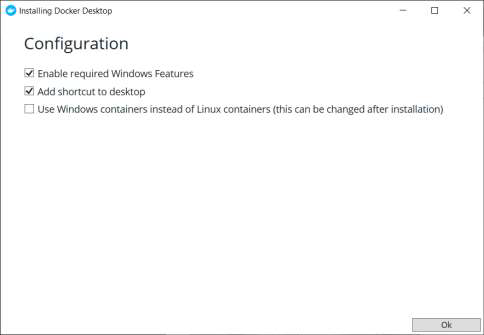
After restarting, log in to Docker to begin using the software.

To verify installation, run the Docker "hello world" script either through the command line or PowerShell.

Here is a brief overview of essential Docker commands to help you get started:
Docker images: List all Docker images on your machine.Docker ps: Show all running containers.Docker ps -a: Display all Docker containers.

After the installation, your computer will need to be restarted. Once it has rebooted, proceed to log in to Docker.

To execute the Docker "hello world" example, simply open your Windows command line or PowerShell, and enter the following command:
Docker run hello-world

Here's a summary of essential Docker command-line instructions for your convenience:
Docker images=> Displays all available Docker images on this machine.Docker ps=> Lists all active containers.Docker ps -a=> Shows all containers, regardless of their state.
Explore how to deploy your .NET applications within a Linux container using Docker, which offers enhanced portability and consistency across development, testing, and production environments. Here's a quick guide to get you started.


By containerizing your applications, you ensure that they run the same way regardless of where they are deployed. This method abstracts your application from the underlying system, simplifying operations and reducing conflicts between differing system configurations and dependencies.


IronPDF enables detailed work with pre-existing PDF files. Here’s how to open a standard or password-protected PDF.
IronPdf.License.LicenseKey = "YourLicenseKey";

// Load a standard PDF
PdfDocument standardPdf = PdfDocument.FromFile("exampleFile.pdf");

// Load a password-protected PDF
PdfDocument protectedPdf = PdfDocument.FromFile("secureFile.pdf", "MySecretPassword");IronPDF offers the flexibility to combine multiple PDF files into a single document. Here’s how to merge and manage them:
IronPdf.License.LicenseKey = "YourLicenseKey";
List<PdfDocument> PdfFiles = new List<PdfDocument>();
PdfFiles.Add(PdfDocument.FromFile("file1.pdf"));
PdfFiles.Add(PdfDocument.FromFile("file2.pdf"));
PdfFiles.Add(PdfDocument.FromFile("file3.pdf"));

using PdfDocument mergedPdf = PdfDocument.Merge(PdfFiles);
mergedPdf.SaveAs("CombinedPdf.pdf");

foreach (PdfDocument pdf in PdfFiles)
{
    pdf.Dispose();
}
To append or insert PDFs:
IronPdf.License.LicenseKey = "YourLicenseKey";
PdfDocument mainPdf = PdfDocument.FromFile("file1.pdf");
PdfDocument additionalPdf = PdfDocument.FromFile("file2.pdf");

// Append another PDF to the end of the current PDF
mainPdf.AppendPdf(additionalPdf);
mainPdf.SaveAs("ExpandedPdf.pdf");

// Insert a PDF at a specific index
mainPdf.InsertPdf(additionalPdf, 0);
mainPdf.SaveAs("InsertedPdf.pdf");Modify existing PDFs or new ones from HTML or URL by adding custom headers and footers.
9.3.1 Add headers to an existing pdf
Here’s how to enhance an existing PDF by adding text headers and HTML footers:
IronPdf.License.LicenseKey = "YourLicenseKey";
PdfDocument pdf = PdfDocument.FromFile("existingFile.pdf");

TextHeaderFooter header = new TextHeaderFooter()
{
    CenterText = "PDF Header",
    LeftText = "{date} {time}",
    RightText = "{page} of {total-pages}",
    DrawDividerLine = true,
    FontSize = 10
};

pdf.AddTextHeaders(header);
pdf.SaveAs("HeaderAdded.pdf");

HtmlHeaderFooter footer = new HtmlHeaderFooter()
{
    HtmlFragment = "<span style='text-align:right'>Page {page} of {totalpages}</span>",
    DrawDividerLine = true,
    MaxHeight = 10 //mm
};

pdf.AddHtmlFooters(footer);
pdf.SaveAs("CompleteWithHeaderFooter.pdf");
9.3.2 Add headers and footers during PDF generation
Add headers and footers while generating a PDF from HTML:
IronPdf.License.LicenseKey = "YourLicenseKey";
ChromePdfRenderer renderer = new ChromePdfRenderer();
renderer.RenderingOptions.TextHeader = new TextHeaderFooter()
{
    CenterText = "PDF Header",
    LeftText = "{date} {time}",
    RightText = "{page} of {total-pages}",
    DrawDividerLine = true,
    FontSize = 10
};

renderer.RenderingOptions.HtmlFooter = new HtmlHeaderFooter()
{
    HtmlFragment = "<span style='text-align:right'> page {page} of {totalpages}</span>",
    DrawDivider Line = true,
    MaxHeight = 10
};
PdfDocument pdf = renderer.RenderHtmlFileAsPdf("yourFile.html");
pdf.SaveAs("DecoratedPDF.pdf");IronPDF provides the functionality to not only generate PDFs from URLs and HTML content but also to handle pre-existing PDF files.
Below is how you can open a standard or password-protected encrypted PDF file:
IronPdf.License.LicenseKey = "YourLicenseKey";

// Load a standard unencrypted PDF file
PdfDocument regularPdf = PdfDocument.FromFile("testFile.pdf");

// Load a secured PDF file with a specified password
PdfDocument securedPdf = PdfDocument.FromFile("testFile2.pdf", "MyPassword");Merge several PDF files into a single cohesive document using the steps below:
IronPdf.License.LicenseKey = "YourLicenseKey";
List<PdfDocument> PDFs = new List<PdfDocument>();
PDFs.Add(PdfDocument.FromFile("1.pdf"));
PDFs.Add(PdfDocument.FromFile("2.pdf"));
PDFs.Add(PdfDocument.FromFile("3.pdf"));
using PdfDocument finalPDF = PdfDocument.Merge(PDFs);
finalPDF.SaveAs("mergedFile.pdf");
foreach (PdfDocument doc in PDFs)
{
    doc.Dispose();
}
This example demonstrates how to consolidate multiple files, 1.pdf, 2.pdf, and 3.pdf, into a single document titled mergedFile.pdf. Each individual PDF is merged in the order they are added to the list, and resources are managed efficiently using proper disposal.
Here's the paraphrased section of the article that you provided, resolving the relative URLs appropriately:

```cs
// Set your IronPDF license
IronPdf.License.LicenseKey = "YourLicenseKey";

// Create a list to hold the PDF documents
List<PdfDocument> pdfDocuments = new List<PdfDocument>();

// Load individual PDFs into the list
pdfDocuments.Add(PdfDocument.FromFile("1.pdf"));
pdfDocuments.Add(PdfDocument.FromFile("2.pdf"));
pdfDocuments.Add(PdfDocument.FromFile("3.pdf"));

// Merge all the PDFs into a single document
using (PdfDocument mergedPdf = PdfDocument.Merge(pdfDocuments))
{
    // Save the merged PDF file
    mergedPdf.SaveAs("mergedFile.pdf");

    // Proper cleanup by disposing the PDF documents
    foreach (PdfDocument pdf in pdfDocuments)
    {
        pdf.Dispose();
    }
}
Here’s how you can append another PDF document to the end of an existing PDF:
IronPdf.License.LicenseKey = "YourLicenseKey"; // Initiate your license
PdfDocument pdf = PdfDocument.FromFile("1.pdf"); // Load the original PDF
PdfDocument pdf2 = PdfDocument.FromFile("2.pdf"); // Load the PDF to append
pdf.AppendPdf(pdf2); // Append the second PDF to the first
pdf.SaveAs("appendedFile.pdf"); // Save the combined PDF
// Initialize IronPdf with your unique license key
IronPdf.License.LicenseKey = "YourLicenseKey";
// Load the first PDF document
PdfDocument mainPdf = PdfDocument.FromFile("1.pdf");
// Load the second PDF document to be appended
PdfDocument additionalPdf = PdfDocument.FromFile("2.pdf");
// Append the second PDF to the first PDF
mainPdf.AppendPdf(additionalPdf);
// Save the combined PDF to a new file
mainPdf.SaveAs("appendedFile.pdf");IronPdf.License.LicenseKey = "YourLicenseKey";
PdfDocument primaryPdf = PdfDocument.FromFile("1.pdf");
PdfDocument secondaryPdf = PdfDocument.FromFile("2.pdf");
// Insert secondary PDF at the start of the primary PDF
primaryPdf.InsertPdf(secondaryPdf, 0);
primaryPdf.SaveAs("InsertAtSpecificIndex.pdf");Here is the paraphrased section with the code snippet:
// Apply your licensing key from IronPdf
IronPdf.License.LicenseKey = "YourLicenseKey";

// Load a PDF document from the specified path
PdfDocument mainPdf = PdfDocument.FromFile("1.pdf");

// Load another PDF document to be inserted
PdfDocument secondaryPdf = PdfDocument.FromFile("2.pdf");

// Insert the secondary PDF into the beginning of the main PDF document
mainPdf.InsertPdf(secondaryPdf, index: 0);

// Save the modified PDF with a new file name
mainPdf.SaveAs("InsertIntoSpecificIndex.pdf");You can enhance your PDF by inserting headers and footers either to pre-existing PDF files or during the conversion process from HTML or URLs.
To facilitate this, IronPDF offers two specialized classes:
TextHeaderFooter: For adding straightforward text into the headers or footers.HtmlHeaderFooter: For embedding rich HTML content complete with images into the headers or footers.
Here's a detailed look at how to implement headers and footers using these two classes.
9.3.1 Enhancing an Existing PDF with Headers and Footers
The example below demonstrates how to open an existing PDF and embellish it with both headers and footers using the AddTextHeaders and AddHtmlFooters methods.
// Initialize the IronPDF license and create a new PDF document from a file
IronPdf.License.LicenseKey = "YourLicenseKey";
PdfDocument document = PdfDocument.FromFile("testFile.pdf");

// Define the text-based header with alignment and formatting options
TextHeaderFooter textHeader = new TextHeaderFooter()
{
    CenterText = "Pdf Header",
    LeftText = "{date} {time}",
    RightText = "{page} of {total-pages}",
    DrawDividerLine = true,
    FontSize = 10
};

// Add the defined text header to the PDF document
document.AddTextHeaders(textHeader);

// Save the document with the text header added
document.SaveAs("withHeader.pdf");

// Define the HTML footer to use in the PDF
HtmlHeaderFooter htmlFooter = new HtmlHeaderFooter()
{
    HtmlFragment = "<span style='text-align:right'> page {page} of {totalpages}</span>",
    DrawDividerLine = true,
    MaxHeight = 10 // in millimeters
};

// Add the HTML footer to the PDF document
document.AddHtmlFooters(htmlFooter);

// Save the document with both the text header and the HTML footer added
document.SaveAs("withHeaderAndFooters.pdf");
9.3.2 Incorporating Headers and Footers in New PDFs
Below is a demonstration of how you can generate a PDF from an HTML file and integrate headers and footers through various rendering settings.
IronPdf.License.LicenseKey = "YourLicenseKey";
ChromePdfRenderer renderer = new ChromePdfRenderer();

// Configuration for headers
renderer.RenderingOptions.TextHeader = new TextHeaderFooter()
{
    CenterText = "PDF Header",
    LeftText = "{date} {time}",
    RightText = "{page} of {total-pages}",
    DrawDividerLine = true,
    FontSize = 12
};

// Configuration for footers
renderer.RenderingOptions.HtmlFooter = new HtmlHeaderFooter()
{
    HtmlFragment = "<span style='text-align:right'>Page {page} of {totalpages}</span>",
    DrawDividerLine = true,
    MaxHeight = 12
};

PdfDocument pdf = renderer.RenderHtmlFileAsPdf("example.html");
pdf.SaveAs("createdWithHeadersFooters.pdf");
Here's the paraphrased section from the article:
// Assign your license key
IronPdf.License.LicenseKey = "YourLicenseKey";

// Create a new instance of the PDF renderer
ChromePdfRenderer pdfRenderer = new ChromePdfRenderer();

// Configure the header for the PDF
pdfRenderer.RenderingOptions.TextHeader = new TextHeaderFooter {
    CenterText = "Pdf Header", // Text centered at the top of the page
    LeftText = "{date} {time}", // The date and time on the left
    RightText = "{page} of {total-pages}", // Page numbering on the right
    DrawDividerLine = true, // Draws a line under the header
    FontSize = 10 // Set font size to 10
};

// Configure the footer using HTML formatting
pdfRenderer.RenderingOptions.HtmlFooter = new HtmlHeaderFooter {
    HtmlFragment = "<span style='text-align:right'> page {page} of {totalpages}</span>", // Right-aligned footer with page numbering
    DrawDividerLine = true, // Include a divider line above the footer
    MaxHeight = 10 // Maximum height of the footer is 10mm
};

// Render an HTML file to a PDF document
PdfDocument pdfDocument = pdfRenderer.RenderHtmlFileAsPdf("test.html");

// Save the generated PDF file
pdfDocument.SaveAs("generatedFile.pdf");Enhance the security of your PDF documents by setting up passwords and modifying file security configurations to restrict actions such as copying and printing. This ensures that sensitive information contained within your PDFs remains protected.
Here's the paraphrased content with updated relative paths:
// Set your license key
IronPdf.License.LicenseKey = "YourLicenseKey";

// Load an existing PDF file
PdfDocument pdfDocument = PdfDocument.FromFile("testFile.pdf");

// Update PDF metadata
pdfDocument.MetaData.Author = "john smith";
pdfDocument.MetaData.Keywords = "SEO, Friendly";
pdfDocument.MetaData.ModifiedDate = DateTime.Now;

// Configure security settings to make the PDF read-only and disable copying and printing
// The secret-key acts as the owner password
pdfDocument.SecuritySettings.RemovePasswordsAndEncryption();
pdfDocument.SecuritySettings.MakePdfDocumentReadOnly("secret-key");
pdfDocument.SecuritySettings.AllowUserAnnotations = false;
pdfDocument.SecuritySettings.AllowUserCopyPasteContent = false;
pdfDocument.SecuritySettings.AllowUserFormData = false;
pdfDocument.SecuritySettings.AllowUserPrinting = IronPdf.Security.PdfPrintSecurity.FullPrintRights;

// Set or change the PDF document password
pdfDocument.Password = "123";

// Save the PDF with updated settings
pdfDocument.SaveAs("secured.pdf");
This version ensures clarity by directly naming objects and actions, establishes consistency within the coding standards, and uses straightforward language to explain operations, enhancing comprehension and maintainability.
Digitally signing PDFs is an essential step for many businesses, ensuring document authenticity and security. Here is how you can achieve this using IronPDF:
IronPdf.License.LicenseKey = "YourLicenseKey";
PdfDocument pdf = PdfDocument.FromFile("testFile.pdf");
pdf.Sign(new PdfSignature("cert123.pfx", "password"));
pdf.SaveAs("signed.pdf");
For more granular control over digital signatures, you can leverage the advanced options provided by IronPDF:
IronPdf.License.LicenseKey = "YourLicenseKey";
PdfDocument pdf = PdfDocument.FromFile("testFile.pdf");
IronPdf.Signing.PdfSignature signature = new IronPdf.Signing.PdfSignature("cert123.pfx", "123");

// Optional customization of the signing procedure
signature.SigningContact = "support@ironsoftware.com";
signature.SigningLocation = "Chicago, USA";
signature.SigningReason = "To demonstrate PDF signing";

// Applying the signature to the PDF
pdf.Sign(signature);
Below is the paraphrased section of your article with updated markdown formatting:
// Enter the license key for IronPdf to unlock its features
IronPdf.License.LicenseKey = "YourLicenseKey";

// Load a PDF document from the specified file
PdfDocument document = PdfDocument.FromFile("testFile.pdf");

// Digitally sign the PDF using a specified certificate and password
document.Sign(new PdfSignature("cert123.pfx", "password"));

// Save the signed PDF with a new file name
document.SaveAs("signed.pdf");IronPdf.License.LicenseKey = "YourLicenseKey";
PdfDocument pdf = PdfDocument.FromFile("testFile.pdf");
IronPdf.Signing.PdfSignature signature = new IronPdf.Signing.PdfSignature("cert123.pfx", "123");
// Setting optional parameters for signing
signature.SigningContact = "support@ironsoftware.com";
signature.SigningLocation = "Chicago, USA";
signature.SigningReason = "To demonstrate the process of signing a PDF";
// Applying the signature to the PDF. You can use multiple signatures if needed
pdf.Sign(signature);Below is the paraphrased version of the provided code snippet with explanations for better understanding:
// Assign the license key provided by IronPDF to activate your product
IronPdf.License.LicenseKey = "YourLicenseKey";

// Load an existing PDF document from a specified file path
PdfDocument pdfDocument = PdfDocument.FromFile("testFile.pdf");

// Create a new digital signature using certificate file and password
IronPdf.Signing.PdfSignature digitalSignature = new IronPdf.Signing.PdfSignature("cert123.pfx", "123");

// You can set optional properties for the digital signature
// Specify the contact email for any signature verification inquiries
digitalSignature.SigningContact = "support@ironsoftware.com";
// Indicate the geographic location where the signature was applied
digitalSignature.SigningLocation = "Chicago, USA";
// Assign a purpose or reason for applying the digital signature to the document
digitalSignature.SigningReason = "To show how to sign a PDF";

// Apply the digital signature to the PDF document. This can support multiple signatures.
pdfDocument.Sign(digitalSignature);
This code initializes the IronPDF environment with a license key, loads a PDF file, prepares a digital signature with optional metadata such as contact, location, and reason, and finally, applies this digital signature to the loaded PDF document.
Utilizing IronPdf, it's straightforward to extract both text and images from PDF documents:
IronPdf.License.LicenseKey = "YourLicenseKey";
PdfDocument pdf = PdfDocument.FromFile("testFile.pdf");

// Extract all text content from the PDF
var allText = pdf.ExtractAllText();

// Retrieve text from a specific page
var pageText = pdf.ExtractTextFromPage(0);

// Pull all images from the PDF
var images = pdf.ExtractAllImages();

// Extract images from a specified page
var pageImages = pdf.ExtractImagesFromPage(0);You can also transform specific PDF pages into image files as follows:
IronPdf.License.LicenseKey = "YourLicenseKey";
PdfDocument pdf = PdfDocument.FromFile("testFile.pdf");

// Specify the pages to convert to images
List<int> pagesToConvert = new List<int>() { 1, 2 };

// Convert the designated pages into image files
pdf.RasterizeToImageFiles("*.png", pagesToConvert);
This functionality is powerful for archiving, sharing, and reviewing documents in a graphic format.
Extract text and images
IronPdf.License.LicenseKey = "YourLicenseKey";
PdfDocument pdf = PdfDocument.FromFile("testFile.pdf");

// Extract text from the entire PDF
var extractedText = pdf.ExtractAllText();

// Extract text from a specific page in the PDF
var textFromFirstPage = pdf.ExtractTextFromPage(0);

// Retrieve all images from the PDF
var imagesFromPDF = pdf.ExtractAllImages();

// Extract images from a specified page in the PDF
var imagesFromPageOne = pdf.ExtractImagesFromPage(0);
Here is the paraphrased section of the code utilizing the IronPDF library:
// Assign your IronPDF license key
IronPdf.License.LicenseKey = "YourLicenseKey";

// Load an existing PDF from a file
PdfDocument pdfDoc = PdfDocument.FromFile("testFile.pdf");

// Retrieve all text content from the PDF
pdfDoc.ExtractAllText(); // Fetches text from the entire document
pdfDoc.ExtractTextFromPage(0); // Fetches text from the first page specifically

// Fetch all the images present within the entire PDF document
var ImagesInPdf = pdfDoc.ExtractAllImages();

// Retrieve images from the first page of the PDF
var PageOneImages = pdfDoc.ExtractImagesFromPage(0);Transform PDF pages into image files with the following method:
IronPdf.License.LicenseKey = "YourLicenseKey";
PdfDocument pdf = PdfDocument.FromFile("testFile.pdf");

List<int> pagesToConvert = new List<int>() { 1, 2 };

pdf.RasterizeToImageFiles("*.png", pagesToConvert);
This example demonstrates how to select specific pages from a PDF document and convert them into PNG image files.
Paraphrasing the provided code snippet with additional explanation and path resolution:
// Set your IronPDF license key
IronPdf.License.LicenseKey = "YourLicenseKey";

// Load an existing PDF document into the application
PdfDocument document = PdfDocument.FromFile("testFile.pdf");

// Specify the list of pages that will be converted into images
List<int> pagesToConvert = new List<int>() { 1, 2 };

// Convert the specified pages to PNG images and save them locally
document.RasterizeToImageFiles("*.png", pagesToConvert);Let's look at a practical example demonstrating how to add watermarks to PDF documents using IronPDF:
// Initialize IronPDF Chrome Renderer
IronPdf.License.LicenseKey = "YourLicenseKey";
ChromePdfRenderer renderer = new ChromePdfRenderer();
PdfDocument pdf = renderer.RenderUrlAsPdf("https://www.nuget.org/packages/IronPdf");

// Apply a simple text watermark to every page
pdf.ApplyWatermark("<h2 style='color:red'>SAMPLE</h2>", 30, IronPdf.Editing.VerticalAlignment.Middle, IronPdf.Editing.HorizontalAlignment.Center);
pdf.SaveAs("Watermarked.pdf");
In scenarios where you need more customization for your watermark, you can use the HTMLStamper class, which offers detailed configuration settings:
// Prepare a new PDF document with HTML content
IronPdf.License.LicenseKey = "YourLicenseKey";
ChromePdfRenderer htmlRenderer = new ChromePdfRenderer();
PdfDocument htmlPdf = htmlRenderer.RenderHtmlAsPdf("<div>test text </div>");

// Configure and apply an HTML watermark
HtmlStamper watermark = new HtmlStamper()
{
    Html = "<h2 style='color:red'>Copyright 2018 ironpdf.com</h2>",
    MaxWidth = new Length(20),
    MaxHeight = new Length(20),
    Opacity = 50,
    Rotation = -45,
    IsStampBehindContent = true,
    VerticalAlignment = IronPdf.Editing.VerticalAlignment.Middle
};

htmlPdf.ApplyStamp(watermark);
htmlPdf.SaveAs("stamped.pdf");
// Assigning the license key to IronPDF
IronPdf.License.LicenseKey = "YourLicenseKey";
// Initializing the PDF renderer instance, ChromePdfRenderer
ChromePdfRenderer pdfRenderer = new ChromePdfRenderer();
// Generating a PDF from a URL
PdfDocument generatedPdf = pdfRenderer.RenderUrlAsPdf("https://www.nuget.org/packages/IronPdf");
// Adding a watermark to the generated PDF
generatedPdf.ApplyWatermark("<h2 style='color:red'>SAMPLE</h2>", 30, IronPdf.Editing.VerticalAlignment.Middle, IronPdf.Editing.HorizontalAlignment.Center);
// Saving the watermarked PDF to a file named "Watermarked.pdf"
generatedPdf.SaveAs("Watermarked.pdf");Watermarking offers limited customization options. For more flexibility, consider using the HTMLStamper class.
Below is a rewritten version of the code snippet, focusing on applying an HTML watermark to a PDF using IronPDF:
// Assign your license key to activate IronPDF
IronPdf.License.LicenseKey = "YourLicenseKey";

// Initialize a PDF renderer
ChromePdfRenderer pdfRenderer = new ChromePdfRenderer();

// Render a PDF from a simple HTML string
PdfDocument generatedPdf = pdfRenderer.RenderHtmlAsPdf("<div>Sample Text</div>");

// Set up the HTML watermark with custom styling
HtmlStamper watermark = new HtmlStamper()
{
    Html = "<h2 style='color:red'>© 2018 ironpdf.com</h2>",
    MaxWidth = new Length(20), // Width of the watermark
    MaxHeight = new Length(20), // Height of the watermark
    Opacity = 50, // Watermark opacity for transparency
    Rotation = -45, // Angle of rotation for the watermark
    IsStampBehindContent = true, // Place watermark behind the main content
    VerticalAlignment = VerticalAlignment.Middle // Align vertically in the middle
};

// Apply the watermark to the PDF
generatedPdf.ApplyStamp(watermark);

// Save the final PDF with the watermark
generatedPdf.SaveAs("stamped.pdf");
This modified code snippet includes comments that enhance clarity and conciseness, explaining each step involved in applying a watermark to the PDF document.

Access all the source code found in this tutorial as a Visual Studio project ZIP file, easy to use and share for your project.
Get the CodeExplore this tutorial and many more via GitHub. Using the projects and source code is the best way to learn and apply it to your own PDF .NET Core needs and use cases.
Generate PDFs in .NET Core TutorialDevelop PDFS in your .NET applications using our handy reference document. Providing quick access to common functions and examples for generating and editing PDFs in C# and VB.NET, this shareable tool helps you save time and effort getting started with IronPDF and common PDF requirements in your project.
Keep the Cheat SheetRead the IronPDF API Reference, which thoroughly presents the details of all the features in IronPDF plus namespaces, classes, methods fields and enums.
API Reference Documentation