
A Discord dashboard for bots
How can we have a dashboard for our bot without having a bot?
Those are the main parts, if you already have an operating bot I'm suggesting you to start from Dashboard Integration
Creating a basic bot
Dashboard Integration
First of all, we will want to create our application by heading to, my apps
After you got to the page you should see something like this:

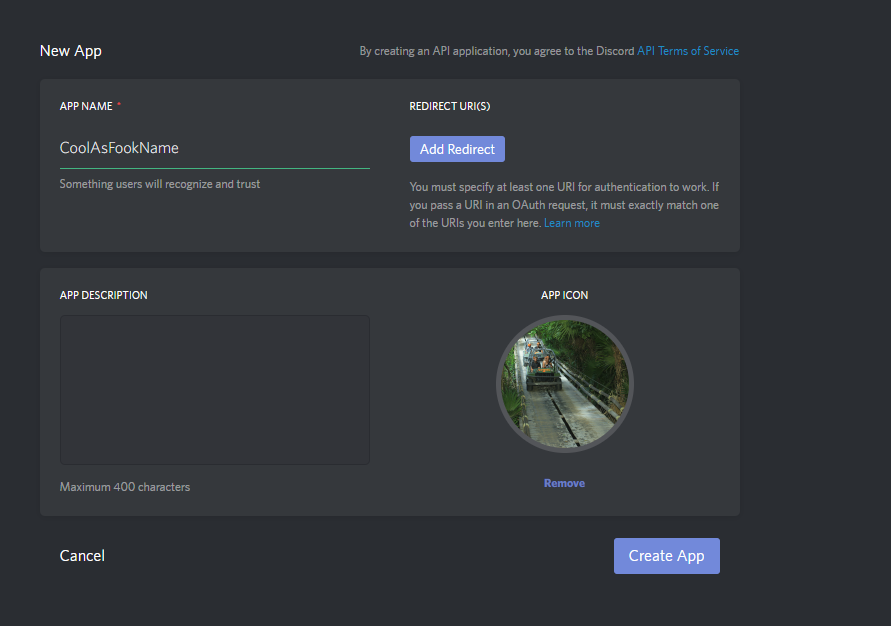
Give your app a name and press Create App
Now we will make our app a Bot User by clicking the next button

Great, we've created our first app! lets get the app's token (Essential to get the app online and functional)

So.. In order to make our bot to run properly with more "security" we will put our "secrets" in a json file
Let's start: (It's going to be easy :D)
We will start by creating a file called config.json which will represent our config
All we need to store in our config.json for this project is the bot's token
This is how your config.json should look like this
{
    "token" : "TheTokenWe'veGot"
}
(Replace the "TheTokenWe'veGot" with your token)
And that's it for the Bot's config! How easy was that?
So we're finally here, the main part for our bot, the core which will run it.
Create a file called app.js
And we will start by meeting our work environment:
Discord.js // A module for Discord API wrapping
run npm init inside the console while the console is on the bot's directory!
and start feeling up the fields
After that is being done you can download discord.js by running the next command inside the console
npm install discord.js
Go to your main.js and require discord.js as Discord and get the Client object
This is what your file should look like now
const Discord = require('discord.js');
const Client = new Discord.Client();
This is a big step of getting our application to run!
Let's make the client to connect Discord, Shall we?
We will do this by adding our config JSON which we've created before to the code
const config = require('./config.json');The next step is making the Client to connect Discord
Client.login(config.token)
As you can see we are using our config to take the token without the need to expose it inside the main file.
Let's make sure our app is connected by adding those line of code to main.js
Client.on('ready', () => {
    console.log('ready!');
})
Now our main.js should look just like this:
const Discord = require('discord.js');
const Client = new Discord.Client();
const config = require('./config.json');;

Client.login(config.token);

Client.on('ready', () => {
    console.log('ready!');
});
Run our application by running this command node main.js inside the console.
After you got that ready! printed inside your console we're good to go to the next step
Ok, We are splitting this part into 4 different parts
- Adding a redirection URL for our application
- Connecting our bot to a RethinkDB database
- Fetching essential data being imported by our users
- Using the data we've fetched
A redirection URL is an important part!
We need it because while we are authorizing to Discord services, Discord will redirect us to that URL
And we will get a grant_code which give us the permissions and the essentials to get every data we need from the user who just got authorized.
Let's start by going to our apps and we will pick our bot
You will see a section called REDIRECT URI(S) Go ahead type the next URL

Press save
Please, Do not keep going untill you are setting up RethinkDB How to setup
Ok, You might ask yourself, "Why do I need a database"?
Well... The answer is pretty straight up, we want a dashboard so we will store all the different guild's configs inside of it.
We will start by installing our RethinkDB API wrapper for Node.js (There are many but we will go with RethinkDBDash)
Let's get into our console and run the next command npm install rethinkdbdash
Great, We've got it!
Go to your main.js file and require rethinkdbdash as r
const r = require('rethinkdbdash')But we want to connect into our database
Let's invoke rethinkdbdash connection function
const r = require('rethinkdbdash')({db: 'Dashcord', servers: [{host: 'localhost', port: 28015}]});Great! let's test if we are connected. go ahead and boot up your RethinkDB server and run node main.js in the console
Did you get the next message: Creating a pool connected to localhost:28015? If you did, you are good to go.
Ok, we are in the main part of the integration.
We will make the fetching very effective by fetching each guild's config from our database
And storing each guild's config in a Map
But we will use a modified map called Collection
Because it is easier to maintain and work with.
Add the next line of code below const config = require('./config.json);
Client.guildsConfig = new Discord.Collection();All of the next code should be inside our ready event! (If you don't understand, Don't worry! a final code will be below)
Let's start by looping through our guilds, our Client holds a guilds property which give us a look of the guilds your bot is inside.
And it would be easy, why? because guild comes in a Collection shape, but it's not ready to be "loopped" through, yet!
Let's invoke a method called .array() which will make our Collection to be an array.
const guilds = Client.guilds.array();Great we got our guilds inside an array! And now we can loop through them, let's do that
for (let guild of guilds) {
    let config = await r.table('Guilds').get(guild.id).run();
    Client.guildsConfig.set(guild.id, config ? config : null);
}
Ok ok ok... I know, It's may be confusing for you but we will go through each like and explain it to you
for (let guild of guilds)This is what called a for..of loop, we are having our variable - let guild which represents each guild by itself inside the loop.
let config = await r.table('Guilds').get(guild.id).run();So if you've followed the RethinkDB setup you should have a table inside your database called Guilds
What we are doing in this line is basically fetching the specific guild from our database, more info about get method for rethinkDB, here
Client.guildsConfig.set(guild.id, config ? config : null)Ok so basically we are pushing the guild into our Collection we've created earlier, and we're using the guild.id as the key
And the actual data is the config we've fetched from our database (If no config the code will insert null)
This is what yuor ready event should look like right now:
Client.on('ready', () => {
    console.log('ready!');

    for (let guild of guilds) {
        let config = await r.table('Guilds').get(guild.id).run();
        Client.guildsConfig.set(guild.id, config ? config : null);
    }
});In #Seday I've introduced a custom prefix feature. I'll will use the custom prefix for the next step
Ok, so we need to get our data into use, if we are going to make a custom prefix feature we would need a message event
Add the next line of code to your main.js
Client.on('message', () => {

});
Good! we got our message event up. let's add some code into it.
const guild = message.guild;In this line we are getting access to the guild the message was sent in.
Now, we want to load the specific guild's config we've stored into Client.guildsConfig
const guildConfig = Client.guildsConfig.get(guild.id)Basically we're getting the specifc config for the guild. Let's check the prefix and assign it.
let prefix = guildConfig && guildConfig.prefix ? guildConfig.prefix : '=' Ok. so I'm using here the ternary operator, if the guild has a prefix it will be the custom prefix, if not, = (Default prefix)
Let's make a basic command and check if it works
if (message.content.startsWith(`${prefix}hello`)) return message.channel.send('hello!!!');And if you've followed everything, it should be listening to the custom prefix if you've set one and to = if you haven't.
This is what your message event should look like
Client.on('message', () => {
    const guild = message.guild;
    const guildConfig = Client.guildsConfig.get(guild.id);
    let prefix = guildConfig && guildConfig.prefix ? guildConfig.prefix : '=';

    if (message.content.startsWith(`${prefix}hello`)) return message.channel.send('hello!!!');
});