Tutorial
This tutorial will help you to build your first FeatureIDE project. After you have finished this tutorial, you will have a simple Hello World software product line. If you have problems at a certain step, you can get the final result using File-> New-> Example in Eclipse's main menu.
The first step for your product line is domain engineering. Here you think about what features to provide for your product.
When using FeatureIDE it is best to activate the FeatureIDE perspective. Your first step is to switch the active perspective to the FeatureIDE Perspective. You can use the button on the upper right corner of the workbench

or Window / Open Perspective / Others... and select Feature IDE.

Let's start with creating of your first Feature IDE Project. You can find the Feature IDE Project wizard under File / New / Feature IDE Project . The wizard will prompt you to select a composer engine. You can choose any composition engine but we will start with AHEAD.

Because each composition engine is slight different in use, you have can see the handling of another composer later in this tutorial.
On the next page, choose a project name. For example HelloWorld Then, close the wizard by clicking Finish.

Now its time to create a feature model specifying the features and their valid combinations.
After creation of the project, FeatureIDE opens the model.xml file. You will see a graphical editor where you can edit the feature model of your software product line.
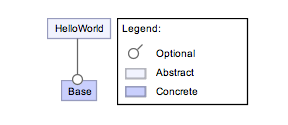
First, create two additional layers under your root feature. Right click on the root feature HelloWorld and select Create Feature (below) twice. Rename the first new feature to Hello, and the second to World. You can rename features using F2, a single click on a selected feature, or using a right click with the option at the context menu.

Rename the feature Base to Beautiful and move it between the features Hello and World.

Now, create a feature Wonderful and move it between the features Beautiful and World.
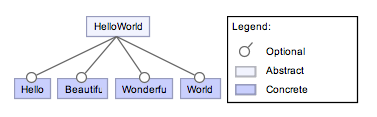
Now, we want to make the features Beautiful and Wonderful exclusive to each other. Select both features, create a new parent feature above using right click menu and select Create Feature Above, and name it Feature. As this feature has no according implementation mark it as abstract using the context menu.

Connections between feature and its group of children are distinguished as And- (no arc), Or- (filled ar) and Alternative-groups (unfilled arc). The children of And-groups can either be mandatory (filled circle) or optional (unfilled circle). Double click on the connection below the feature Feature to change it to an Or-group and again to change it to an Alternative-group. Then double click on the features Hello and World to mark them as mandatory.

It is now time to implement the features. The implementation details depend on the composer you have chosen. Please select the task that explains the implementation for the composer you have chosen during project creation. We will start with AHEAD, but feel free to start with another.
This tutorial guides you through the implementation of features using AHEAD. It supports composition of Jak files. Jak extends Java with keywords for Feature-Oriented-Programming which are
-
refines: used to specify refinements of an existing class. -
Super(): used to call a refined method .
After you have saved your feature model, FeatureIDE will create directories for each feature.

In these directories you can create Jak-Files.
Start with creating a new Jak-file in the directory Hello.
Right click on the directory Hello and use the command New / FeatureIDE Source File of the popup menu.

Set the class name to Main and press the Finish button.

FeatureIDE opens the file and you can write the following code:
public class Main {
   public void print(){
      System.out.print("Hello");
   }

   public static void main(String[] args) {
      new Main().print();
   }
}
Now create more Jak files, one in each of the directories Beautiful, Wonderful and World. In these cases, activate the option Refines in the Wizard. Furthermore, all the Jak files must have the same name Main.

Now edit the remaining Jak-Files. Every feature will refine the method print() in the class Main.
Now insert the following code in your world feature:
public refines class Main {
   public void print() {
      Super().print();
      System.out.print(" world!");
   }
}
In the other files you can insert the same code and just change the print method.
Example
System.out.print(" wonderful") // in the "Wonderful" feature.
System.out.print(" beautiful") // in the "Beautiful" feature.
FeatureC++ is a C++ language extension to support Feature-Oriented Programming (FOP). The extension of C++ is similar to the Java extension (Jak) by AHEAD with the new keywords:
-
refines: used to specify refinements of an existing class. -
super: used to call a refined method .
After you have saved your feature model, FeatureIDE will create directories for each feature. In these directories you can create cpp-Files.
Start with creating a new cpp-file in the directory Hello: Right click on the directory and use the item New / FeatureIDE File. Choose the identifier "Main" for the class name and press the Finish button.
FeatureIDE opens the file and you can write the following code:
#include "stdio.h"
class Main {
   public:
   int run() {
      printf("Hello");
      return 0;
   }
};

int main() {
   //create instance of "Main"
   Main myHello;
   //run Main::run as entry-point of the app
   return myHello.run();
}
Now create more cpp files, one in each of the directories Beautiful, Wonderful and World. In these cases, activate the option Refines in the Wizard. Furthermore, all the cpp files must have the same name Main.
Now edit the remaining cpp-Files. Every feature will refine the method print() in the class Main.
Now insert the following code in your world feature:
refines class Main {
   public:
   int run() {
      int res = super::run();
      if (res!=0)
         return res;
      printf(" World!");
      return 0;
   }
};
In the other files you can insert the same code and just change the print method.
Example:
printf(" wonderful"); // in feature "Wonderful".
printf(" beautiful"); // in feature "Beautiful".
FeatureHouse is language-independent in that software artifacts written in various languages can be composed, e.g., source code, test cases, models, documentation, makefiles. Currently, FeatureHouse provides support for the composition of software artifacts written in Java, C#, C, Haskell, JavaCC, Alloy and UML. In this tutorial you will use Java.
After you have saved your feature model, FeatureIDE will create directories for each feature automatically. In these directories you can create Java-Files.
Start with creating a new Java-file in the directory Hello by right clicking on the directory and use the context-item New / FeatureIDE File. Choose the identifier Main for the class name and press Finish button.
FeatureIDE opens the file and you can write the following code:
public class Main {
   protected void print() {
      System.out.print("Hello");
   }

   public static void main(String[] args){
      new Main().print();
   }
}
Now create more Java files. Create one in each of the directories Beautiful, Wonderful and World. All the Java files must have the same name Main.
Now edit the remaining Java-Files. Every feature will refine the method print() in the class Main.
Now insert the following code in your world feature:
public class Main {
   protected void print() {
      original();
      System.out.print(" World!");
   }
}
In the other files you can insert the same code and just change the print method.
Example:
System.out.print(" wonderful"); // in feature "Wonderful".
System.out.print("beautiful"); // in feature "Beautiful".
AspectJ is a aspect-oriented extension of Java.
In FeatureIDE each feature corresponds to one aspect. First create the Java files for your base program. The aspects for each feature are created automatically. Start with creating a new Java-file in the src-directory by right clicking on the directory and choose to create a new Java class. Choose the identifier Main for the class name and press Finish button.
FeatureIDE opens the file and you can write the following code:
public void print(){
   System.out.print("Hello");
}

public static void main(String[] args) {
   new Main().print();
} Now edit the existing aspects (.aj) for each feature. Every feature will refine the method print() in the class Main.
Now insert the following code in your world feature:
public aspect Wonderful {
   after(): call(void Main.print()) {
      System.out.print(" wonderful");
   }
}
In the other files you can insert the same code and just change the print method.
Example:
System.out.print(" wonderful"); // in the "Wonderful" feature.
System.out.print(" beautiful"); // in the "Beautiful" feature.
DeltaJ is a Java-like language supporting Delta-Oriented-Programming. Delta-Oriented-Programming is similar to Feature-Oriented-Programming but each project contains of one core module and a set of delta modules. A core module is a simple collection of classes, while a delta module is a set of operations that allow to add a new class and modify or remove classes declared in other delta or core modules. Keywords:
-
modifies: used to specify a refined class or - method
original(): used to call a refined method -
delta: used to specify a delta module -
core: used to specify a core module -
after: used to specify module dependencies (the current module depends on the list of modules following the after keyword)
Example:
delta Wonderful after Beautiful when Wonderful{
   modifies class Main{
      modifies void print() {
         original();
         new SystemOutWrapper().print(" wonderful");
      }
   }
} NOTE: a core module includes a lines specifying features and configurations. In FeatureIDE these lines are modified automatically.
Munge is a purposely-simple Java preprocessor. When using Munge you can use Munge-style Java comments to specify the mapping between parts of code and features.
Example:
public class Main {
   public static void main(String[] args){
      /*if[Hello]*/
      System.out.print("Hello");
      /*end[Hello]*/

      /*if[Beautiful]*/
      System.out.print(" beautiful");
      /*end[Beautiful]*/

      /*if[Wonderful]*/
      System.out.print(" wonderful");
      /*end[Wonderful]*/

      /*if[World]*/
      System.out.print(" world!");
      /*end[World]*/
   }
}
Antenna is a Java preprocessor. You can use Antenna-style Java comments to specify the mapping between parts of code and features.
Example:
public class Main {
   public static void main(String[] args){
      //#if Hello
      System.out.print("Hello");
      //#endif

      //#if Beautiful
      System.out.print(" beautiful");
      //#endif

      //#if Wonderful
      System.out.print(" wonderful");
      //#endif

      //#if World
      System.out.print(" world!");
      //#endif
   }
}In this part of the tutorial you will create your first configuration.
After you designed your feature model, and source code, you want to generate a variant which is a product of your product line. To specify a variant, you have to provide a feature selection. This is done in a per-variant configuration file

Create a new configuration file with the according wizard.

Open the configuration file and select the features you want to activate for your variant. After you have saved the file, FeatureIDE will compose your features and compile the generated Java code.

Now it's time to start your application. Right click on the project in package explorer and choose Run As > Java Application. Choose a class name without $$ in the name and enjoy your Hello Beautiful Wonderful Word application! The next time you want to start your application simply use the run button in the eclipse tool bar.
You can access our examples using
-
New / Examples...in package explorer or via -
File / New -> Othersin Eclipse main menu by selectingFeature IDE -> Feature IDE Examplesunder the node Examples the dialog's tree control.
We provide a HelloWorld example for every FeatureIDE extension, which may help to create projects in other languages and with other composition mechanisms.