# Getting Started
Welcome to the MirrorVR Setup! It's a long process, but it's easy if you follow along!
{% hint style="warning" %}
Make sure you have removed your old networking system from the scene before you continue.\
See [photonvr-to-mirrorvr](https://codedimmersions.gitbook.io/mirrorvr/manual/guides/migration-guides/photonvr-to-mirrorvr "mention") or [flowvr-to-mirrorvr](https://codedimmersions.gitbook.io/mirrorvr/manual/guides/migration-guides/flowvr-to-mirrorvr "mention") for proper cleanup.
{% endhint %}
{% hint style="warning" %}
If you have any obfuscators, make sure the following namespaces are added to the skipped namespaces list:\
`Mirror`, `Mirror.VR`, `MetaVoiceChat`, `EpicTransport`, `Epic.OnlineServices`
{% endhint %}
### Dependencies
* **Newtonsoft.Json**
* Make sure you have this installed. To install, go to `Window > (Package Management) > Package Manager`, then hit the `+` icon in the top left, then `Add package by name...`, then type in `com.unity.nuget.newtonsoft-json`, and hit `Add` or `Install`.
* **Unity Version**
* The recommended Unity version for MirrorVR is Unity 6000.3, but you should be able to use this package with no issues if you are on Unity 6000.0.38f1+.
* **Universal Render Pipeline**
* It is recommended to have URP installed before installing this package. It's not required, it's just a suggestion.
### Installation
{% stepper %}
{% step %}
First, download the latest version of [Mirror](https://github.com/MirrorNetworking/Mirror/releases/latest) and put it into your game. Mirror is the backbone of MirrorVR and is how players communicate with each other.
Then, after Mirror is installed in your project, install [EOSTransport](https://github.com/CodedImmersions/EOSTransport/releases/latest). This is the core bridge between Mirror and EOS.
Once both are installed, get the [latest MirrorVR package](https://github.com/MirrorVR/MirrorVR/releases/latest) and put it in your game.
{% endstep %}
{% step %}
Go to `Assets/MirrorVR` in your Unity Project. That is where the package is located. Now go inside the `Prefabs` folder, and drag the Network Manager prefab into your scene.
{% endstep %}
{% step %}
Now open the Network Manager object you just dragged into the scene.\
Assign the Player Transforms to their values. Skip API Keys and Encryption Key for now, we will cover those in a bit.
Go right to the Settings section. Configure it however you like. See [mirror-vr-manager](https://codedimmersions.gitbook.io/mirrorvr/manual/components/mirror-vr-manager "mention") for details.
{% endstep %}
{% step %}
Now, to set up Epic Online Services. If you are using Dedicated Server or PlayFab features, you still need to use Epic, as it provides a player management backend to improve your game.\
\
Head right over to the [Epic Games Developer Portal](https://dev.epicgames.com/portal), sign in, and create an organization if you don't have one already.
{% endstep %}
{% step %}
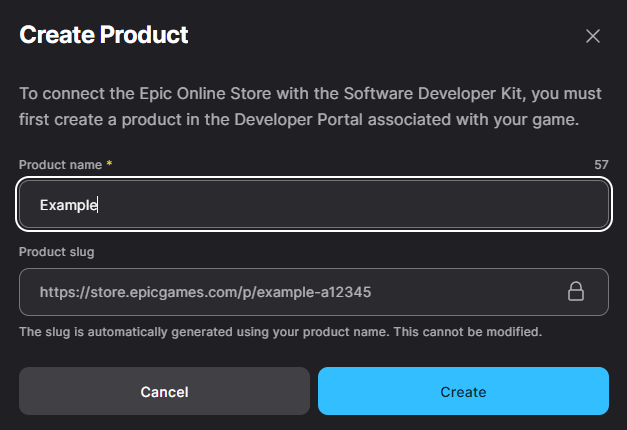
Once you have made your organization, hit the `Create Product` button.\
Name your product. It should be your game name. Once done, hit the create button, then wait a bit.
{% endstep %}
{% step %}
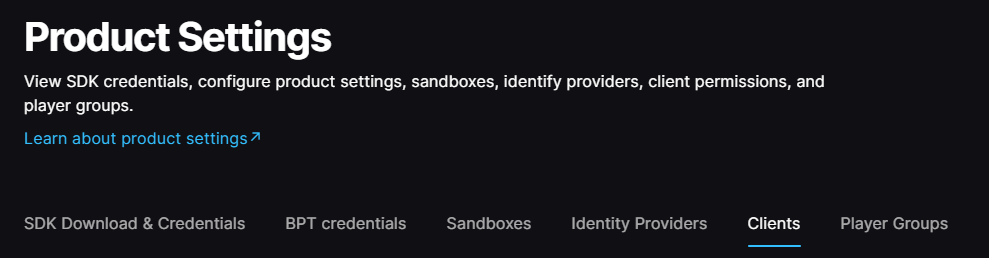
Once your product has been created and it's done loading, click on it. On the left-hand side of your screen, click on the `Product Settings` tab.
Now click on the `Clients` tab.
{% endstep %}
{% step %}
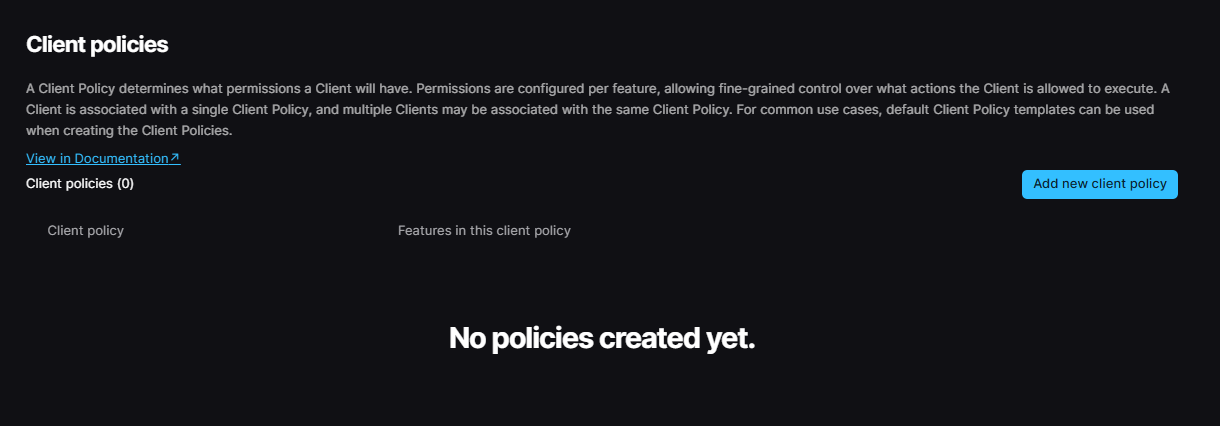
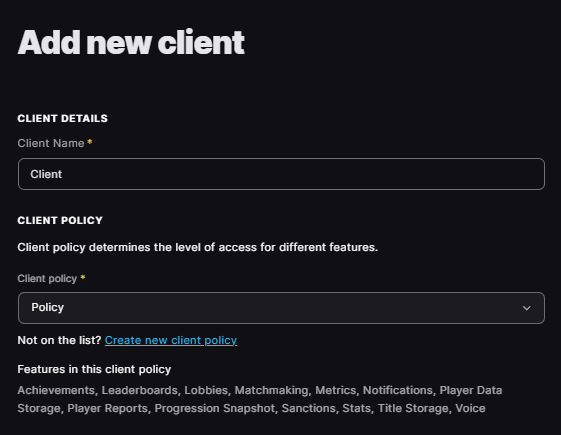
Scroll towards the bottom, where it says `Client policies`. Click the blue `Add new client policy` button.
Name your policy whatever you want. Follow the video below to set up the client policy.
{% embed url="" fullWidth="false" %}
At the bottom right of your screen, press the blue `Add new client policy` button.
{% endstep %}
{% step %}
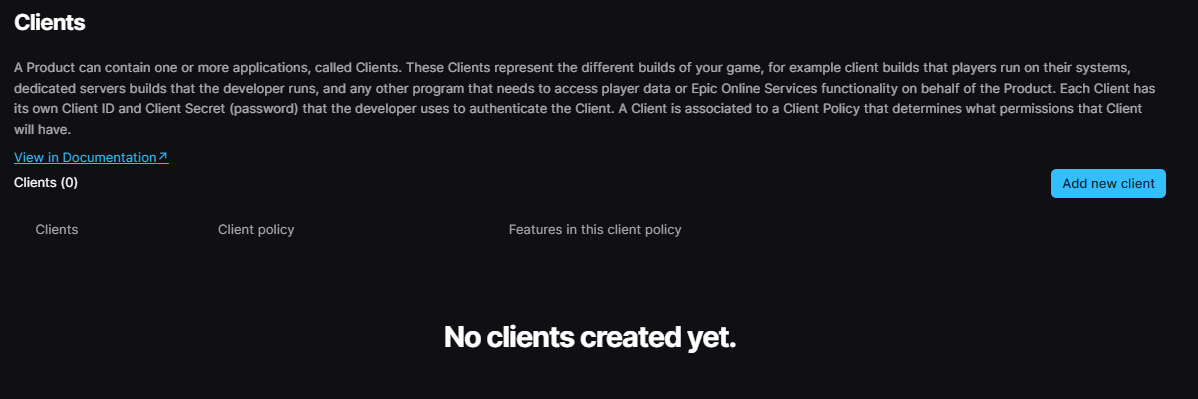
Now scroll up a little to the `Clients` section. Click the `Add new client` button.
Client Name can be anything. On client policy, select the one we just created. We can skip IP allow list and redirect URL, as they aren't needed for our case.
On the bottom right of your screen, click the `Add new client` button.
{% endstep %}
{% step %}
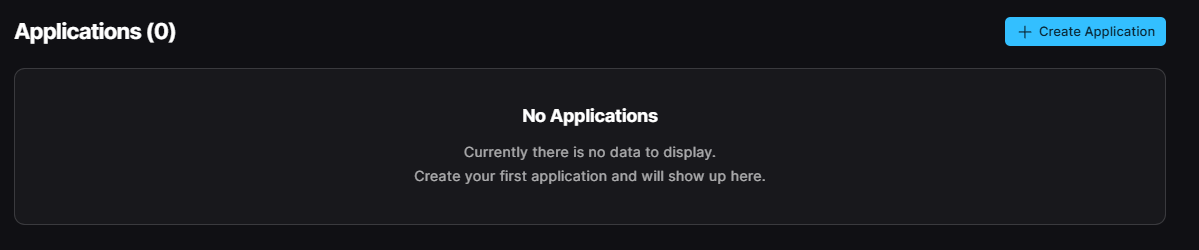
Next, go to the `Epic Account Services` tab.
Hit the `Create Application` button.
{% endstep %}
{% step %}
We don't need to do anything in the `Brand Settings` tab, so go up to the top right of your screen, and select the `Permissions` tab.
Enable all permissions.
Hit `Save Changes` at the bottom right.
{% endstep %}
{% step %}
Head over to the `Linked Clients` tab.
Select the client we made, and then hit `Save Changes`.
Now in the top left, hit the `Back to Epic Account Services` button.
{% endstep %}
{% step %}
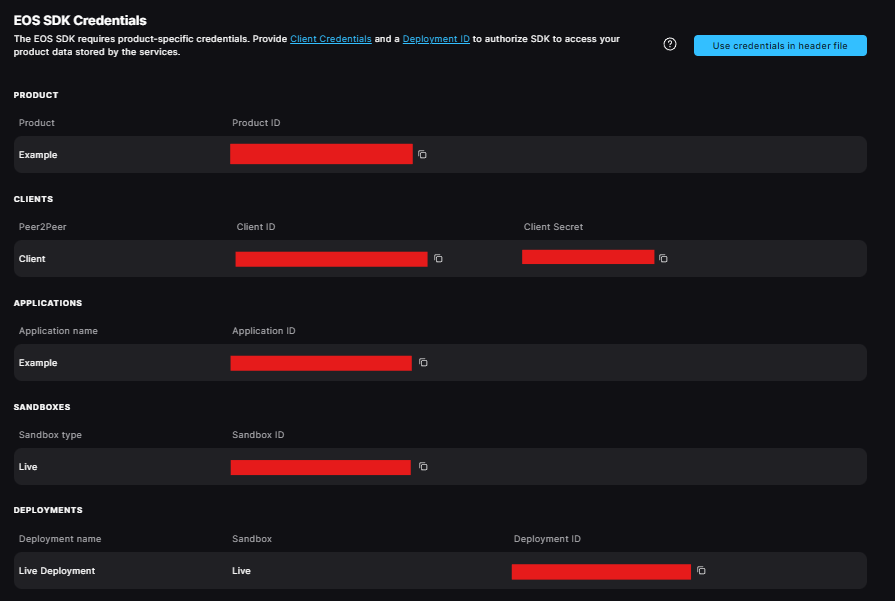
Now go back to the `Product Settings` tab.
Under `SDK Download & Credentials`, scroll to the bottom to get your API Keys.
{% hint style="danger" %}
DO NOT share these API Keys with ANYONE!
{% endhint %}
{% endstep %}
{% step %}
Now go back to MirrorVRManager and put these credentials in their fields.
While we are here, let's set the Encryption Key.
{% hint style="info" %}
The Encryption Key will be used to read and write to Title Storage (10 free GB per app) and Player Data Storage (400 MB or 1000 files per player). Make sure you store it somewhere safe so you can use it later.
{% endhint %}
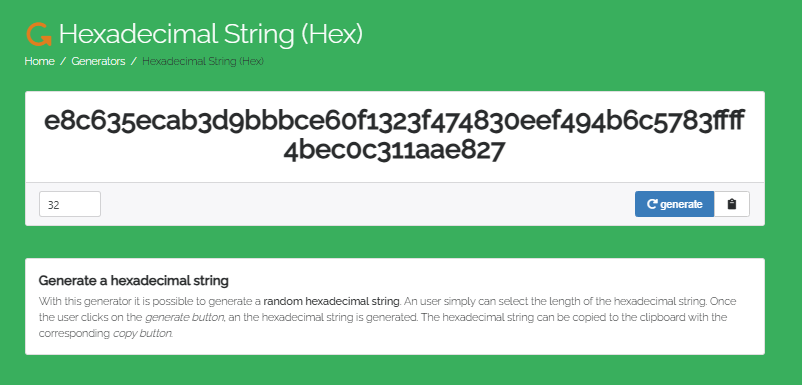
Go to [this website](https://generate.plus/en/hex) to generate a 32-byte hexadecimal string we can use as the encryption key.\
Set the number in the lower left to 32, copy it, put it into the Encryption Key field in MirrorVRManager, and you're all set!
{% hint style="warning" %}
Make sure you save your Encryption Key in some Cloud Storage service in case you lose it, because once you set it, you cannot change it without breaking things.
{% endhint %}
{% endstep %}
{% step %}
And the basic setup is done! See below for next steps.
#### **If you are using Oculus or Steam, there's more setup to do.**
See [meta-quest-setup](https://codedimmersions.gitbook.io/mirrorvr/manual/getting-started/meta-quest-setup "mention") or [steam-setup](https://codedimmersions.gitbook.io/mirrorvr/manual/getting-started/steam-setup "mention") for details.
{% endstep %}
{% endstepper %}