<?xml version="1.0" encoding="utf-8"?><feed xmlns="http://www.w3.org/2005/Atom" ><generator uri="https://jekyllrb.com/" version="4.4.1">Jekyll</generator><link href="https://bitsbytesgates.com/feed.xml" rel="self" type="application/atom+xml" /><link href="https://bitsbytesgates.com/" rel="alternate" type="text/html" /><updated>2026-06-08T23:40:45+00:00</updated><id>https://bitsbytesgates.com/feed.xml</id><title type="html">Bits, Bytes, and Gates</title><subtitle>There&apos;s oh so much fun to be had. At the leading edge,  at the bleeding edge, at the confluence of bits, bytes, and gates.</subtitle><entry><title type="html">The Right Skills for the Job: Project-Scoped Agent Skills</title><link href="https://bitsbytesgates.com/fvutils,/ai/2026/06/06/ContextualAgentConfig.html" rel="alternate" type="text/html" title="The Right Skills for the Job: Project-Scoped Agent Skills" /><published>2026-06-06T00:00:00+00:00</published><updated>2026-06-06T00:00:00+00:00</updated><id>https://bitsbytesgates.com/fvutils,/ai/2026/06/06/ContextualAgentConfig</id><content type="html" xml:base="https://bitsbytesgates.com/fvutils,/ai/2026/06/06/ContextualAgentConfig.html"><![CDATA[<p align="center">
<img src="https://bitsbytesgates.com/imgs/2026/06/skills_banner.png" />
</p>

<p>Agentic AI has quickly become a dominant workflow. Give an LLM access to the
filesystem and shell, provide it good instructions, and watch it work! It’s
that second part that is critical to making the process scalable. LLMs are 
quite happy to fill in the gaps where instructions are incomplete. Agent
Skills help make agentic workflows repeatable and consistent.</p>

<p>Reusable is a great start, but making them context-specific – scoped – is
just as important.  The skills to which an agent has access should be 
determined by what the current project actually uses. This post argues that
the best way to do this is to deliver skills along with the artifacts that 
they describe.</p>

<!--more-->

<h2 id="agent-skills-in-one-minute">Agent Skills in one minute</h2>

<p>If you’re already familiar  with Agent Skills, skip ahead. If not, the concept
is straightforward: a skill is a directory containing a <code class="language-plaintext highlighter-rouge">SKILL.md</code> file – a chunk of
Markdown with a little YAML frontmatter that gives the skill a <code class="language-plaintext highlighter-rouge">name</code> and a
<code class="language-plaintext highlighter-rouge">description</code> – plus any optional scripts or reference files it needs. The
<a href="https://agentskills.io/home">Agent Skills specification</a> and
<a href="https://github.com/anthropics/skills">Anthropic’s skills repository</a> are good
places to see the shape of them.</p>

<p>Skills solve two problems:</p>

<ul>
  <li><strong>Discoverability.</strong> The agent can see, from a short description, that a
capability exists without you having to remember to paste in the relevant
instructions every time.</li>
  <li><strong>Progressive disclosure.</strong> When an agent loads skills, it only reads
the description into the context initially. It only reads more of the 
skill files if and when it decides that the skill is relevant to the
task at hand.</li>
</ul>

<h2 id="where-skills-come-from-today">Where skills come from today</h2>

<p>Most AI assistants – Claude Code, Codex, and others – let you configure
skills through the filesystem or through tool commands, with both
directory-specific and global scopes supported. The default tends to be
global.</p>

<p>The interactive path to acquiring skills is a marketplace. Several have
emerged and they’re growing quickly.</p>

<p>
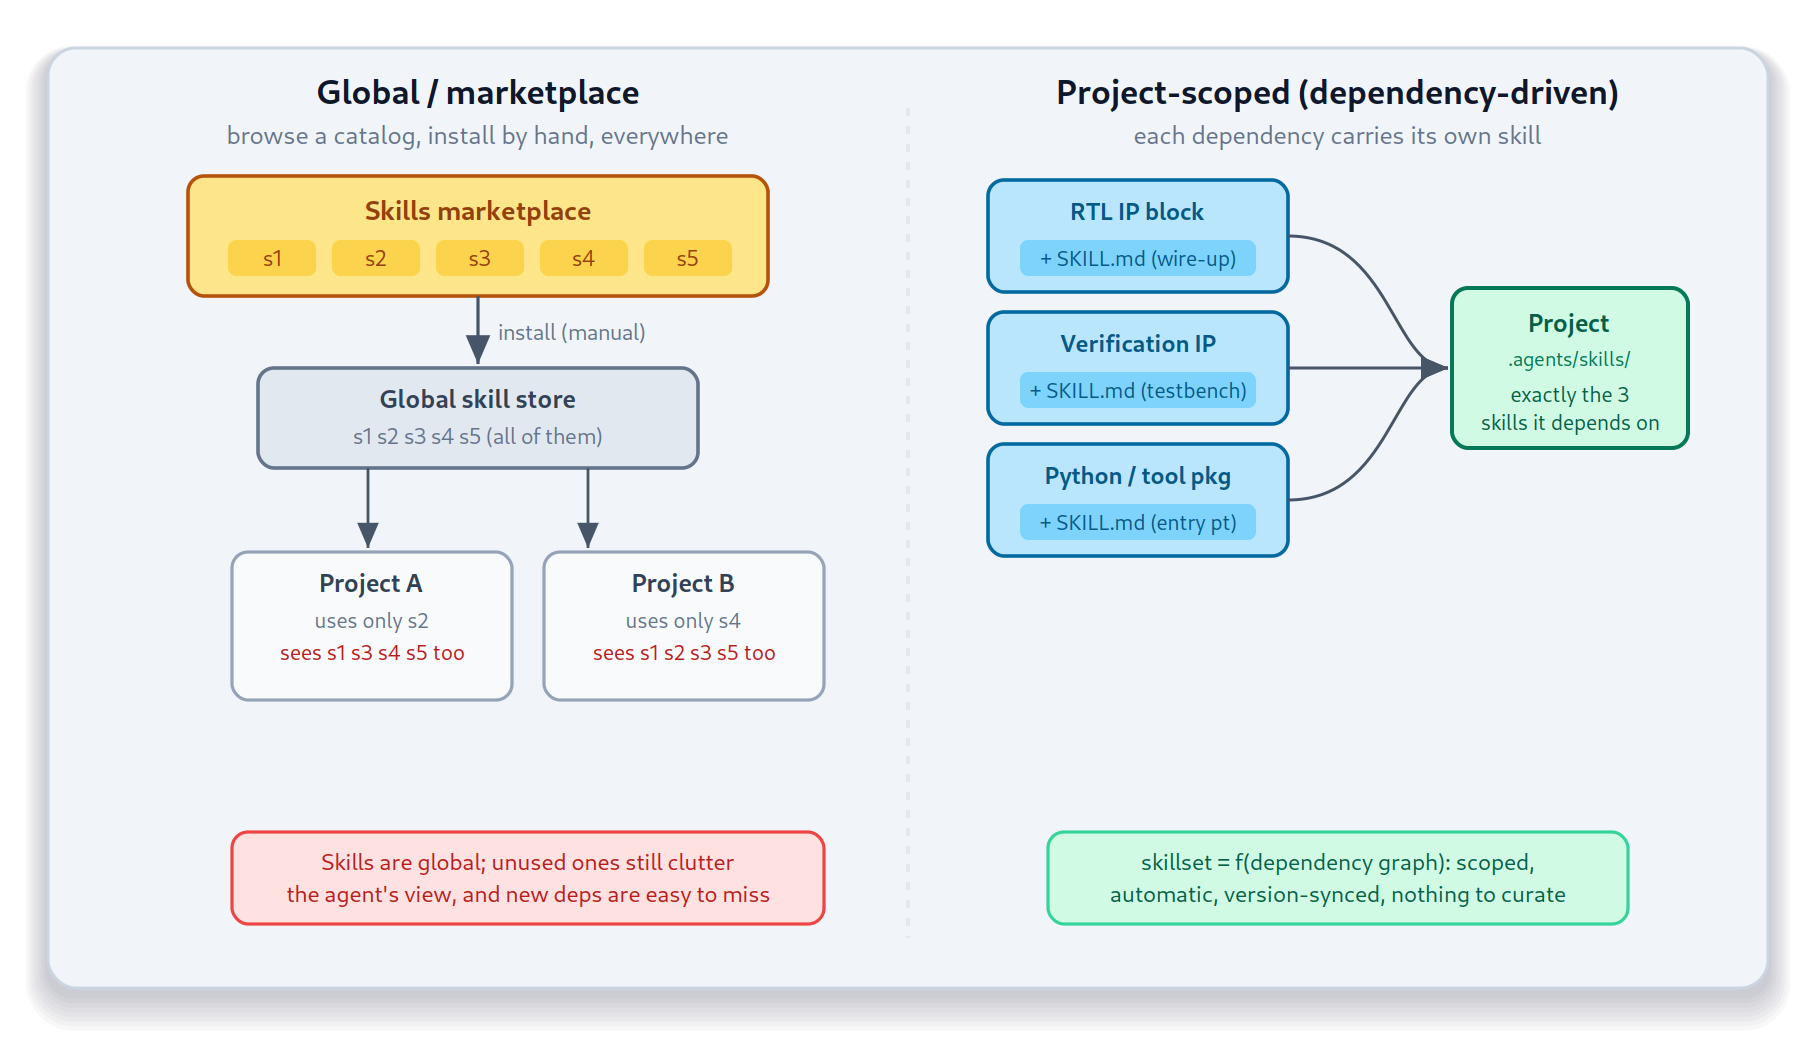
One challenge with the marketplace is that installation and curation are
human-driven: you browse a catalog, decide you want a capability, and install it.
This makes it available in whichever scope(s) you installed it. But, that either
entails having all skills installed always or remembering to install skills
whenever you start a create a new workspace.</p>

<h2 id="skills-should-travel-with-the-artifact">Skills should travel with the artifact</h2>

<p>The person best positioned to write “how to use X” is the author of X. And the 
most-natural vehicle for shipping that knowledge is X’s own package. This ensures
that the skill matches the installed version of X, and gets updated along 
with the package.</p>

<p>For example:</p>

<ul>
  <li>
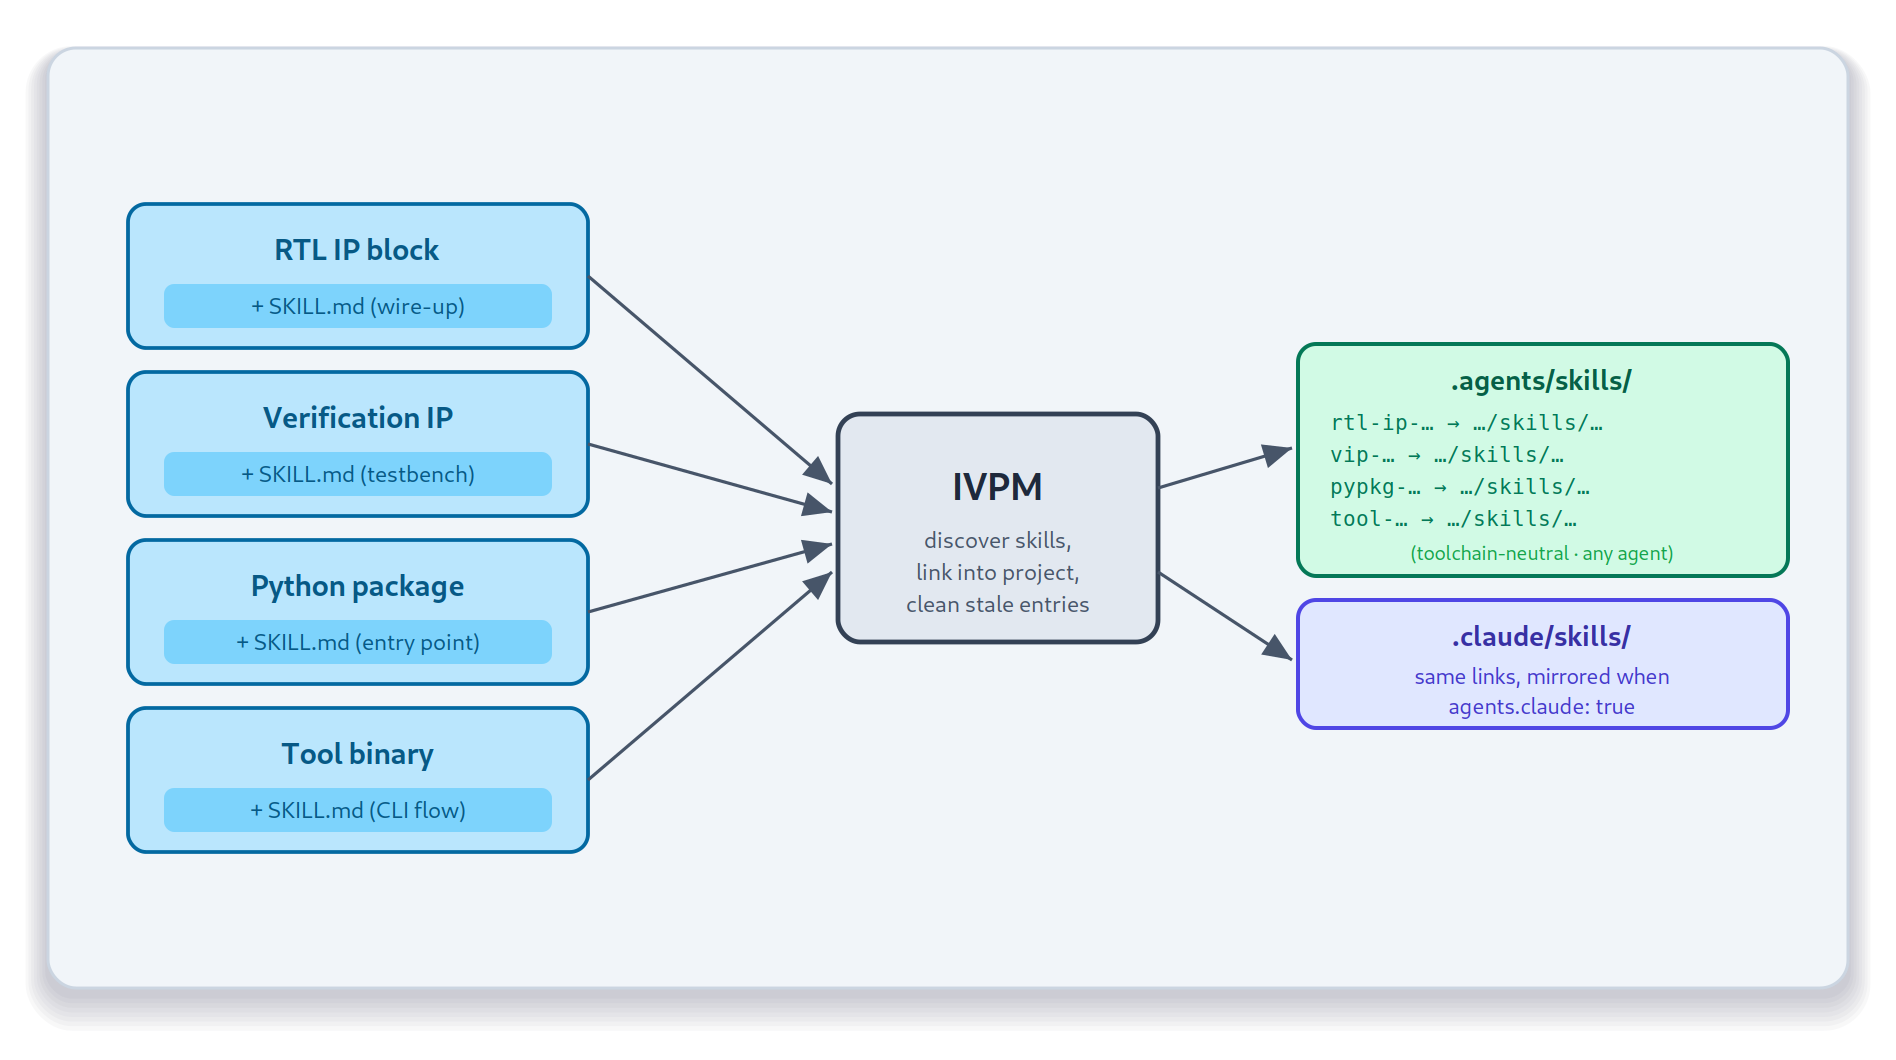
A Verilog/RTL IP block can ship a skill that teaches an agent how to wire it
up and drive it.</li>
  <li>A verification IP can ship a skill describing how to instantiate it in a
testbench.</li>
  <li>A Python package can deliver a skill the same way it delivers any other
packaged resource.</li>
</ul>

<p>In each case the author of the artifact is the author of the skill, and the
two stay in sync because they live in the same package. Contrast that
with a marketplace listing: standalone, general-purpose, and free to drift out
of sync with the thing it describes. When the IP gains a new port or the API
changes, the skill that shipped alongside it changes too. A separately curated
catalog entry has no such guarantee.</p>

<p>Having skills travel with the artifact provides us a new possibility: to
create a project-scoped set of skills that cater to the needs of an engineer
developing that project. No need to remember to install skills after setting
up a workspace. No potential confusion from skills from a dependency that
isn’t relevant to your project.</p>

<p align="center">
<img src="https://bitsbytesgates.com/imgs/2026/06/skills_global_vs_scoped.png" />
</p>

<h2 id="ivpm-project-specific-skillsets">IVPM: project-specific skillsets</h2>

<p>That’s where <a href="https://fvutils.github.io/ivpm">IVPM</a> comes in. The Integrated 
View Package Manager’s mission is to fetch a project’s dependencies and 
integrate the relevant content into project-specific <em>views</em>. For example, 
a project-local Python virtual environment containing the project’s Python 
dependencies. IVPM does the same for agent skills: it gathers the skills 
delivered by a project’s dependencies and links them into the appropriate 
directory-local assistant configuration.</p>

<p>IVPM discovers skills through four mechanisms, applied in priority order:</p>

<p align="center">
<img src="https://bitsbytesgates.com/imgs/2026/06/skill_discovery_tiers.png" />
</p>

<ol>
  <li><strong>Consumer-specified paths.</strong> The dependency entry in your <code class="language-plaintext highlighter-rouge">ivpm.yaml</code> can
name a glob (e.g. <code class="language-plaintext highlighter-rouge">skills/**/SKILL.md</code>) telling IVPM where the skills live.</li>
  <li><strong>Package-declared paths.</strong> A dependency can advertise its own skill
locations via <code class="language-plaintext highlighter-rouge">with.agents.skills</code> in its <code class="language-plaintext highlighter-rouge">ivpm.yaml</code>.</li>
  <li><strong>Auto-probe.</strong> Absent any declaration, IVPM looks for a <code class="language-plaintext highlighter-rouge">SKILL.md</code> at the
package root and searches a <code class="language-plaintext highlighter-rouge">skills/</code> directory. Most packages need no
configuration at all because of this.</li>
  <li><strong>Python entry points.</strong> For installed Python packages, IVPM queries the
<code class="language-plaintext highlighter-rouge">agent.skills</code> entry-point group, so a package can register its skills
programmatically. (A legacy <code class="language-plaintext highlighter-rouge">ivpm.skill</code> group is still accepted for
backward compatibility.) Each entry point is a callable that returns a path
– or list of paths – to directories containing a <code class="language-plaintext highlighter-rouge">SKILL.md</code>.</li>
</ol>

<p>Once discovered, the skills are linked into your project’s configuration
directories. IVPM always populates <code class="language-plaintext highlighter-rouge">.agents/skills/</code> – the toolchain-neutral
layout that any skills-aware agent can read – and, when you ask for it, also
mirrors into <code class="language-plaintext highlighter-rouge">.claude/skills/</code> so Claude Code picks them up automatically.
Links are relative when the target lives inside the project tree and absolute
otherwise, with a directory copy as a fallback on platforms that don’t support
symlinks. Stale links from previous runs are cleaned up on each update.</p>

<p>The only opt-in is a short block in your project’s <code class="language-plaintext highlighter-rouge">ivpm.yaml</code>:</p>

<div class="language-yaml highlighter-rouge"><div class="highlight"><pre class="highlight"><code><span class="na">package</span><span class="pi">:</span>
  <span class="na">with</span><span class="pi">:</span>
    <span class="na">agents</span><span class="pi">:</span>
      <span class="na">claude</span><span class="pi">:</span> <span class="kc">true</span>   <span class="c1"># also mirror skills into .claude/skills/</span>
</code></pre></div></div>

<h2 id="a-worked-example">A worked example</h2>

<p>You can find a runnable example in the IVPM repository:
<a href="https://github.com/fvutils/ivpm/tree/master/examples/agent-skills"><code class="language-plaintext highlighter-rouge">examples/agent-skills</code></a>.</p>

<p>
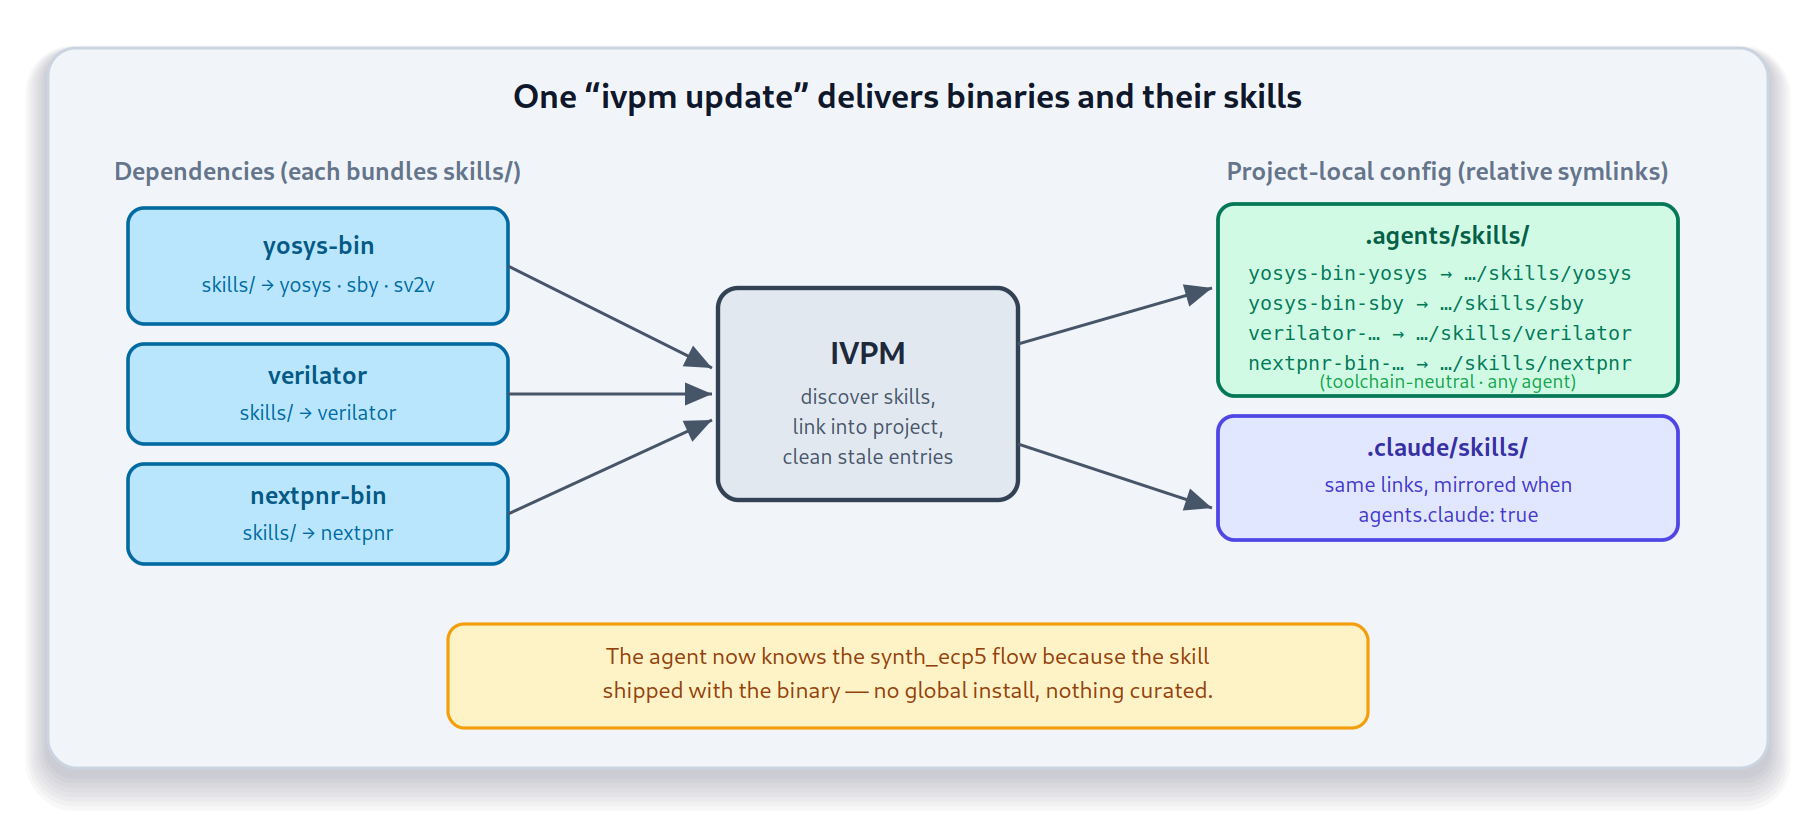
The project depends on three pre-built EDA tools fetched as binary releases
from the <a href="https://github.com/edapack">EDAPack</a> feed – <strong>yosys</strong> (RTL
synthesis), <strong>verilator</strong> (simulation), and <strong>nextpnr</strong> (FPGA
place-and-route). Each of those release tarballs <em>bundles its agent skills</em>
under a <code class="language-plaintext highlighter-rouge">skills/</code> directory, so IVPM auto-discovers them with no extra
configuration. The project’s <code class="language-plaintext highlighter-rouge">ivpm.yaml</code> does nothing more than list the
dependencies and flip on the Claude mirror shown above.</p>

<p>Run a single command:</p>

<div class="language-bash highlighter-rouge"><div class="highlight"><pre class="highlight"><code>ivpm update
</code></pre></div></div>

<p>IVPM fetches the tool <em>binaries</em> and, in the same step, links every discovered
skill into the project:</p>

<div class="language-plaintext highlighter-rouge"><div class="highlight"><pre class="highlight"><code>.claude/skills/
├── yosys-bin-yosys     -&gt; ../../packages/yosys-bin/skills/yosys
├── yosys-bin-sby       -&gt; ../../packages/yosys-bin/skills/sby
├── yosys-bin-sv2v      -&gt; ../../packages/yosys-bin/skills/sv2v
├── verilator-verilator -&gt; ../../packages/verilator/skills/verilator
└── nextpnr-bin-nextpnr -&gt; ../../packages/nextpnr-bin/skills/nextpnr
</code></pre></div></div>

<p align="center">
<img src="https://bitsbytesgates.com/imgs/2026/06/skills_with_artifact_flow.png" />
</p>

<p>Now open your agent in that directory and ask:</p>

<blockquote>
  <p>Simulate the blink design and testbench in Verilator, using available
skills. Then synthesize the design targeting ecp5 using yosys and nextpnr.</p>
</blockquote>

<p>The agent already knows the <code class="language-plaintext highlighter-rouge">synth_ecp5</code> flow, because the skill that explains
it shipped with the synthesis binary. Nothing was hand-curated, and no global
catalog was browsed. One <code class="language-plaintext highlighter-rouge">ivpm update</code> delivered both the toolchain and the
know-how to drive it – and the capability tracked the dependency graph
exactly.</p>

<h2 id="conclusions-and-next-steps">Conclusions and next steps</h2>

<p>Skills are most useful when they’re scoped to what a project actually uses, and
the package manager is the right place to do that scoping. By treating skills
as artifacts that travel with the artifacts that they describe, you
get a project-specific skillset that’s assembled automatically, stays in sync
with its sources, and disappears when its dependency does. No catalog to
browse, nothing to remember to install.</p>

<p>If you maintain an artifact that others integrate – an IP block, a tool, a
library – consider shipping a skill alongside it. You’re the person best
positioned to write it, and a <code class="language-plaintext highlighter-rouge">skills/</code> directory is a small thing to add. And
if you’d like to try the consuming side, the
<a href="https://github.com/fvutils/ivpm/tree/master/examples/agent-skills">agent-skills example</a>
is a good place to start.</p>

<h2 id="references">References</h2>

<ul>
  <li><a href="https://agentskills.io/home">Agent Skills Specification</a></li>
  <li><a href="https://github.com/anthropics/skills">Anthropic Skills repository</a></li>
  <li><a href="https://code.claude.com/docs/en/discover-plugins">Claude Code Plugins</a></li>
  <li><a href="https://fvutils.github.io/ivpm">IVPM</a></li>
  <li><a href="https://fvutils.github.io/ivpm/handlers.html#agents-handler-agents">IVPM Agents Handler</a></li>
  <li><a href="https://github.com/fvutils/ivpm/tree/master/examples/agent-skills">IVPM agent-skills example</a></li>
</ul>]]></content><author><name></name></author><category term="FVUtils," /><category term="AI" /><summary type="html"><![CDATA[Agentic AI has quickly become a dominant workflow. Give an LLM access to the filesystem and shell, provide it good instructions, and watch it work! It’s that second part that is critical to making the process scalable. LLMs are quite happy to fill in the gaps where instructions are incomplete. Agent Skills help make agentic workflows repeatable and consistent. Reusable is a great start, but making them context-specific – scoped – is just as important. The skills to which an agent has access should be determined by what the current project actually uses. This post argues that the best way to do this is to deliver skills along with the artifacts that they describe.]]></summary></entry><entry><title type="html">What’s My Env Again?</title><link href="https://bitsbytesgates.com/fvutils,/ivpm/2026/05/23/WhatsMyEnvAgain.html" rel="alternate" type="text/html" title="What’s My Env Again?" /><published>2026-05-23T00:00:00+00:00</published><updated>2026-05-23T00:00:00+00:00</updated><id>https://bitsbytesgates.com/fvutils,/ivpm/2026/05/23/WhatsMyEnvAgain</id><content type="html" xml:base="https://bitsbytesgates.com/fvutils,/ivpm/2026/05/23/WhatsMyEnvAgain.html"><![CDATA[<p>Almost any non-trivial project will require some amount of environment configuration.
Perhaps the project uses a local Python virtual environment that must be used
for running tests. Perhaps it’s a hardware-design project that needs to configure
the environment for various EDA tools, and ensure that they’re available to users.
If you’re sharing a project with other users, this poses a challenge. The typical
approach is to have a setup.sh script. But, you need to remember to source it 
before doing any work in the project – and when moving over to another project.
And, then, there’s the complication of different shells. Fortunately there’s 
<a href="https://direnv.net/">direnv</a>: a very elegant solution that has become my 
go-to over the past year or so. 
And, naturally, <a href="https://fvutils.github.io/ivpm">IVPM</a> provides support.</p>

<!--more-->

<p>I first learned about <a href="https://direnv.net/">direnv</a> from a colleague a little 
over a year ago.<br />
Initially, I was a bit skeptical because it inverts the typical approach
to environment management. Typically, the environment is a session property
that persists as the user navigates around the filesystem. <a href="https://direnv.net/">direnv</a> 
treats the environment as a property of the project directory tree. Instead of
needing to remember to source a setup file before doing work in a project,
the mere act of entering the project directory causes the environment
to be configured.</p>

<p>Now, if you’re like me, this initially seems a big odd. And, you might
ask if this slows everything down. The good news is that it’s quite fast
and, at least for me, it begins to feel ergonomic very quickly.</p>

<h2 id="how-does-it-work">How does it work?</h2>

<p><a href="https://direnv.net/">direnv</a> has three key components:</p>
<ul>
  <li><code class="language-plaintext highlighter-rouge">.envrc</code> files to configure the environment.</li>
  <li>A lightweight executable, written in <a href="https://go.dev/">Go</a>, to process .envrc files</li>
  <li>A shell alias to ensure direnv runs to configure the environment</li>
</ul>

<h3 id="envrc-files-and-the-stdlib">.envrc files and the stdlib</h3>
<p><code class="language-plaintext highlighter-rouge">.envrc</code> files contain the statements and directives that configure the environment.
These files accept <code class="language-plaintext highlighter-rouge">bash</code> syntax, providing access to standard control-flow statements.
This also enables direnv to work cooperatively with other environment-management
tools, such as <a href="https://envmodules.io/">Environment Modules</a>. Environment modules is
quite popular in silicon engineering environments because it provides elegant support
for managing multiple versions of a tool. For example, you might load version 
5.046 of <a href="verilator.org">Verilator</a> using the following command:</p>

<div class="language-plaintext highlighter-rouge"><div class="highlight"><pre class="highlight"><code>module load verilator/5.046
</code></pre></div></div>

<p>If your environment uses Environment Modules, you can add these same statements to 
your <code class="language-plaintext highlighter-rouge">.envrc</code> file and direnv will configure the proper tool versions in your environment.</p>

<p>In addition to using standard shell syntax to configure environment variables, Direnv
provides a standard library of helpful functions. For example, the <code class="language-plaintext highlighter-rouge">PATH_add</code> stdlib
function adds a directory to the PATH variable:</p>

<div class="language-plaintext highlighter-rouge"><div class="highlight"><pre class="highlight"><code>PATH_add scripts
</code></pre></div></div>

<h3 id="shell-alias">Shell Alias</h3>

<p>Direnv needs to know when the working directory changes so it can update the 
environment if required. This is done by evaluating direnv’s <code class="language-plaintext highlighter-rouge">hook</code> subcommand. 
In <code class="language-plaintext highlighter-rouge">bash</code>, this looks like this:</p>

<div class="language-plaintext highlighter-rouge"><div class="highlight"><pre class="highlight"><code>% eval "$(direnv hook bash)"
</code></pre></div></div>

<p>Direnv supports a <a href="https://direnv.net/docs/hook.html">wide variety of shells</a>, 
including bash, zsh, and tcsh. Add the appropriate statement to your shell’s 
startup script and direnv will ensure that your environment is properly set
whenever you’re within a directory structure containing an <code class="language-plaintext highlighter-rouge">.envrc</code> file.</p>

<h2 id="ivpm-support">IVPM Support</h2>

<p>The Integrated-View Package Manager (IVPM) fetches dependent packages for a
project and assembles unified views of those dependencies – and environment
variables are a critical <em>view</em>. IVPM creates <code class="language-plaintext highlighter-rouge">packages/packages.envrc</code> with
variable settings for the project and loaded dependencies. Here is a sampling
of what it does:</p>
<ul>
  <li>Set IVPM_PACKAGES to point to the root deps-dir</li>
  <li>Add the Python virtual environment to the PATH</li>
  <li>Load <code class="language-plaintext highlighter-rouge">envrc</code> files from dependencies</li>
</ul>

<p>This last item is particularly relevant when it comes to open-source EDA tools
provided by the <a href="https://edapack.github.io">EDAPack</a> project. These projects
provide <code class="language-plaintext highlighter-rouge">export.envrc</code> files that IVPM incorporates into the master <code class="language-plaintext highlighter-rouge">packages.envrc</code>
file. Doing so ensures that the loaded tools are automatically available in
when working in the project tree.</p>

<p>Using the generated envrc file is simple as well. Just add the following to 
the project <code class="language-plaintext highlighter-rouge">.envrc</code> file:</p>

<div class="language-plaintext highlighter-rouge"><div class="highlight"><pre class="highlight"><code>if [ -d packages ]; then
  source_env packages/packages.envrc
fi
</code></pre></div></div>

<h2 id="conclusions-and-next-steps">Conclusions and Next Steps</h2>
<p>The <a href="https://direnv.net">direnv</a> provides a project-centric approach to environment
management that ensures that your environment is always properly configured according
to your working directory. IVPM assembles a unified view of the environment variables
that should be configured based on the dependent projects it has loaded. Together,
these two tools provide an easy approach to project environment configuration.</p>

<p>AI has been a hot topic recently, with engineers increasingly using an AI assistant
like Claude or Codex to automate their work. Next time we’ll look at how IVPM configures
project-specific context data for AI assistants to use.</p>

<h2 id="references">References</h2>
<ul>
  <li><a href="https://direnv.net">direnv</a></li>
  <li><a href="https://edapack.github.io">EDAPack</a></li>
  <li><a href="https://fvutils.github.io/ivpm">IVPM</a></li>
</ul>]]></content><author><name></name></author><category term="FVUtils," /><category term="IVPM" /><summary type="html"><![CDATA[Almost any non-trivial project will require some amount of environment configuration. Perhaps the project uses a local Python virtual environment that must be used for running tests. Perhaps it’s a hardware-design project that needs to configure the environment for various EDA tools, and ensure that they’re available to users. If you’re sharing a project with other users, this poses a challenge. The typical approach is to have a setup.sh script. But, you need to remember to source it before doing any work in the project – and when moving over to another project. And, then, there’s the complication of different shells. Fortunately there’s direnv: a very elegant solution that has become my go-to over the past year or so. And, naturally, IVPM provides support.]]></summary></entry><entry><title type="html">Simplifying Access to Open-Source EDA Software</title><link href="https://bitsbytesgates.com/edapack,/fvutils/2026/05/15/SimplifyingAccessToOSSEDA.html" rel="alternate" type="text/html" title="Simplifying Access to Open-Source EDA Software" /><published>2026-05-15T00:00:00+00:00</published><updated>2026-05-15T00:00:00+00:00</updated><id>https://bitsbytesgates.com/edapack,/fvutils/2026/05/15/SimplifyingAccessToOSSEDA</id><content type="html" xml:base="https://bitsbytesgates.com/edapack,/fvutils/2026/05/15/SimplifyingAccessToOSSEDA.html"><![CDATA[<p>Free and Open-Source Silicon (FOSSi) hardware designs face an interesting
challenge. There’s a sizable and growing set of open source tools. But, obtaining
the software in pre-built form – especially the latest versions – can be a 
challenge due to the number of Linux OS variants. <a href="https://edapack.github.io">EDAPack</a> 
adapts the approach that the Python ecosystem has developed to this challenge of 
distributing binaries
with broad Linux distribution compatibility. Together, <a href="https://edapack.github.io">EDAPack</a> 
and <a href="https://fvutils.github.io/ivpm">IVPM</a> provide 
a simple and fast way for projects to ensure that the proper version of open-source EDA tools
are available in the same way that they manage other dependencies.</p>

<h1 id="problem-and-opportunity">Problem and opportunity</h1>
<p>How do you normally install software? While there are many possible paths, a common path is
to install new software using your operating system’s package manager. Most Linux
variants use something like <code class="language-plaintext highlighter-rouge">apt</code> or <code class="language-plaintext highlighter-rouge">yum</code>. macOS and Windows have App Stores.
These built-in package managers are great for obtaining widely-used, stable software
packages. They’re not as great for niche software, software that changes frequently, or 
software where multiple versions are simultaneously in use. Open-source EDA software, for example.</p>

<p>There are projects that distribute bundles of pre-built open-source EDA software,
such as <a href="https://www.yosyshq.com/tabby-cad-datasheet">Tabby CAD</a>, or create Docker 
images with pre-built software. These are great if they supply all the tools and tool
versions that you need, and supports the Linux version that you’re using. But, often
we only need one or two tools.</p>

<p>One substantial challenge with EDA software is that the community is small enough that
it’s not feasible to independently support each Linux distribution with pre-built packages.
But, at the same time, Linux distributions are sufficiently different that a single
binary can’t support all relevant distributions.</p>

<h1 id="python-and-manylinux">Python and manylinux</h1>
<p>As it so happens, the Python ecosystem has developed quite an elegant solution to this problem.
Using native-compiled extension code is a key technique to increase Python performance.
Obtaining these <code class="language-plaintext highlighter-rouge">binary wheels</code> in pre-built form simplifies package installation and 
avoids users running into compilation errors due to missing development libraries and toolchains.</p>

<p>But, how to ensure broad compatibility across platforms? They key is to build native-compiled
code on a platform with the same characteristics as the target platform. The Python Packaging Authority (ppya)
defines a set of Docker images https://github.com/pypa/manylinux for just this purpose. 
Each are based on a specific Linux distribution, and specify a set of compatible Linux distributions.
A key benefit of using these images vs just using the base Docker image is that the pypa project
keeps <code class="language-plaintext highlighter-rouge">manylinux</code> images updated with recent versions of tools such as compilers and Python interpreters. 
While the software you build with a <code class="language-plaintext highlighter-rouge">manylinux</code> image may be compatible with an older 
Linux distribution versions, you aren’t locked into the old development tools that shipped with that 
distribution version.</p>

<h1 id="edapack---multi-platform-oss-eda-binaries">EDAPack - Multi-Platform OSS EDA Binaries</h1>

<p>The <a href="https://edapack.github.io">EDAPack</a> project borrows the Python <code class="language-plaintext highlighter-rouge">manylinux</code> infrastructure 
to build open-source EDA
tool binaries that support multiple Linux platforms. In cases where an open-source EDA tool
benefits from associated packages, EDAPack includes those as well. For example, the EDAPack 
release of the Yosys synthesis engine includes associated tools for equivalency checking (eqy),
formal verification (sby), and includes the <code class="language-plaintext highlighter-rouge">yosys-slang</code> plug-in that supports a broader 
set of SystemVerilog constructs.</p>

<h1 id="managing-installed-tools-with-ivpm">Managing Installed Tools with IVPM</h1>
<p>It’s great to have access to pre-built binaries, but downloading and managing 
multiple versions of tools is cumbersome. Fortunately, we can use <a href="https://fvutils.github.io/ivpm">IVPM</a> to
simplify the setup process even further. IVPM approaches this by having each
project capture their dependencies – including tools – in a YAML file named
<code class="language-plaintext highlighter-rouge">ivpm.yaml</code>. In the case of using packages from <a href="https://edapack.github.io">EDAPack</a>, a project
specifies the dependency source as <code class="language-plaintext highlighter-rouge">gh-rls</code> (Github Release).</p>

<div class="language-plaintext highlighter-rouge"><div class="highlight"><pre class="highlight"><code>package:
  name: ivpm-fusesoc-example-registry

  dep-sets:
  - name: default
    deps:
    - name: iverilog
      src: gh-rls
      url: https://github.com/edapack/iverilog-bin
      cache: true
</code></pre></div></div>

<p>When we fetch the project’s dependencies, we get tools as well. To save both time
and disk space, we’ve marked our tools packages as being cached. This means
that all projects that use the same version of a given tool simply link to 
a single installation in IVPM’s cache directory.</p>

<p>The obvious win here is that anyone wanting to a given project can very quickly
gather the open-source tools required in order to use the project. But, beyond
that, the project creator can pin tools to specific version to reduce issues due
to using different tool versions. In addition, it’s easy to different projects
to require and use different tool versions. IVPM’s cache holds the total set of
active tool versions, and each project holds links to the specific required versions.</p>

<h1 id="conclusions-and-next-steps">Conclusions and Next Steps</h1>

<p>The EDAPack organization hosts a growing collection of projects that build and
release open-source EDA software. Most packages focus on supporting x86 Linux 
via the <code class="language-plaintext highlighter-rouge">manylinux</code> build system. IVPM supports fetching tools and other 
artifacts from Github Releases, making it easy to load and configure the 
precise set of tools and tool versions required by any project managed with
IVPM.</p>

<p>Feel free to reach out if you’d like to contribute a new open-source EDA tool
to the EDAPack collection or add support for a new platform to a supported
EDA tool.</p>

<p>Next time we’ll look at <a href="https://direnv.net/">direnv</a>, my new favorite tool
for project-centric environment management and see how IVPM integrates.</p>

<h2 id="video">Video</h2>
<p>Increasingly, topics on the blog benefit from a demo. I’m experimenting with
recording companion videos that provide space for this.</p>

<div class="video-container">
<iframe width="560" height="315" src="https://www.youtube.com/embed/At--xRSsLAc" title="YouTube video player" frameborder="0" allow="accelerometer; autoplay; clipboard-write; encrypted-media; gyroscope; picture-in-picture; web-share" referrerpolicy="strict-origin-when-cross-origin" allowfullscreen=""></iframe>
<!--
  <iframe 
    src="https://youtu.be/At--xRSsLAc" 
    frameborder="0" 
    allow="accelerometer; autoplay; encrypted-media; gyroscope; picture-in-picture" 
    allowfullscreen>
  </iframe>
-->
</div>

<h2 id="references">References</h2>
<ul>
  <li><a href="https://www.yosyshq.com/tabby-cad-datasheet">Tabby CAD</a></li>
  <li><a href="https://edapack.github.io">EDAPack</a></li>
  <li><a href="https://fvutils.github.io">IVPM</a></li>
</ul>]]></content><author><name></name></author><category term="EDAPack," /><category term="FVUtils" /><summary type="html"><![CDATA[Free and Open-Source Silicon (FOSSi) hardware designs face an interesting challenge. There’s a sizable and growing set of open source tools. But, obtaining the software in pre-built form – especially the latest versions – can be a challenge due to the number of Linux OS variants. EDAPack adapts the approach that the Python ecosystem has developed to this challenge of distributing binaries with broad Linux distribution compatibility. Together, EDAPack and IVPM provide a simple and fast way for projects to ensure that the proper version of open-source EDA tools are available in the same way that they manage other dependencies. Problem and opportunity How do you normally install software? While there are many possible paths, a common path is to install new software using your operating system’s package manager. Most Linux variants use something like apt or yum. macOS and Windows have App Stores. These built-in package managers are great for obtaining widely-used, stable software packages. They’re not as great for niche software, software that changes frequently, or software where multiple versions are simultaneously in use. Open-source EDA software, for example. There are projects that distribute bundles of pre-built open-source EDA software, such as Tabby CAD, or create Docker images with pre-built software. These are great if they supply all the tools and tool versions that you need, and supports the Linux version that you’re using. But, often we only need one or two tools. One substantial challenge with EDA software is that the community is small enough that it’s not feasible to independently support each Linux distribution with pre-built packages. But, at the same time, Linux distributions are sufficiently different that a single binary can’t support all relevant distributions. Python and manylinux As it so happens, the Python ecosystem has developed quite an elegant solution to this problem. Using native-compiled extension code is a key technique to increase Python performance. Obtaining these binary wheels in pre-built form simplifies package installation and avoids users running into compilation errors due to missing development libraries and toolchains. But, how to ensure broad compatibility across platforms? They key is to build native-compiled code on a platform with the same characteristics as the target platform. The Python Packaging Authority (ppya) defines a set of Docker images https://github.com/pypa/manylinux for just this purpose. Each are based on a specific Linux distribution, and specify a set of compatible Linux distributions. A key benefit of using these images vs just using the base Docker image is that the pypa project keeps manylinux images updated with recent versions of tools such as compilers and Python interpreters. While the software you build with a manylinux image may be compatible with an older Linux distribution versions, you aren’t locked into the old development tools that shipped with that distribution version. EDAPack - Multi-Platform OSS EDA Binaries The EDAPack project borrows the Python manylinux infrastructure to build open-source EDA tool binaries that support multiple Linux platforms. In cases where an open-source EDA tool benefits from associated packages, EDAPack includes those as well. For example, the EDAPack release of the Yosys synthesis engine includes associated tools for equivalency checking (eqy), formal verification (sby), and includes the yosys-slang plug-in that supports a broader set of SystemVerilog constructs. Managing Installed Tools with IVPM It’s great to have access to pre-built binaries, but downloading and managing multiple versions of tools is cumbersome. Fortunately, we can use IVPM to simplify the setup process even further. IVPM approaches this by having each project capture their dependencies – including tools – in a YAML file named ivpm.yaml. In the case of using packages from EDAPack, a project specifies the dependency source as gh-rls (Github Release). package: name: ivpm-fusesoc-example-registry dep-sets: - name: default deps: - name: iverilog src: gh-rls url: https://github.com/edapack/iverilog-bin cache: true When we fetch the project’s dependencies, we get tools as well. To save both time and disk space, we’ve marked our tools packages as being cached. This means that all projects that use the same version of a given tool simply link to a single installation in IVPM’s cache directory. The obvious win here is that anyone wanting to a given project can very quickly gather the open-source tools required in order to use the project. But, beyond that, the project creator can pin tools to specific version to reduce issues due to using different tool versions. In addition, it’s easy to different projects to require and use different tool versions. IVPM’s cache holds the total set of active tool versions, and each project holds links to the specific required versions. Conclusions and Next Steps The EDAPack organization hosts a growing collection of projects that build and release open-source EDA software. Most packages focus on supporting x86 Linux via the manylinux build system. IVPM supports fetching tools and other artifacts from Github Releases, making it easy to load and configure the precise set of tools and tool versions required by any project managed with IVPM. Feel free to reach out if you’d like to contribute a new open-source EDA tool to the EDAPack collection or add support for a new platform to a supported EDA tool. Next time we’ll look at direnv, my new favorite tool for project-centric environment management and see how IVPM integrates. Video Increasingly, topics on the blog benefit from a demo. I’m experimenting with recording companion videos that provide space for this. References Tabby CAD EDAPack IVPM]]></summary></entry><entry><title type="html">Managing DV Project Dependencies - Now with FuseSoc</title><link href="https://bitsbytesgates.com/fvutils/2026/05/09/ManagingDVProjectDeps_NowWithFuseSoc.html" rel="alternate" type="text/html" title="Managing DV Project Dependencies - Now with FuseSoc" /><published>2026-05-09T00:00:00+00:00</published><updated>2026-05-09T00:00:00+00:00</updated><id>https://bitsbytesgates.com/fvutils/2026/05/09/ManagingDVProjectDeps_NowWithFuseSoc</id><content type="html" xml:base="https://bitsbytesgates.com/fvutils/2026/05/09/ManagingDVProjectDeps_NowWithFuseSoc.html"><![CDATA[<p>I had the pleasure of attending <a href="https://fossi-foundation.org/latch-up/2026">LatchUp</a> 
this past weekend. Conferences invariably 
spark new ideas and new perspectives, and this past weekend was no different. 
Specifically, I found a new perspective on interoperability between two free and 
open source silicon (FOSSi) tools that I’ve known about for quite some time:
<a href="https://fusesoc.readthedocs.io/en/stable/user/overview.html">FuseSoc</a>, a package management tool for design 
and verification created by Olof Kindren,
and <a href="https://fvutils.github.io/ivpm/">IVPM</a>, a polyglot project-local package manager that I created and maintain.</p>

<!--more-->

<h2 id="dependencies-in-dv-projects">Dependencies in DV Projects</h2>

<p>Design and verification projects are unique in the diversity of their dependencies.
Mono-language projects tend to have package-management tools focused on the unique
aspects of that programming language – for example, Python has <code class="language-plaintext highlighter-rouge">pypi</code> and <code class="language-plaintext highlighter-rouge">pip</code>/<code class="language-plaintext highlighter-rouge">uv</code>. 
In contrast, design and verification projects
tend to leverage artifacts in multiple languages from a variety of sources. You’ll 
certainly have SystemVerilog and/or VHDL sources, but you might also depend on one or more
Python libraries. This can make dependency management cumbersome, since
initializing a project involves using all the relevant packages managers to fetch
dependencies from those particular ecosystems – in addition to potentially downloading
some files not managed by any package manager. Either way, you’ll likely need some
sort of project-specific section in your README or a <code class="language-plaintext highlighter-rouge">bootstrap.sh</code> script to tie it all together.</p>

<h2 id="ivpm---a-polyglot-package-manager">IVPM - A Polyglot Package Manager</h2>

<p>Integrated-View Package Manager (IVPM) provides another approach. IVPM is a 
project-local dependency manager whose
genesis was my frustration with the limitations of using git submodules to manage
DV project source dependencies. IVPM started off as a relatively simple 
Python script that created local clones of git projects, driven by a manifest file. 
As new requirements came along, IVPM gradually evolved to where it is today: a 
flexible and extensible package manager that supports fetching 
dependencies from a wide variety of sources 
and synthesizing unified views from a variety of package artifacts, including:</p>
<ul>
  <li>Python virtual environment from Python packages</li>
  <li>node_modules install from Node.js packages</li>
  <li>Links to available AI agent skills</li>
  <li>… and more</li>
</ul>

<p>What occurred to me last weekend was to enable IVPM to fetch FuseSoc packages and
assemble a unified view of the available FuseSoc libraries inside a project.</p>

<h2 id="ivpm-in-action">IVPM In Action</h2>

<p>Let’s look at a small example just to get a sense of what this looks like in practice.
Let’s say that we’re developing a little open-source RISC-V core. While developing 
our project, we benefit from having access to a few things:</p>
<ul>
  <li>RISC-V ISA manual</li>
  <li>Verilator for simulation</li>
  <li>Common definitions (Verilog packaged with .core files)</li>
  <li>cocotb, fusesoc, and pyelftools for automating tests</li>
</ul>

<p>While our project README.md will describe what is required in order to 
work on the core, we also provide an ivpm.yaml file that IVPM uses
to automate setup:</p>

<div class="language-plaintext highlighter-rouge"><div class="highlight"><pre class="highlight"><code>package:
  name: my-risc-v

  dep-sets:
  - name: default
    deps:
    - name: riscv-isa-manual
      url: https://github.com/riscv/riscv-isa-manual.git
      anonymous: true
    - name: verilator
      url: https://github.com/edapack/verilator-bin
      src: gh-rls
      cache: true
    - name: fwprotocol-defs.git
      url: https://github.com/featherweight-ip/fwprotocol-defs.git
    - name: cocotb
      src: pypi
    - name: fusesoc
      src: pypi
    - name: pyelftools
      src: pypi
</code></pre></div></div>

<p>When we run <code class="language-plaintext highlighter-rouge">ivpm update</code> in the project, the tool:</p>
<ul>
  <li>Clones the git repos and downloads the Verilator binary release</li>
  <li>Creates a Python virtual environment and installs packages from <code class="language-plaintext highlighter-rouge">pypi</code></li>
  <li>Creates <code class="language-plaintext highlighter-rouge">packages.envrc</code> that adds Python and Verilator to the path</li>
  <li>Updates <code class="language-plaintext highlighter-rouge">fusesoc.conf</code> with paths to the protocol defs .core file</li>
</ul>

<p>When <code class="language-plaintext highlighter-rouge">ivpm update</code> completes, the project is ready to run. The environment
is configured, required open source software is installed, and FuseSoc is
configured to be able to find the installed .core files.</p>

<h2 id="conclusions-and-next-steps">Conclusions and Next Steps</h2>

<p>IVPM provides a way to unify your project dependencies and you and your 
users get up-and-running fast. And, now, it supports FuseSoc-packaged 
IP as well. If you’re interested in experimenting a bit more, you can
find two examples showing IVPM’s support for FuseSoc 
<a href="https://github.com/fvutils/ivpm/tree/master/examples/fusesoc">here</a>.</p>

<p>Next time, we’ll look at leveraging learnings from the Python ecosystem
on creating portable binary releases of open source EDA tools. And, of 
course, fetching these with IVPM.</p>]]></content><author><name></name></author><category term="FVUtils" /><summary type="html"><![CDATA[I had the pleasure of attending LatchUp this past weekend. Conferences invariably spark new ideas and new perspectives, and this past weekend was no different. Specifically, I found a new perspective on interoperability between two free and open source silicon (FOSSi) tools that I’ve known about for quite some time: FuseSoc, a package management tool for design and verification created by Olof Kindren, and IVPM, a polyglot project-local package manager that I created and maintain.]]></summary></entry><entry><title type="html">Better Coverage Analysis with AI</title><link href="https://bitsbytesgates.com/eda,/ucis,/coverage/2026/02/15/BetterCoverageAnalysisWithAI.html" rel="alternate" type="text/html" title="Better Coverage Analysis with AI" /><published>2026-02-15T00:00:00+00:00</published><updated>2026-02-15T00:00:00+00:00</updated><id>https://bitsbytesgates.com/eda,/ucis,/coverage/2026/02/15/BetterCoverageAnalysisWithAI</id><content type="html" xml:base="https://bitsbytesgates.com/eda,/ucis,/coverage/2026/02/15/BetterCoverageAnalysisWithAI.html"><![CDATA[<p>One near-term outcome of AI’s <a href="https://bitsbytesgates.com/eda/2026/02/07/OpenSourceEDA_in_AI_Era.html">impact on open source EDA</a> 
is that I’ve been revisiting and enhancing some of my older projects. <a href="https://fvutils.github.io/pyucis/">PyUCIS</a>, a set of tools for working with 
verification coverage, is one of those. Over the next few posts, we’ll look at the impact
AI is having on both EDA developers and users via this project.</p>

<!--more-->

<p align="center">
<img src="https://bitsbytesgates.com/imgs/2026/02/coverage_tui.png" />
</p>

<h1 id="verification-and-coverage">Verification and Coverage</h1>
<p>Coverage is a key metric we use to evaluate how well-verified a design is. We collect 
and analyze code coverage to identify areas of the design that aren’t exercised. We
use assertion and functional coverage to ensure that key conditions are exercised. Combined
with the right meta-data, such as test name, we can derive higher-level information such as
a small set of tests that will exercise a design change.</p>

<p>Many design verification tools and frameworks support capturing and working with coverage 
metrics. For example, <a href="https://cocotb-coverage.readthedocs.io/en/latest/">cocotb-coverage</a> and 
<a href="https://fvutils.github.io/pyucis/">AVL</a> each support capturing functional 
coverage data, saving it to a file, and performing post-processing. <a href="https://www.veripool.org/verilator/">Verilator</a> 
supports capturing code and assertion coverage, and the major EDA companies have solutions as well.</p>

<p>But, all of these are independent. How can I view and analyze Verilator code coverage and AVL functional coverage
together?</p>

<h1 id="standards-ucis">Standards: UCIS</h1>

<p>A unique aspect of verification coverage is that we have are larger set of metrics than software
projects typically use. Software projects tend to focus on code coverage, while design verification
is also interested in functional coverage, FSM coverage, and assertion coverage.</p>

<p>Back in 2012, the Accellera EDA standards body released <a href="https://www.accellera.org/downloads/standards/ucis">UCIS</a>,
the Unified Coverage Interoperability Standard. UCIS defines a data model and an API for interacting with 
all the types of coverage data that verification engineers work with. It also defines an XML interchange
format supported by some tools and the <a href="https://github.com/accellera-official/fc4sc">FC4SC</a> library that
implements functional coverage for SystemC.</p>

<p>Having a common API enables the classic separation of concerns that other common APIs, such as 
<a href="https://microsoft.github.io/language-server-protocol/">LSP</a> and <a href="https://modelcontextprotocol.io/docs/getting-started/intro">MCP</a> 
enable. Instead of developing analysis capabilities for each and every coverage format, we can 
create tools that use the UCIS API, and converters to map coverage formats into the UCIS data model.</p>

<h1 id="open-source-pyucis">Open Source: PyUCIS</h1>

<p>I initially created the <a href="https://fvutils.github.io/pyucis">PyUCIS</a> project because I needed a way to work with coverage data
captured by the <a href="https://fvutils.github.io/pyvsc/">PyVSC</a> library that I was also working on. At the time, I focused
on support for functional coverage (coverpoints, cross-coverage, etc) since that was the data PyVSC produced.</p>

<p>As I noted in the introduction, AI-driven productivity gains have me revisiting projects like PyUCIS 
to add new features and provide more-comprehensive support. But, also, to ensure that the libraries
are properly AI-enabled for users.  We’ll cover some of these new feature areas in future posts, but 
this post focuses on AI enablement.</p>

<h1 id="three-levels-of-ai-enablement">Three Levels of AI Enablement</h1>
<p>I’ve gradually come to apply a three-level approach for enabling a tool for AI agent access
that reflect successively-deeper levels of integration with the tool.</p>

<h2 id="ai-friendly-cli">AI-Friendly CLI</h2>
<p>The first level of integration is via the command-line interface (CLI). AI agents, such 
as Copilot, Codex, and Claude Code, excel at using command-line tools. Best practices 
for enhancing the CLI to be AI-friendly include:</p>
<ul>
  <li>Providing granular data-manipulation commands with good help messages</li>
  <li>Providing JSON output</li>
  <li>Providing a pointer to a SKILL.md file</li>
</ul>

<p>In the case of PyUCIS, our primary interest is in enabling an AI agent to analyze 
coverage data, so we focus most of our efforts on the <code class="language-plaintext highlighter-rouge">show</code> sub-commands.</p>

<div class="language-plaintext highlighter-rouge"><div class="highlight"><pre class="highlight"><code>usage: ucis show [-h]
                 ...

positional arguments:
    summary             Display overall coverage summary
    gaps                Display coverage gaps (uncovered bins and coverpoints)
    covergroups         Display detailed covergroup information
    bins                Display bin-level coverage details
    tests               Display test execution information
    hierarchy           Display design hierarchy structure
    metrics             Display coverage metrics and statistics
    compare             Compare coverage between two databases
    hotspots            Identify coverage hotspots and high-value targets
    code-coverage       Display code coverage with support for LCOV/Cobertura formats
    assertions          Display assertion coverage information
    toggle              Display toggle coverage information

options:
  -h, --help            show this help message and exit
</code></pre></div></div>

<p>LLMs often work more effectively with JSON data vs unstructured 
(or, arbitrarily-structured) text. JSON data has a regular structure and 
associates meta-data with various elements of the output (eg ‘name’, ‘id’, etc). 
In addition, an LLM can leverage tools like <code class="language-plaintext highlighter-rouge">jq</code> to efficiently slice and
dice it. Consequently, it’s a very good practice to support JSON output. 
Enabling this with a specific switch is fine, since most humans won’t want
to see JSON.</p>

<p><a href="https://agentskills.io/home">Agent Skills</a> is an emerging standard for providing
instructions to agents.</p>

<div class="language-plaintext highlighter-rouge"><div class="highlight"><pre class="highlight"><code>======================================================================
PyUCIS AgentSkills Information
======================================================================

Skill Definition: /home/.../ucis/share/SKILL.md

Note for LLM Agents:
  This file contains detailed information about PyUCIS capabilities,
  usage patterns, and best practices. LLM agents should reference
  this skill to better understand how to work with UCIS coverage
  databases and leverage PyUCIS tools effectively.

For more information, visit: https://agentskills.io
======================================================================
</code></pre></div></div>

<p>A <code class="language-plaintext highlighter-rouge">skill</code> for a tool provides examples and more in-depth
instructions on tool workflows. I like to advertise how to find the 
tool’s <code class="language-plaintext highlighter-rouge">skill</code> in the help message, since AI agents often check this first.</p>

<h2 id="model-context-protocol">Model Context Protocol</h2>
<p>The Model Context Protocol (<a href="https://modelcontextprotocol.io/docs/getting-started/intro">MCP</a>) 
is a JSON RPC-based communication protocol that allows AI agents to run external operations. 
MCP excels in situations where operation setup times are long. For example, loading a waveform
database often takes significant time. The overhead of doing so every time the Agent wishes
to look at a waveform value is prohibitive. A waveform <code class="language-plaintext highlighter-rouge">MCP server</code>, such as 
<a href="https://fvutils.github.io/pywellen-mcp">pywellen-mcp</a>, loads the waveform database once and
allows the Agent to perform many queries.</p>

<p>PyUCIS provides a <a href="https://fvutils.github.io/pyucis/mcp_server.html">MCP server</a> with a 
range of tools, including:</p>

<h3 id="database-operations">Database Operations</h3>
<ul>
  <li>open_database: Load UCIS databases in XML, YAML, or UCIS binary formats</li>
  <li>close_database: Clean up database resources</li>
  <li>list_databases: List all currently open databases</li>
  <li>get_database_info: Retrieve database metadata and statistics</li>
</ul>

<h3 id="coverage-analysis-tools">Coverage Analysis Tools</h3>
<ul>
  <li>get_coverage_summary: Overall coverage statistics by type (statement, branch, etc.)</li>
  <li>get_coverage_gaps: Identify uncovered or low-coverage items with configurable thresholds</li>
  <li>get_covergroups: Retrieve covergroup details with optional bin information</li>
  <li>get_bins: Detailed bin-level coverage with advanced filtering capabilities</li>
  <li>get_tests: Test execution information and results</li>
  <li>get_hierarchy: Navigate and explore the design hierarchy</li>
  <li>get_metrics: Advanced coverage metrics and analysis</li>
</ul>

<h3 id="advanced-features">Advanced Features</h3>
<ul>
  <li>compare_databases: Compare two databases for regression analysis and coverage deltas</li>
  <li>get_hotspots: Identify high-value coverage targets for optimization</li>
  <li>get_code_coverage: Export code coverage in multiple formats (LCOV, Cobertura, JaCoCo, Clover)</li>
  <li>get_assertions: SVA/PSL assertion coverage details</li>
  <li>get_toggle_coverage: Signal toggle coverage information</li>
</ul>

<p>Given the speed of the PyUCIS SQLite database, I’ll be interested in point at which
using the MCP server becomes beneficial.</p>

<h2 id="api">API</h2>
<p>An API provides an AI agent the most-detailed access to a tool’s capabilities.
Both the difficulty of producing an API and the difficult of an AI agent using it
depends heavily on the tool’s implementation language. For example, Python is often
fairly easy on both counts, since producing an API typically means documenting functions
that we’ve already created to implement the tool, and AI agents can simply load the 
module and go. On the other hand, a compiled languages like C/C++ will likely require
explicit action to define and expose an API, and AI agents will need to use the language
toolchain to compile, link, and run with the API.</p>

<h1 id="conclusion-and-next-steps">Conclusion and Next Steps</h1>
<p>Design verification heavily relies on good coverage data to assess completeness, 
and AI can play a critical role in analysis. PyUCIS implements the Accellera UCIS
API, and supports AI agents via the CLI and a built-in MCP server. 
As previously mentioned, you can look at the <a href="https://github.com/fvutils/pyucis/tree/master/examples/ai_assisted_workflow">AI-assisted workflow example</a> 
in the PyUCIS repository to get ideas of how to work with coverage data using
the PyUCIS library and AI agents. Next time, we’ll
shift focus to look at some of the other new and improved features in PyUCIS that
AI agents are helping to rapidly develop.</p>]]></content><author><name></name></author><category term="EDA," /><category term="UCIS," /><category term="Coverage" /><summary type="html"><![CDATA[One near-term outcome of AI’s impact on open source EDA is that I’ve been revisiting and enhancing some of my older projects. PyUCIS, a set of tools for working with verification coverage, is one of those. Over the next few posts, we’ll look at the impact AI is having on both EDA developers and users via this project.]]></summary></entry><entry><title type="html">Open Source EDA in the AI Era</title><link href="https://bitsbytesgates.com/eda/2026/02/07/OpenSourceEDA_in_AI_Era.html" rel="alternate" type="text/html" title="Open Source EDA in the AI Era" /><published>2026-02-07T00:00:00+00:00</published><updated>2026-02-07T00:00:00+00:00</updated><id>https://bitsbytesgates.com/eda/2026/02/07/OpenSourceEDA_in_AI_Era</id><content type="html" xml:base="https://bitsbytesgates.com/eda/2026/02/07/OpenSourceEDA_in_AI_Era.html"><![CDATA[<p>AI is changing the world in many ways. This is particularly visible in the 
commercial software-development space, where AI is often credited with 
<a href="https://techcrunch.com/2025/04/29/microsoft-ceo-says-up-to-30-of-the-companys-code-was-written-by-ai/">developing significant portions of new code</a>. 
But, what about the impact on open source software and, much more specifically, open source
Electronic Design Automation (EDA) software? What follows are some observations
on how open source EDA developers, users, and contributors can leverage AI based
on my own experience. In short, I see a strong potential for AI to spark a new
era of open source EDA growth and discovery if we as user, developers,
and contributors leverage it well.</p>

<!--more-->

<h1 id="eda-software-and-domain-expertise">EDA Software and Domain Expertise</h1>

<p>Electronic Design Automation (EDA) software is a unique market. Like 
any other complex software, developing it requires strong software engineering 
skills. But, developing good EDA software also requires deep knowledge of the
silicon engineering domain.</p>

<p>In my experience with commercial EDA, these two roles are generally handled
by different people. Software engineering is handled by teams of software
developers that, thinking simplistically, need to know very little about
silicon engineering. Silicon engineering expertise is often represented 
by the product engineering role. This role is responsible for understanding
the domain, and the user’s perspective on it, and translating that into
requirements that the software engineering team can implement. 
In practice, of course, each of these disciplines has some cross-over. 
EDA software engineers have varying degrees of expertise in silicon
engineering, and product engineers have varying degrees of software
engineering expertise.</p>

<h1 id="ai-and-open-source-eda">AI and Open Source EDA</h1>

<p>An open source EDA developer typically doesn’t have the luxury of focusing 
on a single domain. Open source EDA developers often start from a vision – whether 
that’s simply the existence of open source tools for a given portion of the 
silicon engineering workflow, or a vision of a new way to approach a 
part of that workflow. But, very quickly, the developer must pivot and focus
of the nuts and bolts of realizing this vision in code.</p>

<p>My experience, increasingly so over the last 4-6 months, has been that 
AI allows me to focus much more energy on the Product Engineering aspects
of open source EDA, while delegating much of the software engineering 
aspects.</p>

<h1 id="ai-and-open-source-eda-developers">AI and Open Source EDA Developers</h1>

<p>If you’re an open source EDA developer, AI enables you to spend a greater
portion of your time in Product Engineer mode. With good requirements and
review (all key Product Engineer skills), the bulk of software engineering
tasks can be delegated to an agent. Here are a few things to consider as 
you look for AI opportunities in your project.</p>

<h2 id="develop-nice-to-have-features">Develop ‘Nice to Have’ Features</h2>
<p>Being an open source developer fosters a mentality of scarcity, if your
experience is anything like mine. Ruthless prioritization is the only
way to ensure that something with sufficiently-broad application can
be produced by a single developer. ‘Nice to have’ features must be 
deferred – potentially forever.</p>

<p>AI nicely inverts this equation. When the primary cost of a new feature
is specification, it becomes much easier to justify adding helpful 
features: better error handling, more output formats, etc.</p>

<h2 id="more-communication">More Communication</h2>
<p>Communication tasks such as documentation, project websites, 
and project news is a task that often gets de-prioritized. After all,
we need to get key features developed!</p>

<p>AI-created content has come a long ways. One can argue it still has a 
ways to go, but it’s often quite good for technical documentation. It 
works well in incremental mode to document features as they’re developed, 
but also to improve documentation for an existing codebase. While we 
should always be cautious about passing off AI-generated ‘slop’ as 
useful documentation, my current experience is that AI-generated docs are
far better than no documentation at all. I’m also finding that providing
a little structure and guidance goes a long way in getting better results.</p>

<h2 id="consider-the-agent-experience">Consider the Agent Experience</h2>
<p>As a developer, it’s key to consider how your user will experience your 
project. Increasingly, you can assume that your users will be using an 
AI agent of some form to work with your project. This means that your
project should expose usage information to make it easy for an agent 
effectively use your project.</p>

<p>One approach that I’ve found effective is to reference a <code class="language-plaintext highlighter-rouge">skill.md</code> file
for the tool from the help message. For example, here’s the help output
from <a href="https://dv-flow.github.io">DV Flow Manager</a>, a workflow automation tool I work with.</p>

<pre>
usage: dfm [-h] [--log-level {NONE,INFO,DEBUG}] [-D NAME=VALUE] [-P FILE_OR_JSON]
           {graph,run,show,cache,validate,context,agent,util} ...

DV Flow Manager (dfm) - A dataflow-based build system

positional arguments:
  {graph,run,show,cache,validate,context,agent,util}
    graph               Generates the graph of a task
    run                 run a flow
    show                Display and search packages, tasks, types, and tags
    cache               Cache management commands
    validate            Validate flow.yaml/flow.dv files for errors and warnings
    context             Output comprehensive project context for LLM agent consumption
    agent               Launch an AI assistant with DV Flow context
    util                Internal utility command

For LLM agents: See the skill file at: /home/mballance/.../share/skill.md
</pre>

<p>AI agents often check a tool’s help message to better-understand its operation. Including
a path to the tool’s “AI Skill” file provides the agent with a pointer to more in-depth
information.</p>

<p>If your project produces human-consumable output, such as reports, you should
have an option to produce JSON output as well. While JSON isn’t particularly easy 
for humans to read, agents work well with its regular structure.</p>

<h2 id="test-test-test">Test, Test, Test</h2>
<p>We all know that tests are good and important. But, often, we settle for a few
basic tests so we can spend more time developing new features.</p>

<p>Here, again, AI can help. But, also, a good test suite is critical to getting
good results with AI. Just like a human developer, an agent makes mistakes and
a robust test suite catches those errors before they accidentally get committed.</p>

<h1 id="ai-and-open-source-eda-users">AI and Open Source EDA Users</h1>

<p>As an Open Source EDA user, AI provides you tools to make better use of the 
available software. Don’t hesitate to have your agent look at the source
for software that you’re using. If you’re trying to get a case working, 
ask it to analyze the EDA software source alongside your code and understand
what needs to change in your code.</p>

<p>If you hit a bug, use AI to create a reduced testcase in conjunction with
the EDA software’s source.</p>

<p>Now, one personal request as an open source developer: please don’t just
paste the AI-generated output into an Issue and click submit. The AI-created
analysis is important, of course. Please include it in your Issue report.
But, it’s likely that the AI-generated analysis is missing critical details
about your usecase and intent. Including that critical user perspective 
helps to ensure that your usecase is well-supported beyond just fixing
a point issue.</p>

<h1 id="ai-and-open-source-eda-contributors">AI and Open Source EDA Contributors</h1>

<p>If you’re trying to move from open source EDA user to open source EDA 
contributor, welcome! AI is definitely a help here as well.</p>

<p>Any complex codebase is difficult to get started with, and open source
EDA is no different. AI offers strong benefits in helping to more-rapidly
find key components of the codebase.</p>

<p>A key thing to bear in mind is that LLMs are tools, not oracles. Using 
AI isn’t going to magically turn you into an expert in a given project.
And, all the best practices of contributing to an open source project
still apply: ask questions, search issues, ask for feedback on 
contributions. That said, AI can bring you up to speed on a project 
far faster than you could on your own.</p>

<p>Set your sights a bit more broadly when it comes to reference materials.
Reading an entire standard (SystemVerilog, SystemRDL, PSS) is daunting
as a human, but easy with an agent. Use an agent to help explore 
implementation alternatives and refine requirements.</p>

<h1 id="ai-and-open-source-eda-sponsors">AI and Open Source EDA Sponsors</h1>

<p>Sponsoring open source software development and maintenance has always been
a bit tricky – especially for small projects. Large projects with an organization
and, often, a team of paid software developers are somewhat easy: donate
to the foundation, possibly participate in a steering committee, etc. In this case,
there is a clear link between supporting the project financially and the project
being able to scale. Smaller projects are much harder. Developers will have a 
‘day job’ with contract clauses prohibiting moonlighting. But, even without
this obstacle, paying the developer won’t really help the project scale because
it won’t lead to more people working on the project.</p>

<p>While it’s still early, AI suggests a new way to support small open-source projects.
AI access is typically paid by usage, coarsely denominated in Tokens. Open source
developers with an effective AI utilization strategy can easily scale a project
based on access to a larger number of tokens each month.</p>

<p>If you’re a would-be sponsor of Open Source EDA software, be on the lookout 
for organizations and platforms that allow you to contribute AI agent
access (LLM tokens) to your favorite projects.</p>

<h1 id="conclusion">Conclusion</h1>

<p>AI has the potential to scale open source EDA software efforts in ways that 
other technology advances simply have not. In short, allowing us as 
open source EDA users, contributors, and developers to focus on envisioning
the workflows that we want to have, and delegating the bulk of implementation
tasks to AI assistants. This new era of open source EDA
promises new, more productive, approaches to silicon engineering challenges,
easier-to-use tools, and new funding models to help the ecosystem
scale. The future of open source EDA in the AI era is bright, and I’m 
excited to be here for this phase of the journey.</p>

<h2 id="references">References</h2>
<ul>
  <li><a href="https://agentskills.io/home">Anthropic Skills</a></li>
</ul>]]></content><author><name></name></author><category term="EDA" /><summary type="html"><![CDATA[AI is changing the world in many ways. This is particularly visible in the commercial software-development space, where AI is often credited with developing significant portions of new code. But, what about the impact on open source software and, much more specifically, open source Electronic Design Automation (EDA) software? What follows are some observations on how open source EDA developers, users, and contributors can leverage AI based on my own experience. In short, I see a strong potential for AI to spark a new era of open source EDA growth and discovery if we as user, developers, and contributors leverage it well.]]></summary></entry><entry><title type="html">Getting Started with Executable Specs</title><link href="https://bitsbytesgates.com/zuspec/2026/02/01/ModelingExample_GettingStarted.html" rel="alternate" type="text/html" title="Getting Started with Executable Specs" /><published>2026-02-01T00:00:00+00:00</published><updated>2026-02-01T00:00:00+00:00</updated><id>https://bitsbytesgates.com/zuspec/2026/02/01/ModelingExample_GettingStarted</id><content type="html" xml:base="https://bitsbytesgates.com/zuspec/2026/02/01/ModelingExample_GettingStarted.html"><![CDATA[<p>Hardware engineers spend their lives working with specifications, both
natual language (“paper”) and executable. We’ve been looking at 
characterizing the interfaces and internal implementation of executable
specifications – models. But, enough theory. Let’s look at specifications
and specification refinement through an example. Throughout the process,
we can see how the <a href="https://github.com/zuspec/">Zuspec</a> ecosystem helps to 
speed and simplify the modeling process, as well as increasing our ability 
to reuse models.</p>

<!--more-->

<h1 id="example-vehicle-dma-engine">Example Vehicle: DMA Engine</h1>

<p>A DMA engine is one of my favorite examples to use. It’s relatively simple,
yet highlights several key aspects of a range of hardware devices:</p>
<ul>
  <li>It is controlled via a software interface (mmio)</li>
  <li>It has characteristics of other bulk data movers, such as accelerators and high-speed communications interfaces</li>
  <li>Its operation often involves arbitration and resource contention</li>
</ul>

<p><img /></p>

<p>Let’s walk through the process of developing a series of executable and
natural-language specifications that will allow us to refine a high-level
natural-language specification for a DMA device to a synthesizable
executable specification. I’ll store all of the models in the
<a href="https://github.com/zuspec/zuspec-example-dma/">zuspec-example-dma</a> 
repo so you can follow along if you’re interested.</p>

<h1 id="dma-high-level-specification">DMA High-Level Specification</h1>

<p>Let’s start with a simple natural-language spec for what we want. You can find 
the file here: <a href="https://github.com/zuspec/zuspec-example-dma/blob/main/docs/spec/01_highlevel_spec.md">01_highlevel_spec.md</a></p>

<div class="language-plaintext highlighter-rouge"><div class="highlight"><pre class="highlight"><code># DMA: High-Level Requirements

The DMA engine supports fast memory transfer between two 
memory regions. It is intended for use with both storage
and memory-mapped I/O devices.

## Transfer Requirements: General
- Each transfer shall have an associated priority (0..15)
- Each transfer shall have non-overlapping source and destination addresses
- Each transfer shall specifies the total number of bytes to transfer

## Transfer Requirements: Device
In addition to the requirements above:
- Each transfer shall specify an access size (eg 1, 2, 4, 8)
- Each transfer shall specify a chunk size, denominated in &lt;accesses&gt;
- The total transfer size is in bytes, and must be a multiple of &lt;access-size&gt;
- The source and destination addresses shall be aligned to &lt;access-size&gt;
- Each transfer specifies whether the source/dest addresses are incremented
- Device I/O is generally controlled by requests from the device itself
  - Request a chunk -&gt; DMA engine performs &lt;chunk-size&gt; &lt;access-size&gt; accesses

## Transfer Requirements: Chaining
- It shall be possible to specify lists of both general and device transfers
</code></pre></div></div>

<p>So, these are quite high-level. They focus on the required functionality, while
spending little time on how we might implement this.</p>

<p>Already, though, we might want to do some experiments with different executable
specifications that implement the natural language one above.</p>

<h1 id="dma-algorithmic-model">DMA Algorithmic Model</h1>

<p>Our first step is to define an algorithmic model with interfaces that satisfy
the requirements above. Let’s start with the Logical Interface, since that is 
often how we phrase high-level requirements.</p>

<figure class="highlight"><pre><code class="language-python" data-lang="python"><span class="kn">import</span> <span class="n">zuspec.dataclasses</span> <span class="k">as</span> <span class="n">zdc</span>
<span class="kn">from</span> <span class="n">typing</span> <span class="kn">import</span> <span class="n">List</span><span class="p">,</span> <span class="n">Protocol</span>

<span class="nd">@zdc.dataclass</span>
<span class="k">class</span> <span class="nc">MemCpy</span><span class="p">(</span><span class="n">zdc</span><span class="p">.</span><span class="n">Struct</span><span class="p">):</span>
    <span class="n">src</span><span class="p">:</span> <span class="n">zdc</span><span class="p">.</span><span class="n">uptr</span> <span class="o">=</span> <span class="n">zdc</span><span class="p">.</span><span class="nf">field</span><span class="p">()</span>
    <span class="n">dst</span><span class="p">:</span> <span class="n">zdc</span><span class="p">.</span><span class="n">uptr</span> <span class="o">=</span> <span class="n">zdc</span><span class="p">.</span><span class="nf">field</span><span class="p">()</span>
    <span class="n">sz</span><span class="p">:</span> <span class="n">zdc</span><span class="p">.</span><span class="n">u32</span> <span class="o">=</span> <span class="n">zdc</span><span class="p">.</span><span class="nf">field</span><span class="p">()</span>

<span class="nd">@zdc.dataclass</span>
<span class="k">class</span> <span class="nc">DevCpy</span><span class="p">(</span><span class="n">MemCpy</span><span class="p">):</span>
    <span class="n">acc_sz</span><span class="p">:</span> <span class="n">zdc</span><span class="p">.</span><span class="n">u8</span> <span class="o">=</span> <span class="n">zdc</span><span class="p">.</span><span class="nf">field</span><span class="p">()</span>
    <span class="n">chk_sz</span><span class="p">:</span> <span class="n">zdc</span><span class="p">.</span><span class="n">u32</span> <span class="o">=</span> <span class="n">zdc</span><span class="p">.</span><span class="nf">field</span><span class="p">()</span>
    <span class="n">inc_src</span><span class="p">:</span> <span class="nb">bool</span> <span class="o">=</span> <span class="n">zdc</span><span class="p">.</span><span class="nf">field</span><span class="p">()</span>
    <span class="n">inc_dst</span><span class="p">:</span> <span class="nb">bool</span> <span class="o">=</span> <span class="n">zdc</span><span class="p">.</span><span class="nf">field</span><span class="p">()</span>


<span class="k">class</span> <span class="nc">DmaOp</span><span class="p">(</span><span class="n">Protocol</span><span class="p">):</span>

    <span class="k">async</span> <span class="k">def</span> <span class="nf">memcpy</span><span class="p">(</span>
            <span class="n">self</span><span class="p">,</span>
            <span class="n">src</span><span class="p">:</span> <span class="n">zdc</span><span class="p">.</span><span class="n">uptr</span><span class="p">,</span>
            <span class="n">dst</span><span class="p">:</span> <span class="n">zdc</span><span class="p">.</span><span class="n">uptr</span><span class="p">,</span>
            <span class="n">sz</span><span class="p">:</span> <span class="n">zdc</span><span class="p">.</span><span class="n">u32</span><span class="p">,</span>
            <span class="n">pri</span><span class="p">:</span> <span class="n">zdc</span><span class="p">.</span><span class="n">i32</span> <span class="o">=</span> <span class="mi">0</span><span class="p">):</span>
        <span class="p">...</span>

    <span class="k">async</span> <span class="k">def</span> <span class="nf">memcpy_chain</span><span class="p">(</span>
            <span class="n">self</span><span class="p">,</span>
            <span class="n">xfers</span><span class="p">:</span> <span class="n">List</span><span class="p">[</span><span class="n">MemCpy</span><span class="p">],</span>
            <span class="n">pri</span><span class="p">:</span> <span class="n">zdc</span><span class="p">.</span><span class="n">i32</span> <span class="o">=</span> <span class="mi">0</span><span class="p">):</span>
        <span class="p">...</span>

    <span class="k">async</span> <span class="k">def</span> <span class="nf">devcpy</span><span class="p">(</span>
            <span class="n">self</span><span class="p">,</span>
            <span class="n">src</span><span class="p">:</span> <span class="n">zdc</span><span class="p">.</span><span class="n">uptr</span><span class="p">,</span>
            <span class="n">dst</span><span class="p">:</span> <span class="n">zdc</span><span class="p">.</span><span class="n">uptr</span><span class="p">,</span>
            <span class="n">sz</span><span class="p">:</span> <span class="n">zdc</span><span class="p">.</span><span class="n">u32</span><span class="p">,</span>
            <span class="n">acc_sz</span><span class="p">:</span> <span class="n">zdc</span><span class="p">.</span><span class="n">u8</span><span class="p">,</span>
            <span class="n">chk_sz</span><span class="p">:</span> <span class="n">zdc</span><span class="p">.</span><span class="n">u32</span><span class="p">,</span>
            <span class="n">inc_src</span><span class="p">:</span> <span class="nb">bool</span><span class="p">,</span>
            <span class="n">inc_dst</span><span class="p">:</span> <span class="nb">bool</span><span class="p">,</span>
            <span class="n">pri</span><span class="p">:</span> <span class="n">zdc</span><span class="p">.</span><span class="n">i32</span> <span class="o">=</span> <span class="mi">0</span><span class="p">):</span>
        <span class="p">...</span>

    <span class="k">async</span> <span class="k">def</span> <span class="nf">devcpy_chain</span><span class="p">(</span>
            <span class="n">self</span><span class="p">,</span>
            <span class="n">xfers</span><span class="p">:</span> <span class="n">List</span><span class="p">[</span><span class="n">DevCpy</span><span class="p">],</span>
            <span class="n">pri</span><span class="p">:</span> <span class="n">zdc</span><span class="p">.</span><span class="n">i32</span> <span class="o">=</span> <span class="mi">0</span><span class="p">):</span>
        <span class="p">...</span></code></pre></figure>

<p>The API definition above captures how software would interact with the
DMA engine. But, we also care about how the DMA engine accesses memory 
in the environment, and how devices in the environment request service
from the DMA engine.</p>

<figure class="highlight"><pre><code class="language-python" data-lang="python"><span class="k">class</span> <span class="nc">MemoryOp</span><span class="p">(</span><span class="n">Protocol</span><span class="p">):</span>
    <span class="s">"""Memory interface for DMA to access system memory."""</span>

    <span class="k">async</span> <span class="k">def</span> <span class="nf">read</span><span class="p">(</span><span class="n">self</span><span class="p">,</span> <span class="n">addr</span><span class="p">:</span> <span class="n">zdc</span><span class="p">.</span><span class="n">u64</span><span class="p">)</span> <span class="o">-&gt;</span> <span class="n">zdc</span><span class="p">.</span><span class="n">u64</span><span class="p">:</span>
        <span class="s">"""Read a word from memory.

        Args:
            addr: Memory address (word-aligned)

        Returns:
            Data value read
        """</span>
        <span class="p">...</span>

    <span class="k">async</span> <span class="k">def</span> <span class="nf">write</span><span class="p">(</span><span class="n">self</span><span class="p">,</span> <span class="n">addr</span><span class="p">:</span> <span class="n">zdc</span><span class="p">.</span><span class="n">u64</span><span class="p">,</span> <span class="n">data</span><span class="p">:</span> <span class="n">zdc</span><span class="p">.</span><span class="n">u64</span><span class="p">,</span> <span class="n">size</span><span class="p">:</span> <span class="n">zdc</span><span class="p">.</span><span class="n">i8</span><span class="p">)</span> <span class="o">-&gt;</span> <span class="bp">None</span><span class="p">:</span>
        <span class="s">"""Write a word to memory.

        Args:
            addr: Memory address (word-aligned)
            data: Data value to write
        """</span>
        <span class="p">...</span></code></pre></figure>

<p><a href="https://github.com/zuspec/zuspec-example-dma/blob/main/src/org/zuspec/example/dma/mem.py">mem.py</a> 
defines a memory-access interface that the DMA model implementation will
use to access memory in the system.</p>

<figure class="highlight"><pre><code class="language-python" data-lang="python"><span class="k">class</span> <span class="nc">ReqOp</span><span class="p">(</span><span class="n">Protocol</span><span class="p">):</span>
    <span class="k">async</span> <span class="k">def</span> <span class="nf">req_transfer</span><span class="p">(</span><span class="n">self</span><span class="p">,</span> <span class="nb">id</span><span class="p">:</span> <span class="n">zdc</span><span class="p">.</span><span class="n">i32</span><span class="p">):</span>
        <span class="s">"""Request a transfer"""</span>
        <span class="p">...</span></code></pre></figure>

<p><a href="https://github.com/zuspec/zuspec-example-dma/blob/main/src/org/zuspec/example/dma/req.py">req.py</a>
defines the API used by devices to request data transfers from the DMA engine.</p>

<p>In total, we’ve define the key operations used to interact with the DMA engine
in less than 100 lines of code. Now, to do something with these operations.</p>

<h1 id="algorithmic-model-implementation">Algorithmic Model Implementation</h1>
<p>Now that we’ve defined our abstract interfaces, we can create an <em>algorithmic</em> 
implementation of the DMA engine.</p>

<p>You can find the algorithmic implementation of the DMA engine model here:
<a href="https://github.com/zuspec/zuspec-example-dma/blob/main/src/org/zuspec/example/dma/impl/op_op_alg.py">op_op_alg.py</a>.</p>

<figure class="highlight"><pre><code class="language-python" data-lang="python"><span class="nd">@zdc.dataclass</span>
<span class="k">class</span> <span class="nc">DmaOpOpAlg</span><span class="p">(</span><span class="n">DmaOp</span><span class="p">,</span> <span class="n">ReqOp</span><span class="p">,</span> <span class="n">zdc</span><span class="p">.</span><span class="n">Component</span><span class="p">):</span>
    <span class="s">"""DMA engine with no fixed channels. Uses MemoryOp for memory access
    and implements ReqOp for device transfer request control."""</span>
    
    <span class="n">mem</span><span class="p">:</span> <span class="n">MemoryOp</span> <span class="o">=</span> <span class="n">zdc</span><span class="p">.</span><span class="nf">port</span><span class="p">()</span></code></pre></figure>

<p>The interface to the model is shown above. Because we’ve deliberately been
abstract about the device’s structure – for example, how many channels
it contains – the model simply implements both the DmaOp and ReqOp 
interfaces.</p>

<figure class="highlight"><pre><code class="language-python" data-lang="python">    <span class="k">async</span> <span class="k">def</span> <span class="nf">memcpy</span><span class="p">(</span>
            <span class="n">self</span><span class="p">,</span>
            <span class="n">src</span><span class="p">:</span> <span class="n">zdc</span><span class="p">.</span><span class="n">uptr</span><span class="p">,</span>
            <span class="n">dst</span><span class="p">:</span> <span class="n">zdc</span><span class="p">.</span><span class="n">uptr</span><span class="p">,</span>
            <span class="n">sz</span><span class="p">:</span> <span class="n">zdc</span><span class="p">.</span><span class="n">u32</span><span class="p">,</span>
            <span class="n">pri</span><span class="p">:</span> <span class="n">zdc</span><span class="p">.</span><span class="n">i32</span> <span class="o">=</span> <span class="mi">0</span><span class="p">):</span>
        <span class="s">"""Copy memory from src to dst.
        
        Performs narrow accesses until 8-byte aligned, then wide accesses.
        """</span>
        <span class="k">await</span> <span class="n">self</span><span class="p">.</span><span class="n">_mem_l</span><span class="p">.</span><span class="nf">acquire</span><span class="p">()</span>
        <span class="k">try</span><span class="p">:</span>
            <span class="n">remaining</span> <span class="o">=</span> <span class="n">sz</span>
            <span class="k">while</span> <span class="n">remaining</span> <span class="o">&gt;</span> <span class="mi">0</span><span class="p">:</span>
                <span class="c1"># Determine access size based on alignment and remaining bytes
</span>                <span class="c1"># Use the largest power-of-2 size that is both aligned and fits
</span>                <span class="n">align</span> <span class="o">=</span> <span class="n">src</span> <span class="o">&amp;</span> <span class="mh">0x7</span>  <span class="c1"># Low 3 bits give alignment
</span>                <span class="k">if</span> <span class="n">align</span> <span class="o">==</span> <span class="mi">0</span> <span class="ow">and</span> <span class="n">remaining</span> <span class="o">&gt;=</span> <span class="mi">8</span><span class="p">:</span>
                    <span class="n">xfer_sz</span> <span class="o">=</span> <span class="mi">8</span>
                <span class="nf">elif </span><span class="p">(</span><span class="n">align</span> <span class="o">&amp;</span> <span class="mh">0x3</span><span class="p">)</span> <span class="o">==</span> <span class="mi">0</span> <span class="ow">and</span> <span class="n">remaining</span> <span class="o">&gt;=</span> <span class="mi">4</span><span class="p">:</span>
                    <span class="n">xfer_sz</span> <span class="o">=</span> <span class="mi">4</span>
                <span class="nf">elif </span><span class="p">(</span><span class="n">align</span> <span class="o">&amp;</span> <span class="mh">0x1</span><span class="p">)</span> <span class="o">==</span> <span class="mi">0</span> <span class="ow">and</span> <span class="n">remaining</span> <span class="o">&gt;=</span> <span class="mi">2</span><span class="p">:</span>
                    <span class="n">xfer_sz</span> <span class="o">=</span> <span class="mi">2</span>
                <span class="k">else</span><span class="p">:</span>
                    <span class="n">xfer_sz</span> <span class="o">=</span> <span class="mi">1</span>
                
                <span class="n">data</span> <span class="o">=</span> <span class="k">await</span> <span class="n">self</span><span class="p">.</span><span class="n">mem</span><span class="p">.</span><span class="nf">read</span><span class="p">(</span><span class="n">src</span><span class="p">)</span>
                <span class="k">await</span> <span class="n">self</span><span class="p">.</span><span class="n">mem</span><span class="p">.</span><span class="nf">write</span><span class="p">(</span><span class="n">dst</span><span class="p">,</span> <span class="n">data</span><span class="p">,</span> <span class="n">xfer_sz</span><span class="p">)</span>
                <span class="n">src</span> <span class="o">+=</span> <span class="n">xfer_sz</span>
                <span class="n">dst</span> <span class="o">+=</span> <span class="n">xfer_sz</span>
                <span class="n">remaining</span> <span class="o">-=</span> <span class="n">xfer_sz</span>
        <span class="k">finally</span><span class="p">:</span>
            <span class="n">self</span><span class="p">.</span><span class="n">_mem_l</span><span class="p">.</span><span class="nf">release</span><span class="p">()</span></code></pre></figure>

<p>The implementation of the ‘memcpy’ operation is shown above. The implementation
is simple and brief, aside from a little complexity with respect to aligning 
the address. The total model implementation is ~150 lines of Python code, 
which is just about 6x the length of the original high-level spec.</p>

<h1 id="tests-and-test-fixture">Tests and Test Fixture</h1>

<p>Now that we have a behavioral model, we need a way to exercise it. Fortunately,
we have a couple of tools that simplify the process. <a href="https://docs.pytest.org/en/stable/">pytest</a> is used as the
testing framework, and AI assistants are proving to be incredibly capable at
creating test fixtures and tests from the behavioral model that we created.</p>

<p>You can find the tests in <a href="https://github.com/zuspec/zuspec-example-dma/blob/main/tests/unit/test_op_op_alg.py">test_op_op_alg.py</a>.
The vast majority of the code was created using an AI assistant: copilot cli and Sonnet 4.5 in this case.</p>

<figure class="highlight"><pre><code class="language-python" data-lang="python"><span class="k">def</span> <span class="nf">test_memcpy_basic</span><span class="p">():</span>
    <span class="s">"""Test basic memcpy operation."""</span>
    <span class="nf">print</span><span class="p">(</span><span class="s">"</span><span class="se">\n</span><span class="s">=== Test: Basic memcpy ==="</span><span class="p">)</span>

    <span class="nd">@zdc.dataclass</span>
    <span class="k">class</span> <span class="nc">Top</span><span class="p">(</span><span class="n">zdc</span><span class="p">.</span><span class="n">Component</span><span class="p">):</span>
        <span class="n">fixture</span><span class="p">:</span> <span class="n">DmaTestFixture</span> <span class="o">=</span> <span class="n">zdc</span><span class="p">.</span><span class="nf">field</span><span class="p">()</span>

        <span class="k">async</span> <span class="k">def</span> <span class="nf">run</span><span class="p">(</span><span class="n">self</span><span class="p">):</span>
            <span class="c1"># Initialize source memory
</span>            <span class="n">data</span> <span class="o">=</span> <span class="p">[</span><span class="mh">0x10</span><span class="p">,</span> <span class="mh">0x20</span><span class="p">,</span> <span class="mh">0x30</span><span class="p">,</span> <span class="mh">0x40</span><span class="p">]</span>
            <span class="n">self</span><span class="p">.</span><span class="n">fixture</span><span class="p">.</span><span class="nf">init_memory</span><span class="p">(</span><span class="mh">0x1000</span><span class="p">,</span> <span class="n">data</span><span class="p">)</span>

            <span class="c1"># Perform memcpy
</span>            <span class="k">await</span> <span class="n">self</span><span class="p">.</span><span class="n">fixture</span><span class="p">.</span><span class="n">dma</span><span class="p">.</span><span class="nf">memcpy</span><span class="p">(</span>
                <span class="n">src</span><span class="o">=</span><span class="mh">0x1000</span><span class="p">,</span>
                <span class="n">dst</span><span class="o">=</span><span class="mh">0x2000</span><span class="p">,</span>
                <span class="n">sz</span><span class="o">=</span><span class="mi">32</span>  <span class="c1"># 4 words * 8 bytes
</span>            <span class="p">)</span>

            <span class="c1"># Verify destination
</span>            <span class="n">result</span> <span class="o">=</span> <span class="n">self</span><span class="p">.</span><span class="n">fixture</span><span class="p">.</span><span class="nf">read_memory</span><span class="p">(</span><span class="mh">0x2000</span><span class="p">,</span> <span class="mi">4</span><span class="p">)</span>
            <span class="k">assert</span> <span class="n">result</span> <span class="o">==</span> <span class="n">data</span><span class="p">,</span> <span class="sa">f</span><span class="s">"Data mismatch: </span><span class="si">{</span><span class="n">result</span><span class="si">}</span><span class="s"> != </span><span class="si">{</span><span class="n">data</span><span class="si">}</span><span class="s">"</span>

            <span class="nf">print</span><span class="p">(</span><span class="s">"  Basic memcpy test PASSED"</span><span class="p">)</span>

    <span class="n">t</span> <span class="o">=</span> <span class="nc">Top</span><span class="p">()</span>
    <span class="n">asyncio</span><span class="p">.</span><span class="nf">run</span><span class="p">(</span><span class="n">t</span><span class="p">.</span><span class="nf">run</span><span class="p">())</span>
    <span class="n">t</span><span class="p">.</span><span class="nf">shutdown</span><span class="p">()</span></code></pre></figure>

<p>A basic transfer test is shown above, showing how the ‘memcpy’ operation is 
used, and how results are checked.</p>

<h1 id="conclusions-and-next-steps">Conclusions and Next Steps</h1>
<p>Engineers spend significant time working with natural-language and executable
specifications. Zuspec simplifies the process of creating and testing 
executable specifications (models) at multiple abstraction levels, which
enables greater use of executable models to help refine our natural-language
specifications.</p>

<p>Algorithmic modeling of this style is done today – and, often, in Python. 
The difference with Zuspec is that the models are designed to be reusable
for multiple purposes. Over the next few posts, we’ll look at how we continue
to refine, reuse, and retarget our DMA model.</p>

<h1 id="resources">Resources</h1>
<ul>
  <li><a href="">zuspec-example-dma</a></li>
</ul>]]></content><author><name></name></author><category term="Zuspec" /><summary type="html"><![CDATA[Hardware engineers spend their lives working with specifications, both natual language (“paper”) and executable. We’ve been looking at characterizing the interfaces and internal implementation of executable specifications – models. But, enough theory. Let’s look at specifications and specification refinement through an example. Throughout the process, we can see how the Zuspec ecosystem helps to speed and simplify the modeling process, as well as increasing our ability to reuse models.]]></summary></entry><entry><title type="html">Relating Hardware Model Abstractions</title><link href="https://bitsbytesgates.com/zuspec/2026/01/18/RelatingModelAbstractions.html" rel="alternate" type="text/html" title="Relating Hardware Model Abstractions" /><published>2026-01-18T00:00:00+00:00</published><updated>2026-01-18T00:00:00+00:00</updated><id>https://bitsbytesgates.com/zuspec/2026/01/18/RelatingModelAbstractions</id><content type="html" xml:base="https://bitsbytesgates.com/zuspec/2026/01/18/RelatingModelAbstractions.html"><![CDATA[<p align="center">
<img src="https://bitsbytesgates.com/imgs/2026/01/design_abstraction.png" />
</p>

<p>The most difficult transition in hardware modeling is the transition from
natural-language to executable specification. It is during this transition
that the ambiguities inherent in natural-language descriptions are resolved.
Maximizing value from a multi-abstraction hardware modeling strategy requires
minimizing the number of times a natural-language spec is converted to executable.
Zuspec defines interface abstraction levels that provide a basis for comparing
implementations with different abstraction levels.</p>

<!--more-->

<h1 id="connecting-modeling-abstractions">Connecting Modeling Abstractions</h1>

<p align="center">
<img src="https://bitsbytesgates.com/imgs/2026/01/spec_model_relationship.png" />
</p>

<p>In the previous post, we looked at several internal-implementation abstraction
levels. These help us explore the architecture and micro-architecture of the
design with different cost and performance tradeoffs. However, the internal 
implementation doesn’t provide a good basis for comparing models. 
In essence, this means that 
the natural-language to executable spec translation happens for each model.
This raises the cost of modeling, but also increases the risk that each model
implements a slightly different interpretation of the original spec.</p>

<p align="center">
<img src="https://bitsbytesgates.com/imgs/2026/01/spec_model_model_relationship.png" />
</p>

<p>Ideally, we want some basis for mechanically comparing two models with different
implementations such that we can easily establish whether they are equivalent 
according to that basis. Each
model still needs to incorporate abstraction-specific details from the spec, but 
isn’t a full from-spec implementation.</p>

<h1 id="breaking-down-device-abstraction">Breaking Down Device Abstraction</h1>

<p align="center">
<img src="https://bitsbytesgates.com/imgs/2026/01/design_abstraction.png" />
</p>

<p>Zuspec uses interface abstraction levels as this basis of comparison. 
The first thing to note is that there are two levels of interface: logical and physical.</p>

<p>The same set of interface abstractions apply to logical and physical interfaces, so
let’s explore the abstraction levels first.</p>

<h2 id="abstraction-scenario">Abstraction: Scenario</h2>
<p>A scenario-level interface captures rules about how a device may be used. The 
<a href="https://www.accellera.org/downloads/standards/portable-stimulus">Portable Test and Stimulus (PSS) standard</a> 
is likely the best-known example of a scenario-level interface abstraction.
PSS uses scheduling rules and constraints to specify data, data-flow, and 
resource utilization rules. The rules of a scenario-level description assist
in automating test creation and simplifying the integration of content 
from multiple IPs.</p>

<h2 id="abstraction-operation">Abstraction: Operation</h2>
<p>An operation-level interface captures the device interface in terms of 
operations that the device can perform. Think of the API of a software driver
for a device. An operation-level interface lets us exercise key functions
of a device without worrying too much about the details.</p>

<h2 id="abstraction-mmio">Abstraction: MMIO</h2>
<p>A memory-mapped I/O (MMIO) interface uses memory-mapped registers and 
interrupts as the device interface.</p>

<h2 id="abstraction-tlm">Abstraction: TLM</h2>
<p>A transaction-level modeling (TLM) interface uses packet-like messages. 
The <a href="https://www.accellera.org/images/downloads/standards/systemc/TLM_2_0_LRM.pdf">TLM 1.0 and 2.0 standards</a> 
provide good examples of this level of modeling. TLM is also heavily
used in <a href="https://www.accellera.org/downloads/standards/uvm">UVM</a> testbench 
environments.</p>

<h2 id="abstraction-protocol">Abstraction: Protocol</h2>
<p>Protocol-level interfaces are the familiar signal-level interfaces used
in register-transfer level (RTL) designs.</p>

<h2 id="physical-interfaces">Physical Interfaces</h2>

<p>We’re all familiar with physical device interfaces. In RTL, these are the Protocol-level
interfaces with signal-level ports at the boundary of the device. Every hardware model has physical interfaces,
and these typically</p>

<h2 id="logical-interfaces">Logical Interfaces</h2>

<p>A logical interface is typically a software interface. Software, firmware, and 
test environments interact with a device via logical interfaces. A key attribute
of a logical interface is that it is independent of the physical interface 
and can be virtualized.</p>

<h2 id="useful-combinations">Useful Combinations</h2>

<p>The combination of logical and physical interface abstraction levels, combined with
internal implementation abstraction level, provides a flexible way to characterize
a given model. The table below summarizes how the abstraction levels apply to
logical and physical interfaces.</p>

<table>
  <thead>
    <tr>
      <th>Abstraction</th>
      <th>Logical</th>
      <th>Physical</th>
    </tr>
  </thead>
  <tbody>
    <tr>
      <td>Scenario</td>
      <td>Yes</td>
      <td>Maybe</td>
    </tr>
    <tr>
      <td>Operation</td>
      <td>Yes</td>
      <td>Yes</td>
    </tr>
    <tr>
      <td>MMIO</td>
      <td>Yes</td>
      <td>Yes</td>
    </tr>
    <tr>
      <td>TLM</td>
      <td>Maybe</td>
      <td>Yes</td>
    </tr>
    <tr>
      <td>Protocol</td>
      <td>No</td>
      <td>Yes</td>
    </tr>
  </tbody>
</table>

<h1 id="interface-roles">Interface Roles</h1>

<p align="center">
<img src="https://bitsbytesgates.com/imgs/2026/01/interface_roles.png" />
</p>

<p>In addition to abstraction level and interface type, interface roles are also worth
considering when characterizing a device.</p>
<ul>
  <li>Initiator interfaces make requests to targets. Think: memory interface on a RISC-V core</li>
  <li>Target interfaces respond to requests from an initiator. Think: register interface on a UART</li>
  <li>Monitor interfaces passively view interaction between initiator and target</li>
</ul>

<h1 id="relating-interface-abstractions">Relating Interface Abstractions</h1>

<p align="center">
<img src="https://bitsbytesgates.com/imgs/2026/01/abstractors.png" />
</p>

<p>Abstractors, a term used by the <a href="https://www.accellera.org/downloads/standards/ip-xact">IP-XACT</a>
standard, provide a mechanism for bridging abstraction levels in a reusable way. An abstractor
has two or more physical interfaces with different abstraction levels and different roles. 
Specific kinds of abstractors often go by names like bus functional model or transactor.</p>

<p>With the right set of abstractors, we can provide multiple views of the same model implementation.
For example, an algorithmic implementation of a device with MMIO physical interfaces can 
be used as a stand-in for the RTL implementation of the device with protocol-level interfaces 
in a verification testbench simply by adding the right protocol transactors from a library.</p>

<h1 id="next-steps">Next Steps</h1>
<p>Interface abstraction levels and interface types (logical, physical) enable 
model reuse and provide a basis for comparing models with very different
internal implementations. While there are many legal combinations of logical interface,
physical interface, and internal implementation, there are a few key combinations. 
In the next post, we’ll start to look at how some of these key combinations, and
how they are captured and evaluated in Zuspec.</p>]]></content><author><name></name></author><category term="Zuspec" /><summary type="html"><![CDATA[The most difficult transition in hardware modeling is the transition from natural-language to executable specification. It is during this transition that the ambiguities inherent in natural-language descriptions are resolved. Maximizing value from a multi-abstraction hardware modeling strategy requires minimizing the number of times a natural-language spec is converted to executable. Zuspec defines interface abstraction levels that provide a basis for comparing implementations with different abstraction levels.]]></summary></entry><entry><title type="html">Shifting Left with Hardware Model Abstractions</title><link href="https://bitsbytesgates.com/zuspec/2026/01/11/ShiftingLeftWithModelingAbstractions.html" rel="alternate" type="text/html" title="Shifting Left with Hardware Model Abstractions" /><published>2026-01-11T00:00:00+00:00</published><updated>2026-01-11T00:00:00+00:00</updated><id>https://bitsbytesgates.com/zuspec/2026/01/11/ShiftingLeftWithModelingAbstractions</id><content type="html" xml:base="https://bitsbytesgates.com/zuspec/2026/01/11/ShiftingLeftWithModelingAbstractions.html"><![CDATA[<p>“Shift-Left” is a strategy to reorganize processes to enable more parallelism 
by adjusting dependencies. Hardware model abstractions provide a key tool to
shifting tasks left in the silicon design process.</p>

<!--more-->

<h1 id="a-simplified-silicon-design-process">A simplified silicon design process</h1>

<p align="center">
<img src="https://bitsbytesgates.com/imgs/2026/01/simplified_si_design_process.png" />
</p>

<p>The gantt chart above illustrates a simplified silicon design process. It
deliberately makes no attempt to assign accurate relative times to any step
in the process. The key challenge is that starting most steps is gated by
the previous step either completing, or reaching some fairly advanced state
of readiness. For example, the DV team can’t really start verifying the 
design until RTL is available. They can study the spec and, perhaps even,
write some tests speculatively while the RTL is under development. But, 
validating assumptions must wait until RTL exists.</p>

<p>Note that these tasks are grouped by the design-model abstraction
level, with most activity centering around a register-transfer-level (RTL) 
model of the design. This poses several challenges, but one of the biggest
is that the abstraction difference between Spec and RTL is enormous.</p>

<h1 id="a-closer-look">A closer look</h1>

<p>While the diagram above is straightforward, it hides some useful details
about what is actually happening during each of the steps above.</p>

<div class="mermaid">
gantt
    title Elaborated Silicon Design Process
    dateFormat YYYY-MM-DD
    axisFormat x
    Start            :start, 2000-01-12, 1d
    section Spec
        Spec Development :spec_devel, after start, 24d
        Arch Choices      :arch, after start, 12d
    section Algorithmic
        Statistical Model :static_validate, after arch, 12d
        Dynamic Model     :dynamic_validate, after arch, 12d
        Spec Ready        :spec_ready, after dynamic_validate, 2d
    section Cycle Accurate
        Reference Model      :ref_model, after bring_up, 16d
    section RTL
        Impl Structure       :rtl_structure, after spec_ready, 8d
        Impl Sub-IP          :rtl_subip, after rtl_structure, 8d
        Sub-IP Integ         :rtl_integ, after rtl_subip, 8d
        RTL Ready            :rtl_ready, after rtl_integ, 2d
        Bring-up             :bring_up, after rtl_ready, 8d
        Spec Cov             :spec_coverage, after bring_up, 8d
        Impl Cov             :impl_coverage, after spec_coverage, 8d
        RTL Verified         :rtl_verified, after impl_coverage, 2d
        Develop Firmware     :dev_firmware, after rtl_verified, 24dj
</div>

<p>Let’s walk through to look at the changes. First, you’ll notice that 
there are now four abstraction levels:</p>
<ul>
  <li><strong>Spec</strong> - Typically a natural-language description</li>
  <li><strong>Algorithmic</strong> - A behavioral model with limited timing fidelity</li>
  <li><strong>Cycle Accurate</strong> - A behavioral (non-synthesizable) model that reflects the 
intended micro-architecture of the design</li>
  <li><strong>RTL</strong> - Synthesizable model</li>
</ul>

<h2 id="spec-development">Spec Development</h2>

<p>During spec development, it’s natural to use some high-level models to
validate assumptions. These models are captured at a high level of
abstraction, and support one of two methods of evaluation. A model
intended for dynamic evaluation will be behavioral, and supports 
activities such as running existing software workloads. A statistical
model (e.g. an Excel sheet) enables what-if analysis by adjusting 
control parameters. These are typically two distinct models because 
of the two different evaluation approaches.</p>

<h2 id="rtl-implementation">RTL Implementation</h2>

<p>The RTL development process is also not a monolith. Generally, you could
think of a process by which the design is partitioned into independent
sub-IP that can be implemented by different engineers. Once the design
is partitioned, engineers can work in parallel to implement and test
their assigned sub-IP. Finally, sub-IPs are integrated back into the
overall structure of the design.</p>

<h2 id="design-verification">Design Verification</h2>

<p>The design verification process is also step-wise, typically starting
with basic bring-up tests to ensure that simple operations, such as 
register accesses, make it past the interfaces and properly interact 
with the design. Verification then proceeds to exercise key device
usescases and, finally, exercise key implementation details.</p>

<p>The DV team will often create some type of reference model or predictor
to use in checking results from the design. Sometimes this will be 
cycle accurate, but it might also be at an algorithmic level of abstraction.</p>

<p>Looking in more detail, it becomes clear that modeling at different abstarction
levels is being done. But, too often, these models are only used within a specific
silo. There are many reasons for this, including the language(s) used to implement
models and integration challenges.</p>

<h1 id="shifting-left-with-model-reuse">Shifting Left with Model Reuse</h1>

<p>The Zuspec ‘bet’ is that we can reorganize the silicon development process by making models
easier to create, easier to reuse and transform, and easier to integrate. Future posts will
go into more depth on how Zuspec enables this. For now, let’s look at how different modeling
abstractions are used across the silicon development process.</p>

<div class="mermaid">
gantt
    title Ideal Design Implementation Process
    dateFormat YYYY-MM-DD
    axisFormat x
    Start            :start, 2000-01-12, 1d
    section Spec
        Spec Development :spec_devel, after start, 24d
        Arch Choices      :arch, after start, 12d
    section Algorithmic
        Alg Model            :alg_model, after arch, 12d
        Spec Ready           :spec_ready, after alg_model, 2d
    section Cycle Accurate
        CA Model (Structure) :ca_model, after spec_ready, 16d
    section RTL
        Impl Sub-IP          :rtl_subip, after ca_model, 8d
        Sub-IP Integ         :rtl_integ, after rtl_subip, 8d
        RTL Ready            :rtl_ready, after rtl_integ, 2d
        Spec Cov             :spec_coverage, after spec_ready, 8d
        Impl Cov             :impl_coverage, after ca_model, 8d
        Bring-up             :bring_up, after rtl_ready, 8d
        RTL Verified         :rtl_verified, after bring_up, 2d
        Develop Firmware     :dev_firmware, after spec_ready, 24d
</div>

<p>Let’s look at some of the key points:</p>
<ul>
  <li>A single algorithmic model is used to serve both dynamic (simulation) and
static/formal evaluation during the spec development process.
    <ul>
      <li>The DV team can use this algorithmic model, with a few modifications, as a 
substitute for RTL while they setup the testbench environment and write 
tests that exercise the specified design behavior.</li>
      <li>The Firmware team can also get started writing firmware using the 
algorithmic model.</li>
    </ul>
  </li>
  <li>The RTL implementation team develops a cycle-accurate model of the design
as part of the process of partitioning the design.
    <ul>
      <li>The RTL implementation team selectively replaces sub-IPs within the 
cycle-accurate model to test a particular sub-IP’s implementation together
with the more-abstract remainder of the design model.</li>
      <li>The DV team can move to running their tests against the more-accurate 
model. This helps to highlight different interpretations of the spec 
much earlier.</li>
      <li>The DV team can also run their tests against various configurations
of the hybrid cycle accurate / RTL model of the device to begin 
exercising sub-IPs prior to availability of the fully-integrated RTL.
Doing this can also enable tests that target implementation coverage 
to be developed incrementally as the relevant sub-IPs are ready.</li>
    </ul>
  </li>
  <li>Once the RTL is ready, the DV team proceeds to run bring-up activities. 
Final issues are much easier to track down because the tests are known
to run against the cycle-accurate model and various combinations of
RTL sub-IPs.</li>
</ul>

<p>So, how much time will we save? That, of course, heavily depends on the 
relative size of the tasks shown above, as well as on the cost
of creating the set of models used above. But, the savings should be
significant.</p>

<h1 id="next-stes">Next Stes</h1>

<p>We’ve looked at several implementation abstraction levels for device models. 
In the next post, we’ll dig into interface abstraction levels and see how
these enable incremental refinement of models.</p>]]></content><author><name></name></author><category term="Zuspec" /><summary type="html"><![CDATA[“Shift-Left” is a strategy to reorganize processes to enable more parallelism by adjusting dependencies. Hardware model abstractions provide a key tool to shifting tasks left in the silicon design process.]]></summary></entry><entry><title type="html">The Best of a Language and a Class Library</title><link href="https://bitsbytesgates.com/zuspec/2026/01/04/BestOfLanguageAndClassLib.html" rel="alternate" type="text/html" title="The Best of a Language and a Class Library" /><published>2026-01-04T00:00:00+00:00</published><updated>2026-01-04T00:00:00+00:00</updated><id>https://bitsbytesgates.com/zuspec/2026/01/04/BestOfLanguageAndClassLib</id><content type="html" xml:base="https://bitsbytesgates.com/zuspec/2026/01/04/BestOfLanguageAndClassLib.html"><![CDATA[<p>In hardware design and verification, we’re used to working with domain-specific
languages (DSLs), such as SystemVerilog, VHDL, and PSS, as well as class libraries, such as
UVM, SystemC, and CHISEL. We use these DSLs and class libraries to capture key 
semantics of hardware design ; each have their costs and benefits. A language, of course,
offers ultimate flexibility with significant implementation cost. Class libraries reduce
that implementation cost significantly by leveraging the capabilities of a host language,
but often lack expressive capability and portability. The <a href="https://github.com/zuspec">Zuspec</a> 
project that I’ve been working on takes a different approach, with the goal of getting the 
benefits (and avoiding most drawbacks) of both approaches.</p>

<!--more-->

<h1 id="dsl-or-class-library">DSL or Class Library?</h1>
<p>In my experience, the use of hardware modeling varies widely across project teams. At the
extremes, some attempt to maintain a consistent set of models across various abstraction 
levels, while others focus on producing RTL for their piece of the design and create 
models on an as-needed basis to achieve that task. While these approaches seem very 
different there are points of intersection. For example, both teams will likely have a 
predictor model for use in verification. Both teams will likely find that model creation
is time consuming and, depending on their choice of modeling language, both may have 
challenges integrating a predictor model into their verification environment.</p>

<p>Modeling language is one of the first choices to be made when creating a hardware model.
In general, there are two choices: select a domain-specific language such as SystemVerilog, 
or select a class library, such as SystemC, that is implemented in terms of a 
general-purpose language.</p>

<p>Both of these approaches have benefits and drawbacks.</p>

<h3 id="benefits">Benefits</h3>
<ul>
  <li>Language
    <ul>
      <li>Full flexibility to have domain-specific features</li>
      <li>Clear boundaries between what is the ‘language’ and the rest of the</li>
      <li>Full flexibility to process a model</li>
    </ul>
  </li>
  <li>Class Library
    <ul>
      <li>Leverage existing tools (compilers, editors, linters, debuggers) for the base language</li>
      <li>Leverage existing expertise in the base language</li>
      <li>Easily expand the class library to add new capabilities</li>
    </ul>
  </li>
</ul>

<h3 id="drawbacks">Drawbacks</h3>
<ul>
  <li>Language
    <ul>
      <li>Expensive to implement and add new features</li>
      <li>Must convince users to learn and become proficient in the language</li>
      <li>Interoperability with existing languages and tools can be a challenge</li>
    </ul>
  </li>
  <li>Class Library
    <ul>
      <li>Existing tools don’t comprehend domain-specifics encoded by the library</li>
      <li>The need to work with base-language compilers limits how the model can be processed</li>
      <li>The base language often limits how easily/naturally domain-specific features can be described</li>
    </ul>
  </li>
</ul>

<p>We currently use a variety of domain-specific languages across the design and verification
process. Ideally, we could apply a modeling approach that retains the key benefits of 
both approaches much more broadly.</p>

<h1 id="zuspec-a-dsl--class-library-hybrid">Zuspec: A DSL / Class Library Hybrid</h1>

<p><a href="https://github.com/zuspec/">Zuspec</a> is a Python class library with a twist. 
A model described with Zuspec dataclasses is completely valid Python syntax, and can 
be validated with existing Python static checkers.  But, due to some key Python 
capabilities, a Zuspec model can also be processed as if it were a domain-specific language.</p>

<p>Python offers benefits both to the Zuspec users (ie the author of a Zuspec model) and 
to tool implementors. For users, large portions of the existing tool ecosystem can
be leveraged natively with a Zuspec description. Because the Zuspec library adheres
to Python type rules, content-assist and navigation features in integrated developement
environments, such as <a href="https://code.visualstudio.com/">VSCode</a>, work properly. 
For the same reason, static type checkers can help detect issues, such as incorrect 
use of functions, early.</p>

<p>But, what’s even more attractive about Python is that it provides parsing infrastructure
that helps Zuspec construct an intermediate-representation (IR) data model that captures
details that would impossible for a pure class library to capture. This IR also 
allows Zuspec to map a Zuspec model to a variety of implementations.</p>

<p>Let’s look at a simple example:</p>

<figure class="highlight"><pre><code class="language-python" data-lang="python">    <span class="nd">@zdc.dataclass</span>
    <span class="k">class</span> <span class="nc">Prod</span><span class="p">(</span><span class="n">zdc</span><span class="p">.</span><span class="n">Component</span><span class="p">):</span>
        <span class="n">p</span> <span class="p">:</span> <span class="n">zdc</span><span class="p">.</span><span class="n">PutIF</span><span class="p">[</span><span class="nb">int</span><span class="p">]</span> <span class="o">=</span> <span class="n">zdc</span><span class="p">.</span><span class="nf">port</span><span class="p">()</span>

        <span class="k">async</span> <span class="k">def</span> <span class="nf">_send</span><span class="p">(</span><span class="n">self</span><span class="p">):</span>
            <span class="k">for</span> <span class="n">i</span> <span class="ow">in</span> <span class="nf">range</span><span class="p">(</span><span class="mi">16</span><span class="p">):</span>
                <span class="k">await</span> <span class="n">self</span><span class="p">.</span><span class="n">p</span><span class="p">.</span><span class="nf">put</span><span class="p">(</span><span class="n">i</span><span class="p">)</span>
                <span class="k">await</span> <span class="n">self</span><span class="p">.</span><span class="nf">wait</span><span class="p">(</span><span class="n">zdc</span><span class="p">.</span><span class="n">Time</span><span class="p">.</span><span class="nf">ns</span><span class="p">(</span><span class="mi">10</span><span class="p">))</span>

    <span class="nd">@zdc.dataclass</span>
    <span class="k">class</span> <span class="nc">Cons</span><span class="p">(</span><span class="n">zdc</span><span class="p">.</span><span class="n">Component</span><span class="p">):</span>
        <span class="n">c</span> <span class="p">:</span> <span class="n">zdc</span><span class="p">.</span><span class="n">GetIF</span><span class="p">[</span><span class="nb">int</span><span class="p">]</span> <span class="o">=</span> <span class="n">zdc</span><span class="p">.</span><span class="nf">port</span><span class="p">()</span>

        <span class="nd">@zdc.process</span>
        <span class="k">async</span> <span class="k">def</span> <span class="nf">_recv</span><span class="p">(</span><span class="n">self</span><span class="p">):</span>
            <span class="k">while</span> <span class="bp">True</span><span class="p">:</span>
                <span class="n">i</span> <span class="o">=</span> <span class="k">await</span> <span class="n">self</span><span class="p">.</span><span class="n">c</span><span class="p">.</span><span class="nf">get</span><span class="p">()</span>
                <span class="nf">print</span><span class="p">(</span><span class="s">"Received %d"</span> <span class="o">%</span> <span class="n">i</span><span class="p">)</span>

    <span class="nd">@zdc.dataclass</span>
    <span class="k">class</span> <span class="nc">Top</span><span class="p">(</span><span class="n">zdc</span><span class="p">.</span><span class="n">Component</span><span class="p">):</span>
        <span class="n">p</span> <span class="p">:</span> <span class="n">Prod</span> <span class="o">=</span> <span class="n">zdc</span><span class="p">.</span><span class="nf">inst</span><span class="p">()</span>
        <span class="n">c</span> <span class="p">:</span> <span class="n">Cons</span> <span class="o">=</span> <span class="n">zdc</span><span class="p">.</span><span class="nf">inst</span><span class="p">()</span>
        <span class="n">ch</span> <span class="p">:</span> <span class="n">zdc</span><span class="p">.</span><span class="n">Channel</span><span class="p">[</span><span class="nb">int</span><span class="p">]</span> <span class="o">=</span> <span class="n">zdc</span><span class="p">.</span><span class="nf">inst</span><span class="p">()</span>

        <span class="k">def</span> <span class="nf">__bind__</span><span class="p">(</span><span class="n">self</span><span class="p">):</span> <span class="nf">return </span><span class="p">(</span>
            <span class="p">(</span><span class="n">self</span><span class="p">.</span><span class="n">p</span><span class="p">.</span><span class="n">p</span><span class="p">,</span> <span class="n">self</span><span class="p">.</span><span class="n">ch</span><span class="p">.</span><span class="n">put</span><span class="p">),</span>
            <span class="p">(</span><span class="n">self</span><span class="p">.</span><span class="n">c</span><span class="p">.</span><span class="n">c</span><span class="p">,</span> <span class="n">self</span><span class="p">.</span><span class="n">ch</span><span class="p">.</span><span class="n">get</span><span class="p">)</span>
        <span class="p">)</span>

    <span class="n">t</span> <span class="o">=</span> <span class="nc">Top</span><span class="p">()</span>

    <span class="n">asyncio</span><span class="p">.</span><span class="nf">run</span><span class="p">(</span><span class="n">t</span><span class="p">.</span><span class="n">p</span><span class="p">.</span><span class="nf">_send</span><span class="p">())</span></code></pre></figure>

<p>This is a simple producer-consumer model. The producer and consumer 
communicate via a channel, and the testbench is responsible for activating
the producer. As a side-note, a comparable case in SystemC is roughly twice
as many lines of code, so there are already some measurable efficiencies.</p>

<p>Staying inside Python early in the model-development process is attractive 
due to the fast turnaround time and access to existing Python libraries. 
Any Zuspec model can be run directly in Python and can access all Python 
language and library features.</p>

<p>If you look closely at the description above, you might find yourself 
wondering how it executes. For example, how are ports connected? This is 
where some of the ‘declarative’ aspects of this description come into play.
Despite the description looking and behaving like a class library, there is
still some “magic” behind the scenes. In the case of port connections, the
Zuspec library takes the user’s bind specification and determines how to
properly connect ports and channels. And, of course, there are many other
cases where Zuspec allows the user to specify <em>what</em> is desired and have
the library determine <em>how</em> that intent is implemented.</p>

<h1 id="beyond-pure-python">Beyond Pure Python</h1>

<p>There are quite a few projects that seek to translate Python to a more-performant
implementation. Python ahead-of-time (AOT) compilers typically work with a Python
script (and it dependent libraries) as a whole. Zuspec looks at the world 
differently.</p>

<h2 id="identifying-the-model-boundary">Identifying the Model Boundary</h2>
<p>Zuspec uses types defined in zuspec.dataclasses to identify the boundary of
a model. For example, in the example above, the ‘Top’ class defines such
a boundary. Tools that map a Zuspec description to a non-Python implementation
operate on such boundaries.</p>

<p align="center">
<img src="https://bitsbytesgates.com/imgs/2026/01/zuspec_diagram_2.png" />
</p>

<h2 id="pure-python-vs-retargetable">Pure Python vs Retargetable</h2>

<p>The other place where Zuspec is a bit different is in defining ‘Profiles’
for content. This has significant similarities to the SystemVerilog “synthesizable” 
subset. The first choice is whether a model is <em>Retargetable</em> or not. 
<em>Retargetable</em> models can be mapped to non-Python implementations.</p>

<p>In order to be <em>retargetable</em>, a model can only contain elements of Zuspec-recognized
types. The ‘Top’ class above matches this criteria. That said, as long as running 
in Python is sufficient, a Zuspec model is free to use any Python construct.</p>

<p>Checking <em>Profile</em> compliance is another place where the Python ecosystem helps.
Zuspec implements a plug-in to the <a href="https://flake8.pycqa.org/en/latest/">flake8</a> 
linter that allows Zuspec to check profile compliance along with other Python
rules that flake8 checks. This allows Zuspec-specific checks to be performed
on-the-fly as code is developed, providing much faster feedback to the developer 
(or LLM, as is often the case today).</p>

<p>The diagram above shows several options for how a <em>Retargetable</em> Zuspec model 
might be implemented. Several of these targets, such as SystemVerilog RTL,
have their own <em>Profile</em> that further restricts available features.</p>

<h1 id="conclusions-and-next-steps">Conclusions and Next Steps</h1>
<p>Zuspec is showing early promise in simplifying hardware model creation, and allowing
those models to be reused and retargeted to a variety of environments. Next time,
we’ll look at modeling abstraction-level methodology, and how this helps humans (and LLMs)
to more-effectively discuss and implement the hardware models they care about.</p>

<h2 id="references">References</h2>
<ul>
  <li><a href="https://bitsbytesgates.com/zuspec/2025/09/22/Zuspec_PythonicModelDrivenHardwareDevelopment.html">Zuspec: Pythonic Model-Driven Hardware Development</a></li>
</ul>]]></content><author><name></name></author><category term="Zuspec" /><summary type="html"><![CDATA[In hardware design and verification, we’re used to working with domain-specific languages (DSLs), such as SystemVerilog, VHDL, and PSS, as well as class libraries, such as UVM, SystemC, and CHISEL. We use these DSLs and class libraries to capture key semantics of hardware design ; each have their costs and benefits. A language, of course, offers ultimate flexibility with significant implementation cost. Class libraries reduce that implementation cost significantly by leveraging the capabilities of a host language, but often lack expressive capability and portability. The Zuspec project that I’ve been working on takes a different approach, with the goal of getting the benefits (and avoiding most drawbacks) of both approaches.]]></summary></entry></feed>